No backups yet? No worries. But let’s make a deal here. You browse this epic, beginner-friendly resource on how to backup your WordPress website, then you go implement one of the methods we’ve laid out ASAP. Odds are you’ll thank us one day.

Taking regular backups of your site is like having an inexpensive insurance protecting you from losing all your hard work.
When you’re producing or editing your work in, let’s say, your favorite text or graphics editor, one of the most important and time-saving features has to be the “Undo” button, right?
Well, for your site, think of backups as an undo button and a virtual time-machine that:
- saves you from having to spend minutes or hours correcting your mistakes
- prevents you from having to start over from scratch when technology goes sour
We’re serious about protecting our customers from accidental data loss. So, while most website owners and bloggers can get away with one layer of regular backups (i.e. any single method described in this article), we implement four layers of daily automated backups for each site in our care.
I know what it’s like when you pour hours into setting up and creating content for your site, then suddenly something goes wrong—and poof—you’re now seeing a blank screen and realizing that smashing the refresh button isn’t saving the day.
Or perhaps some time you discover your site is behaving all funky because you let your guard down and got hacked as a result.
You don’t know what happened, your hosting company tells you they either have no backups, or the most recent backup is from ages ago, and you start pulling your hair out in frustration.
I’m involved in various WordPress support and blogging forums, and despite the importance and general ease at which you can backup a site these days, still so many people don’t do it.
In early 2015, CodeGuard, a backup service company, carried out a survey with 503 respondents based on the simple criterion that each participant had experience managing a WordPress site or blog.
Some interesting findings included:
- 47% of users backed up their sites every few months
- 21% did it a couple of times per month
- 22% of users actually considered backups NOT important
- 76% of users were not using any backup plugins
- 69% had experienced problems after updating a plugin, while 21% had experienced the “white screen of death” error regardless of cause
More interestingly yet, 19% of respondents would pay thousands of dollars to have their sites restored after things went sour, while 24% would pay “anything” to get their sites working again.
In an article recently published on ProBlogger, guest contributor, Larry Alton, writes,
Don’t let this be you. Also, you don’t need to depend on your hosting provider or anyone else to do these things for you, as you can readily do it yourself.
To that effect, we’ve created this 12,000+ word mega resource with over 200 guiding images to help make life a lot easier for WordPress site owners just like you.
Hey, you may even become an expert on backups. Cool, huh? Yeah…
We have included free and premium options as well as options ranging from easy to requiring a bit of technical know-how for seasoned users.
I will be showing you, step by step, how to backup your site:
- manually,
- by using WordPress plugins, and
- through 3rd party backup services.
If you’re also curious about how we backup our own and our customers’ sites, I’ll touch on this shortly.
[thrive_2step id=’948′] [/thrive_2step]
By the way… what are backups worth if you don’t know how to restore them? So, of course, I’ll also show you how to restore your site’s files and database from any method you use in this guide.
Ready to dig in? All right, here’s what I’ve got for you:
Toggle Table of Contents- Before We Get Started, This Is What We’re Backing Up
- Do I Really Need to Backup My Website?
- Do I Need to Backup My Site Using Multiple Methods?
- How Often Should I Backup My Website?
- How Many Backup Copies Should I Keep?
- Where Should I Store My Backups?
- Should I Use Automatic Backups or Do It Myself?
- Should I Restore Both the Database and Files Every Time?
- You Have Covered So Many Options, Which One is Right for Me?
- How We Backup Our Customers’ Websites
- Complete Manual Backups Using cPanel
- cPanel Method 1: How to Backup Your WordPress Website Using phpMyAdmin and File Manager (fairly easy)
- cPanel: How to Restore Your WordPress Website with phpMyAdmin and File Manager (fairly easy)
- cPanel Method 2: How to Backup Your WordPress Website Using Backup Application (very easy)
- cPanel: How to Restore Your WordPress Website with Backup Application (very easy)
- cPanel Method 3: How to Backup Your WordPress Website Using Softaculous (very easy)
- cPanel: How to Restore Your WordPress Website with Softaculous (very easy)
- Complete Manual Backups Using WordPress’ Export Tool and FileZilla FTP Client
- Plugin Backup Solution 1: Duplicator
- Plugin Backup Solution 2: UpdraftPlus
- Plugin Backup Solution 3: BackUpWordPress
- Backups Via 3rd Party Service 1: VaultPress
- Backups Via 3rd Party Service 2: CodeGuard
- Share / Sign Up / Comment (We Appreciate It!)
Before We Get Started, This Is What We’re Backing Up
Before we roll up our sleeves, let’s address a few things first.
It helps to know exactly what it is we’re trying to backup for safekeeping.
According to the WordPress Codex, a typical WordPress website is made up of:
- WordPress Core installation files
- Theme files
- Plugin files
- Images, documents, and other files
- Files containing code (PHP, JavaScript, CSS, etc.)
In addition to the above, each WordPress site also depends on a database to store your:
- pages, posts, custom post types, and comments
- user profiles and customer accounts
- authors, categories, tags, links, etc.
- product orders
- all website settings
So, for a complete backup, you need both the files that make up your website, as well as the database.
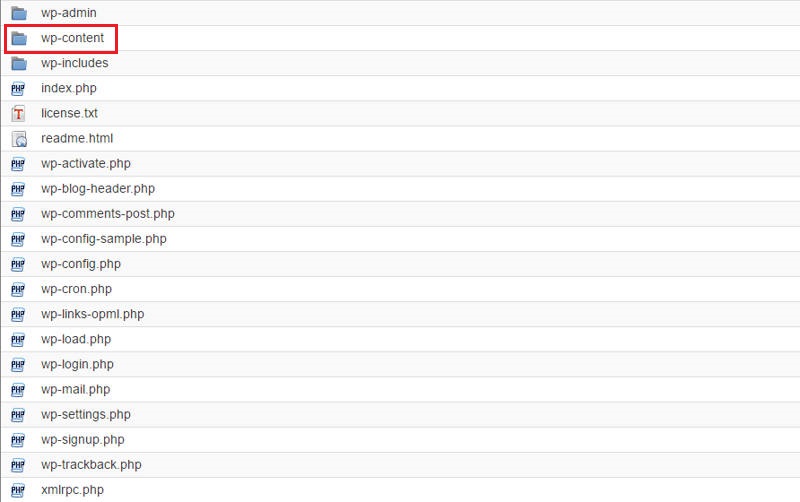
The most important directory to think about when talking about your site’s files, is the wp-content directory. This directory contains your themes, plugins, and all files you upload to your site through the media library.
You don’t have to worry so much about other critical WordPress files, because you can get new copies of all of them by downloading a fresh copy of the WordPress software.
There are some backup methods you can use to conveniently copy just the wp-content directory, and there is nothing wrong with that.
The following image shows what comes with a default installation of WordPress. Most backup solutions will backup everything you see here:
Do I Really Need to Backup My Website?
Wait, are you saying you haven’t done it yet?
I’m just kidding.
I really encourage you to ask yourself the following question: “If I lose all the work I’ve put into this site tomorrow, would I be okay with starting over from scratch?”
If you feel even slightly hesitant answering “yes,” then find a way to backup your website as soon as you can.
You need to understand there are many things that can go wrong, which are outside of your control.
At any time, your site can be at the mercy of events like:
- a successful hack or exploit attempt infecting your site with malware or other issues
- bad change to settings causing a crash or locking you out of your site
- you mistakenly create errors while editing files, causing a crash
- theme or plugin conflicts causing a crash
- faulty WordPress, plugin or theme updates causing a crash
- your hosting provider deactivates your account without warning because you’re using too many resources
- other constant problems with your hosting provider so you’re forced to move your site elsewhere
- server hardware failures
- server power outages
The single best way you can prepare for these situations, in my view, is with regular backups stored somewhere outside of your server (such as on your computer, external hard drive, and/or a cloud storage service).
Let this guide be the starting point for you to proactively protect your work.
Do I Need to Backup My Site Using Multiple Methods?
Not necessarily, it depends on how important your website is.
It’s always a good rule of thumb to have at least two independent backup solutions running simultaneously.
Why? Because any single backup system you use, can fail for many different reasons.
The integrity of the WordPress files or database could become corrupted. Or the restoring mechanism can simply fail to work.
In these cases, it’s great to have a second backup system running if the first one fails.
As an example, say you have a backup plugin installed on your WordPress site. Then let’s say you were tinkering with some settings, hit “Save,” and suddenly your site was knocked offline or you locked yourself out from the admin dashboard.
Well, oops.
Now, what if the only way to restore your website back to working order, is to log into the dashboard, enter the backup plugin’s settings page and click “Restore”? Well, the site itself is down, or you’re locked out, so you can’t get there either way.

But if you had a second backup system running that can do its job independently of whether or not your site is down, then you can use that option to replace your dysfunctional site with a working copy.
How Often Should I Backup My Website?
This really depends on how often changes are made to your site.
How often do you upload files and media, publish new content, or change existing content? If customer transactions are stored in your site’s database, how often do these transactions occur?
If you make changes on a weekly basis, I suggest running daily automated backups. That way, you can set, forget and not have to worry about it.
If you have an active site with a lot of changes occurring each day, then you may consider backing up your site 2-3 times daily.
But if you’re barely touching your site from month to month, then you’ll be fine with a weekly backup.
How Many Backup Copies Should I Keep?
How many copies you keep will depend on a few things:
- How large is your website?
- Where are you storing the backups and, if you’re paying for storage, how much are you willing to spend?
- How important is the site, and how often do changes happen?
We keep at minimum 30 and up to 120+ copies of all sites we manage for our clients. One copy for each day.
For the typical small business site and blog, I suggest keeping at least 3-4 weeks worth of daily copies.
“That must be expensive or take up a lot of storage space,” you’d think. For most people, this won’t be the case.
You can very likely store 100+ full backups of an average-size WordPress website on an inexpensive Amazon S3 cloud bucket and only pay a couple of dollars per month.
In fact, below is the billing for one of our Amazon Web Services accounts.
On this account, we have 11 WordPress sites with a total of 60 copies of each (30 Duplicator packages plus 30 gzip-compressed SQL database files and 30 gzip-compressed WordPress file folders for each site).
What are we charged? Somewhere between $1.00-2.00 per month.
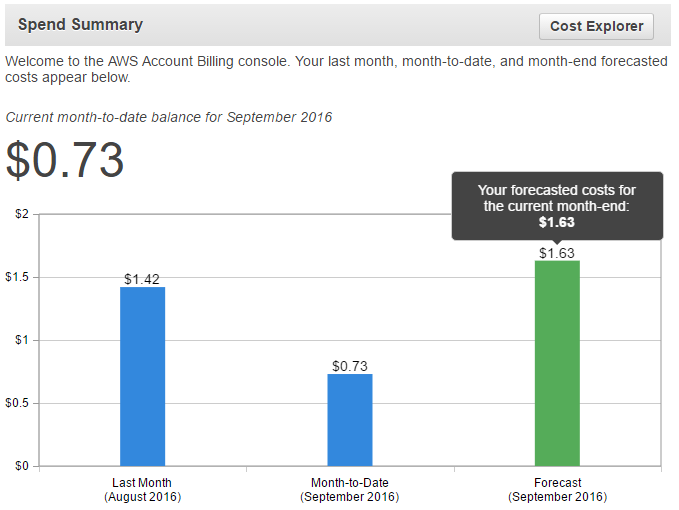
So, unless your site is over a dozen GBs in size AFTER being compressed, don’t expect to pay more than we are in the above example.
Where Should I Store My Backups?
Depending on the flexibility of the method you’re using, there are several places you can store your files.
You can store your backups on different mediums such as:
- on the same server hosting your website
- on a separate server, you’re using for storage
- on your computer
- on an external drive or USB
- in the cloud (Amazon S3, Dropbox, Google Drive, Microsoft OneDrive, etc.)
The above are not the only locations your files can be stored, but they are the most commonly used.
For most sites, we use a combination of
- temporarily storing backups on the hosting server
- cloud storage
- server snapshots for last resort emergency restores
Should I Use Automatic Backups or Do It Myself?
While it’s great to know how to perform backups manually, I always suggest people should configure at least one automated backup solution so they can relax.
You see… if you had to do it manually every time, you probably wouldn’t be bothered, right?
Automation is not flawless, though. So in case things stop working properly, make sure to periodically check that the backup files are actually being created, and take some time out to test one of your backups every now and then.
That way, you’ll know for sure you can count on your backups if and when disaster hits.
Should I Restore Both the Database and Files Every Time?
No. You may not always need to restore either the database or the files, and this really depends on the reason why you’re restoring your site to begin with.
As an example, if you changed a setting on your site that caused an immediate crash, then all you would need to do is restore the database given that the database is where all your settings are saved and you wouldn’t have lost any files.
With that said, some backup solutions in this guide will only let you restore everything (both files and database) at once.
You Have Covered So Many Options, Which One is Right for Me?
You’re right. There’s a handful of options to choose from in this guide. And as we research and test more backup solutions that turn out to be decent, we’ll include those here as well.
But this can also mean you’re left wondering which option(s) you should rely on for your own website(s).
We’re not going to leave you hanging though, so here’s a downloadable guide that will help you make a choice:
[thrive_2step id=’948′] [/thrive_2step]
How We Backup Our Customers’ Websites
Perhaps some of you are curious and interested in how we handle backups for our customers, so I’ll give you a little glimpse.
For maximum flexibility, we use a combination of:
- The Duplicator Pro plugin (paid)
- ManageWP Orion backups (paid)
- Full local server backups of each website’s files and database using Linux shell scripts (free)
- Full backup snapshots of each of our hosting servers (paid)
Our Duplicator Pro backups are uploaded to an Amazon S3 bucket storage immediately following completion.
We will explore the free version of Duplicator in an upcoming section.
But the key advantage to using Duplicator, for us, is that the “packages” Duplicator creates allow us to quickly move (migrate) any website to a different server, with ease. Also, if a client wants a complete file and database copy of their site for any reason, we can easily “pass a package” to them.
If not for these two benefits, we wouldn’t be using any backup plugins since we can manage fine without.
We choose to upload ManageWP Orion’s backups to the Amazon S3 cloud.
The local backups are kept for 48 hours before they’re uploaded to a separate S3 bucket.
The server snapshots can be used in case of an emergency where all other restore systems fail (which will probably never happen).
All four backup solutions are automated and run daily. We go out of our way to ensure no one ever loses all their hard work.
Complete Manual Backups Using cPanel
The low-down:
- Cost: free (all required software included with your cPanel hosting plan)
- Difficulty: generally easy and straightforward
- Special requirements: none
- Automatic backups: yes, most easily done using Softaculous (I show you how in the Softaculous tutorial)
cPanel is a highly popular web hosting control panel that a majority of hosting providers offer as part of their services.
If you’ve ever managed a website with any of the most widely recognized, low-budget hosting companies like Bluehost, HostGator, iPage, GoDaddy, SiteGround, etc., then you’re likely already familiar with using cPanel.
It looks something like this:
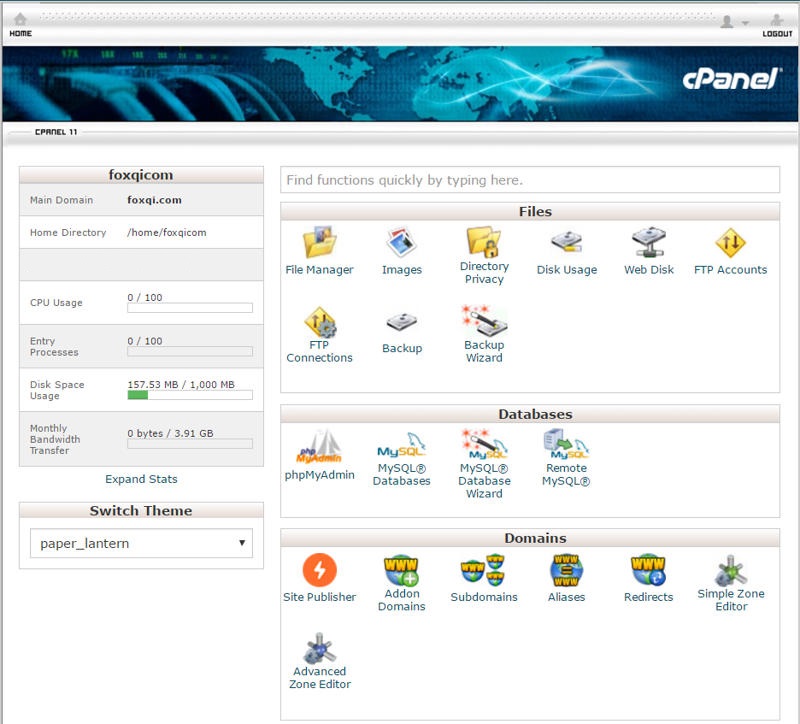
The looks of cPanel can vary depending on the skin and styling applied by the hosting provider. Here’s a more slick example:
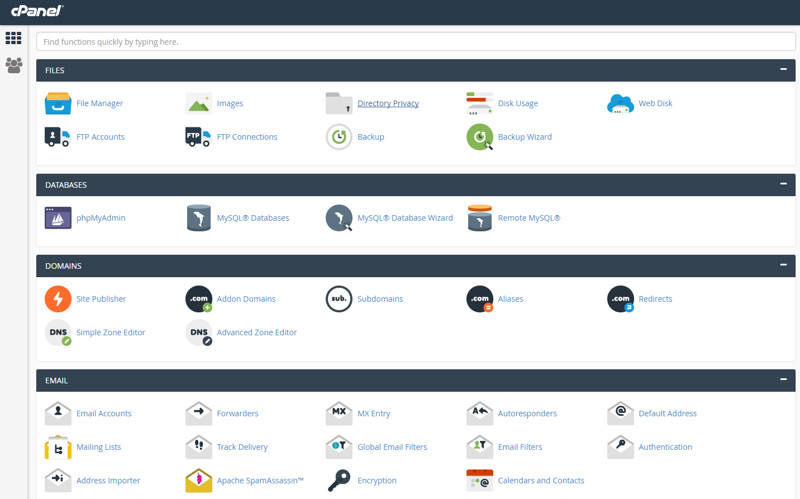
Regardless of appearance, the available options will more or less always be the same.
Through cPanel, you can manage your WordPress site’s files, media, and database, among many other things.
Assuming you know how to access your cPanel account, let’s get started.
cPanel Method 1: How to Backup Your WordPress Website Using phpMyAdmin and File Manager (fairly easy)
We’ll begin by backing up your site’s database. Through cPanel, we can achieve this by using phpMyAdmin, a program used to manage MySQL databases.
However, there is one important piece of information we might need, so we can identify the correct database to backup. You’ll see what I mean a little later.
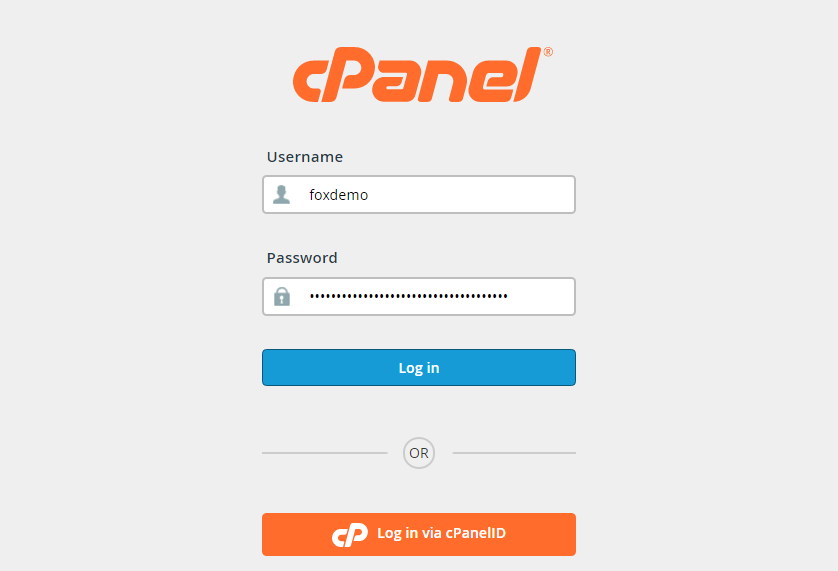
Step 1: Log into your cPanel account.
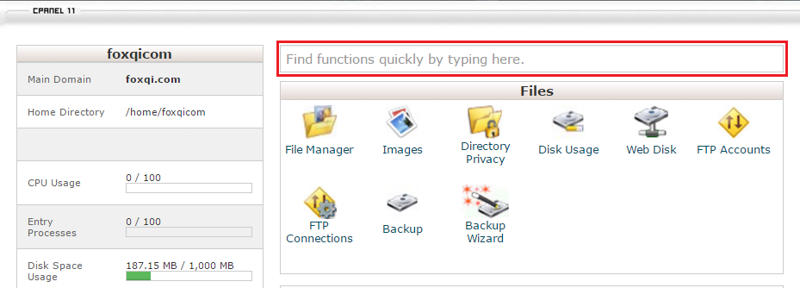
To locate specific cPanel applications quickly, you can use cPanel’s jump-search field.
Alternatively, use your browser’s built-in search-this-web-page feature. To do so:
- Windows users press CTRL + F
- Mac users press Command + F
Step 2: Go to the Files section, then find and open the File Manager application.
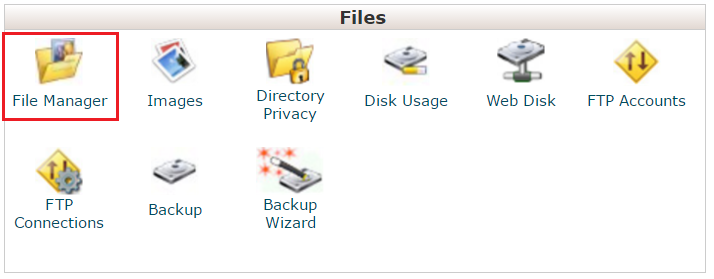
NOTE: On some cPanel accounts, the File Manager Directory Selection window will appear after you try to open File Manager. From here, you can choose to go straight to the public_html web root directory.
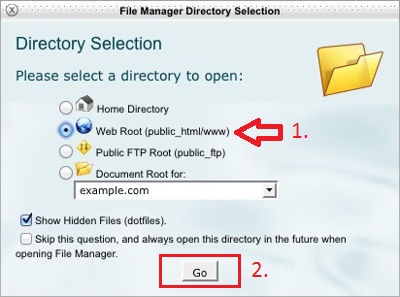
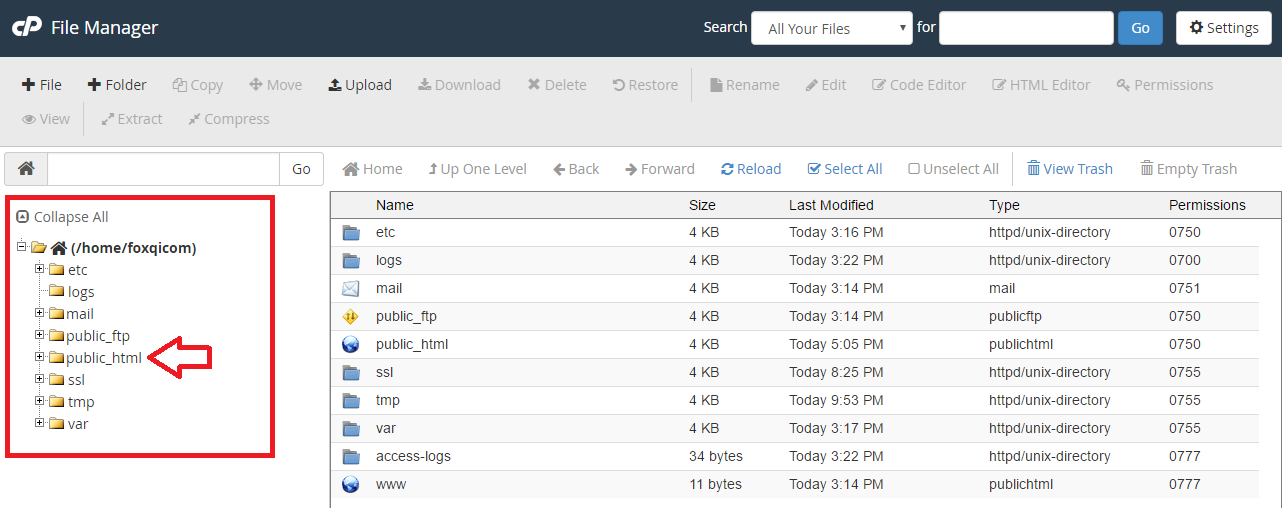
Step 3: With the File Manager controls open, look for and open a directory named public_html (some hosting providers may give this directory a different name) on the left-hand side.
In most cases, this is the “root” directory for your site as one-click WordPress installers will usually install your first site within this directory.
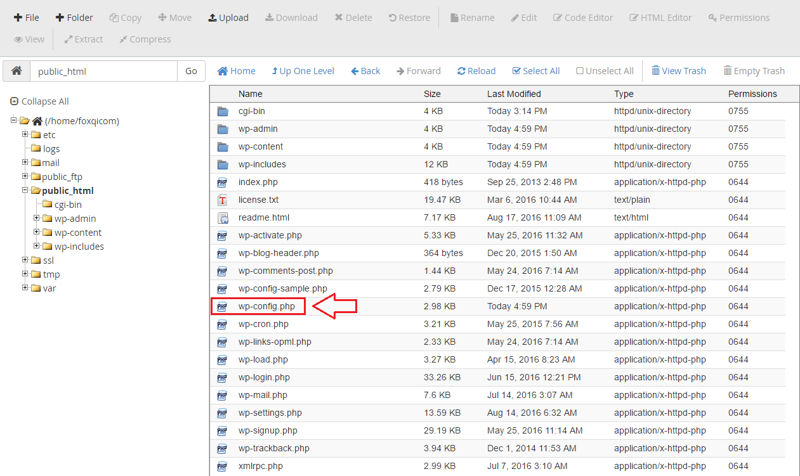
Step 4: Within the public_html directory, locate the wp-config.php file.
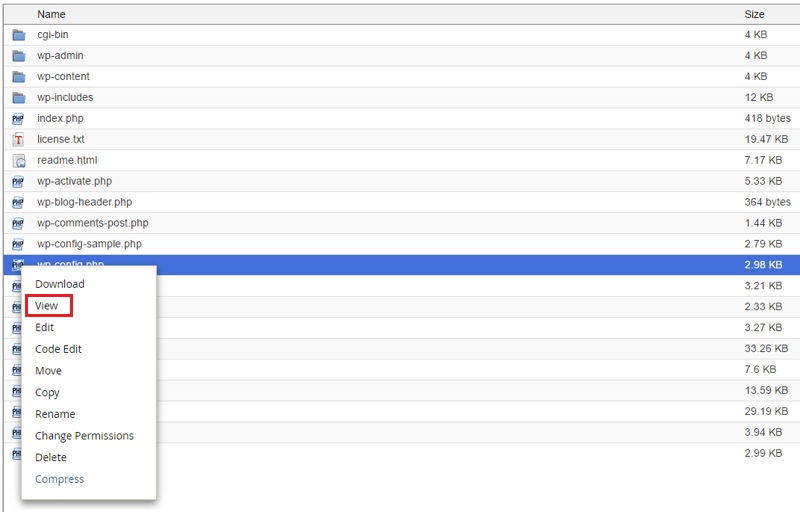
Step 5: Right-click the wp-config.php file and click view to bring up the contents of the file.
Step 6: The wp-config.php file contains very sensitive information about your website that no one but yourself and those you trust should see. This includes the database name, privileged user, and password.
What we’re specifically interested in, is the database name. In the following example, you’ll see that the database name for our demo site is foxqicom_wp245. Yours will have a different name.
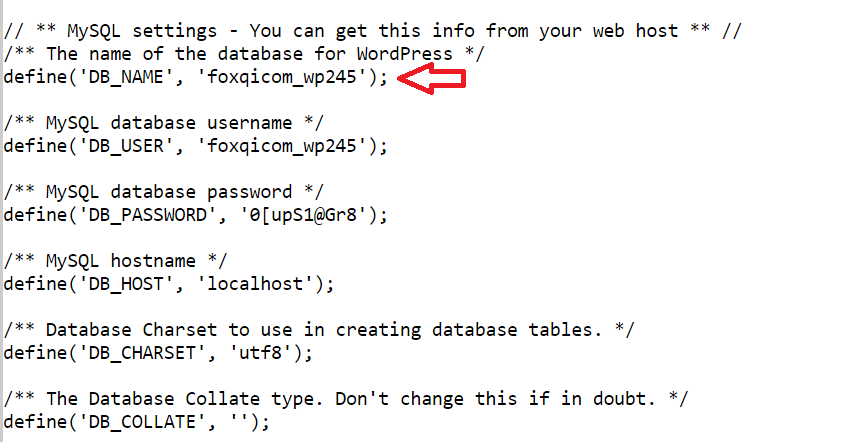
Note down your database’s name and return to the cPanel dashboard.
Step 5: Go to the Databases section, then locate and click to open phpMyAdmin.

Step 6: You should now see the phpMyAdmin controls. In the left panel, you’ll see a drop-down list of databases, one unique database for each WordPress site you’ve installed.
In this example, I’ve installed two websites, so we have two databases: “foxqicom_wp92” and “foxqicom_wp245”.
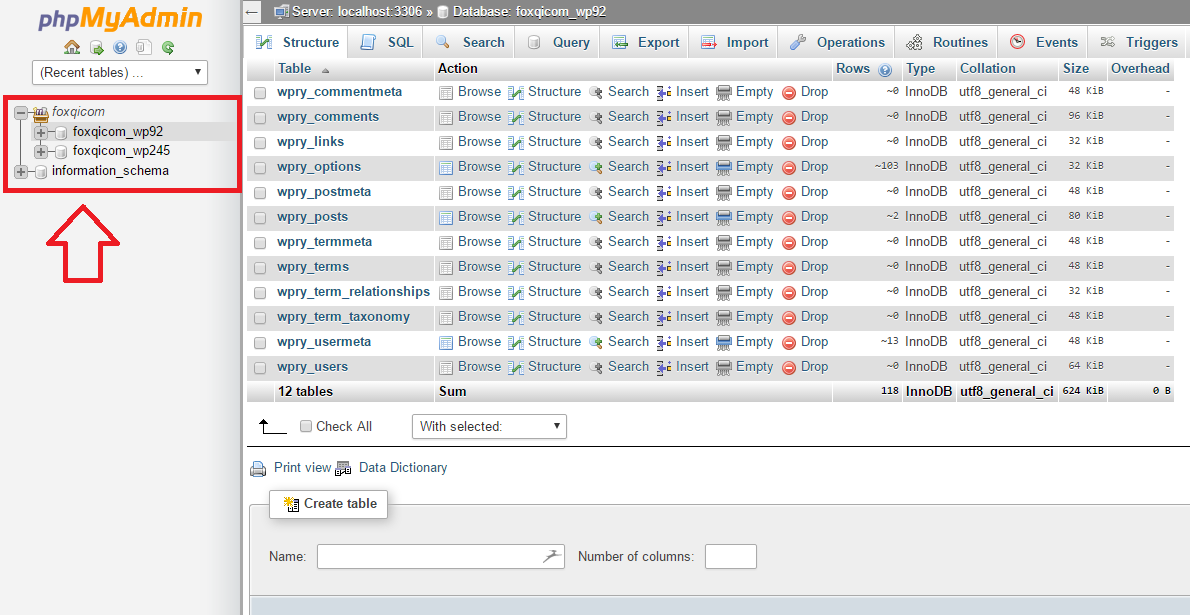
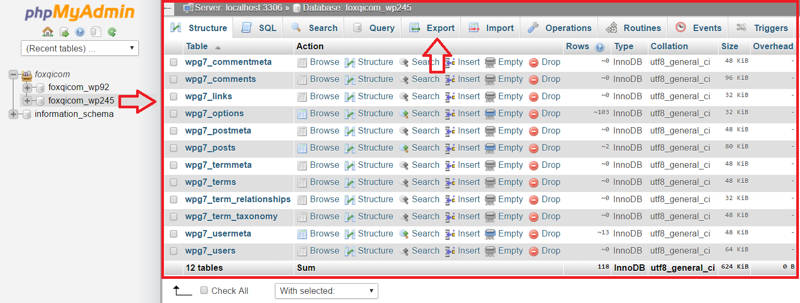
So, if you have multiple databases with obscure names, you may now be going, “Uh oh, which one of the databases is the right one?” Now refer back to the database name you collected earlier from the wp-config.php file and voila, there’s your answer, it’s foxqicom_wp245. Click on the database name to load the tables on the right and click the Export tab.
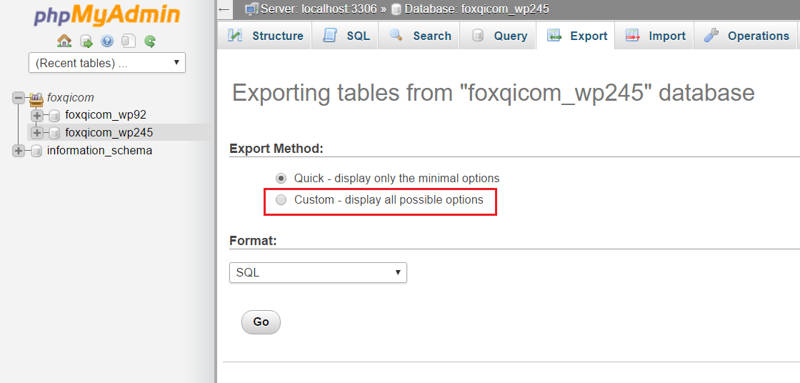
Step 7: On the export page under Export Method, it’ll be set to Quick method by default. Change it to Custom to toggle more options.
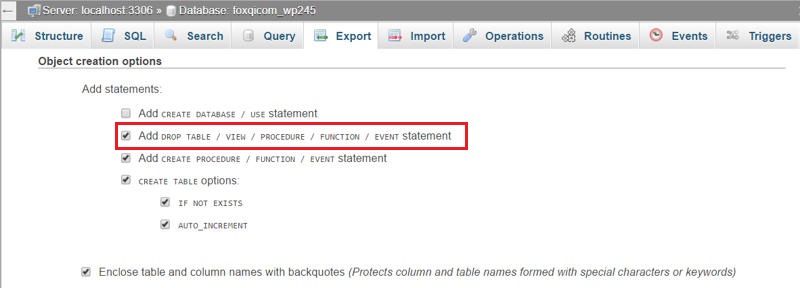
Step 8: With the new options visible, scroll down to Object creation options and tick the Add DROP TABLE option.
Then scroll all the way to the bottom of the page and click the Go button.
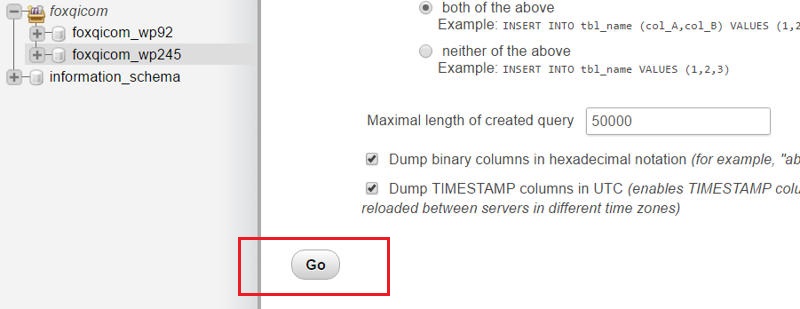
This will trigger a MySQL database dump (backup) and creates a .sql file that is downloaded to your computer.
You may have to accept the download if it doesn’t begin automatically. How long the download takes will depend on the size of your database.
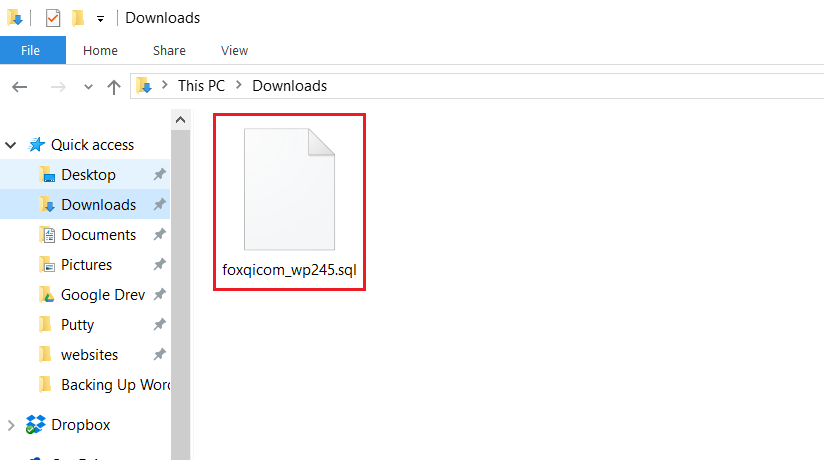
In the case of our demo site, the downloaded file is called foxqicom_wp245.sql. That’s your database backup. Keep it safe somewhere.
Step 9: Pat yourself on the back. Good job! Now we just need all your site’s files, so head back to your cPanel dashboard.
Step 10: From step 2 earlier, do you remember the File Manager application within the Files section? We’re going to use it again. And this time, our objective is to find your website’s wp-content directory and compress it into a downloadable zip file.
As mentioned before, this directory contains all your WordPress themes, plugins, and everything you’ve ever uploaded to your site (images, documents, videos, etc.) through the WordPress media library.
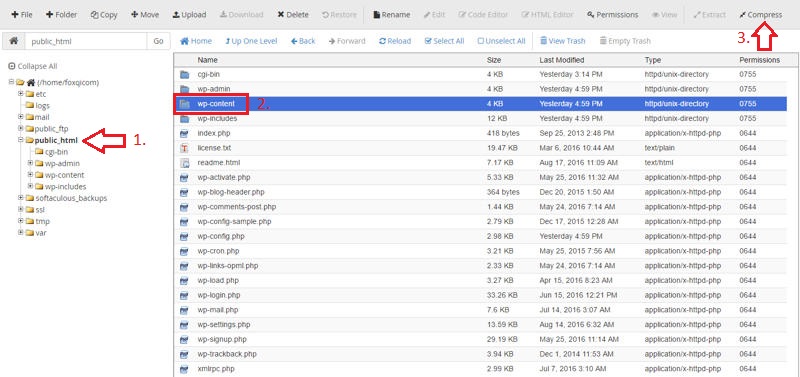
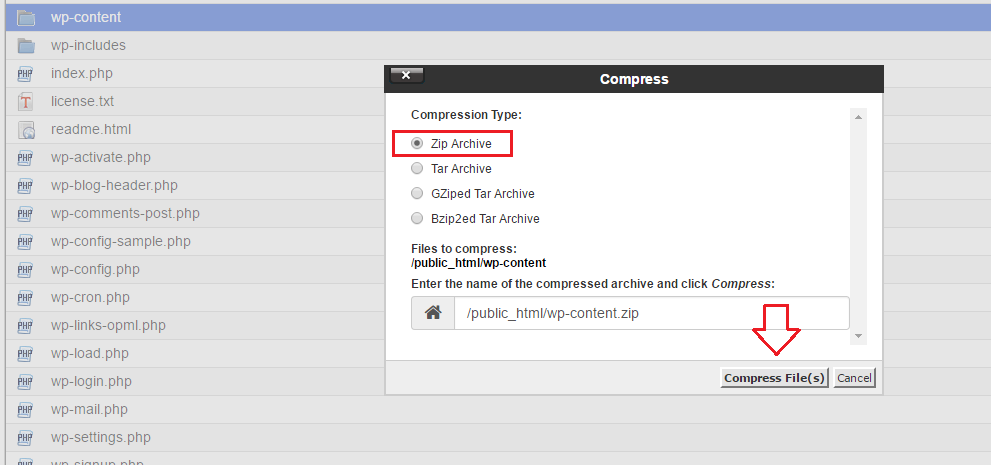
Step 11: Click the public_html directory again to load its contents. You should now be able to find the wp-content directory in the listed content. Click on wp-content to select it, then find and click the compress button (in this example, it’s located in the upper right-hand corner).
Step 12: In the modal window that appears, tick the Zip Archive option for compression type and click the Compress File(s) button.
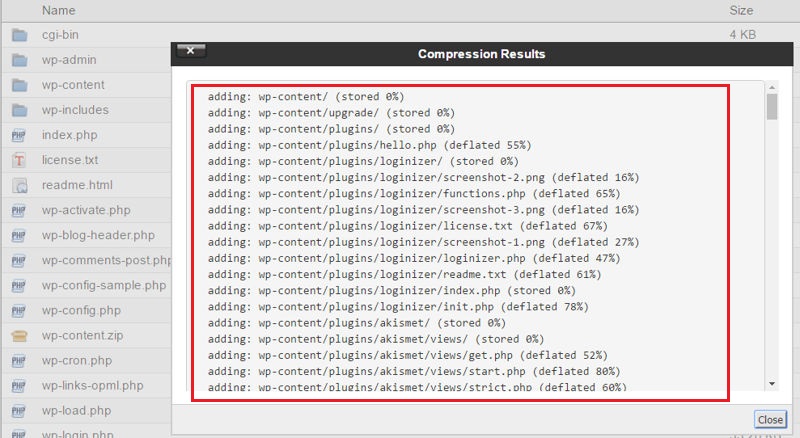
When the compression process has finished, you’ll see a new modal window displaying the results.
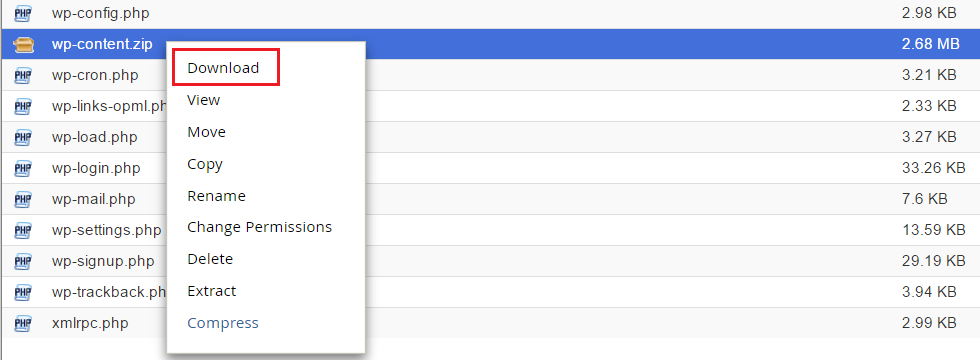
Step 13: You should now have a wp-content.zip file inside the public_html directory. Right-click on it and click Download. The zip file will begin downloading to your computer.
Excellent work! You’ve now got both your website’s database and files ready for safekeeping and restoring.
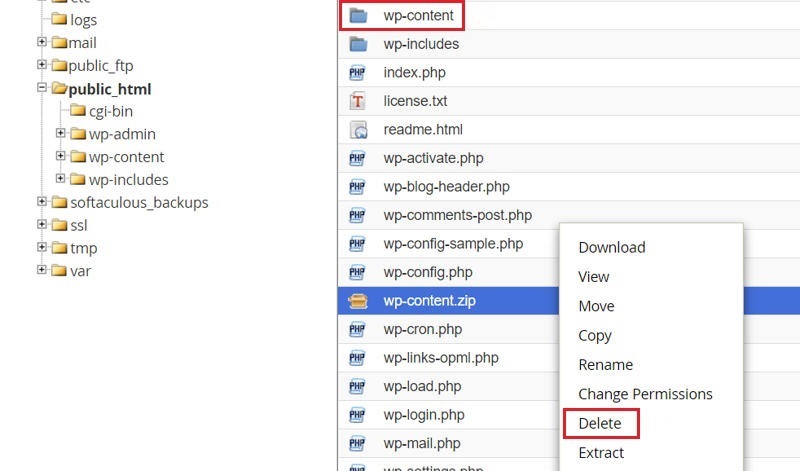
You can now right-click and delete the wp-content.zip file from the public_html directory as it doesn’t need to stay there.
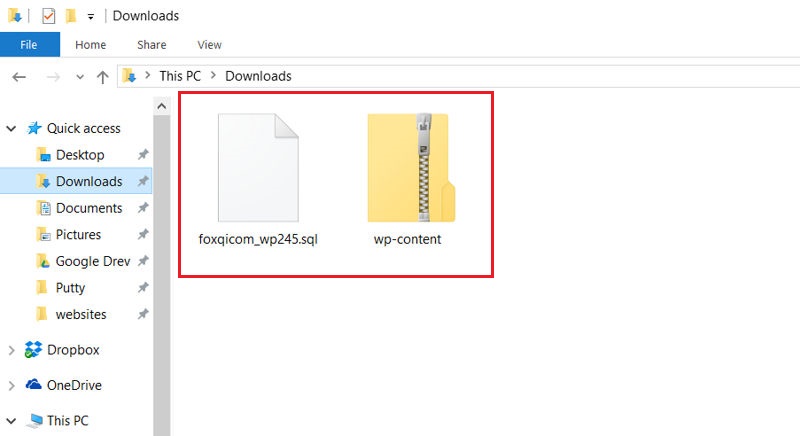
Right. So let’s say your website now suddenly took on a personality of its own and decided to crash itself. Sweet! Because, next up, I’ll show you how to restore your site.
cPanel: How to Restore Your WordPress Website with phpMyAdmin and File Manager (fairly easy)
I’ll start by showing you how to restore your database using the .sql file and phpMyAdmin.
Step 1: Log into cPanel and access phpMyAdmin within the Databases section.
Step 2: Click on the database you want to restore. In our example, it’s foxqicom_wp245.sql. Now click the Import tab.
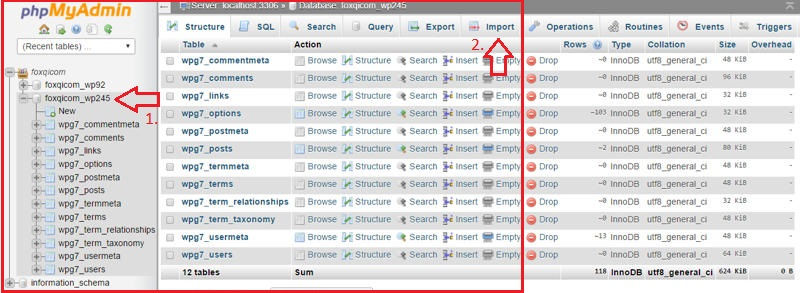
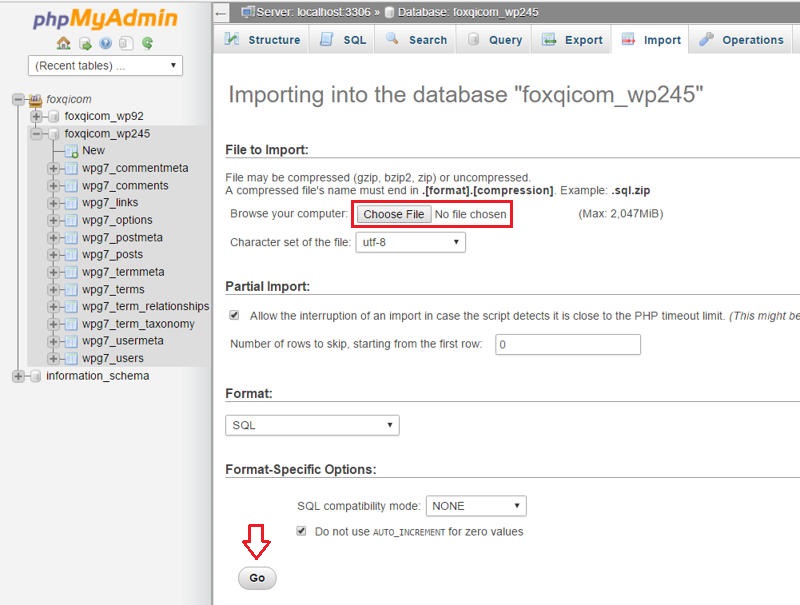
Step 3: On the SQL import page, click Choose File and select the .sql database file you downloaded earlier.
Unless you know you’re using a specific character set (which is also shown in the wp-config.php file), leave the “Character set of the file” on the default setting (utf-8).
Click the Go button at the bottom to import your .sql file. If your database is large, the import can take a while, so don’t worry.
Once the import has completed, you’ll get a success message.

And voila. Your database has been successfully restored. You can now return to your cPanel dashboard.
Next up, you may want to restore your WordPress site’s files if you’ve lost any. We’ll do this using File Manager.
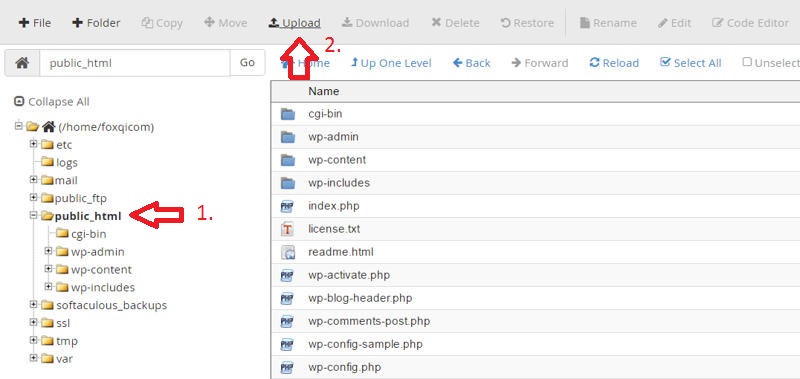
Step 4: From the cPanel dashboard, open File Manager within the Files section as usual. Click on the public_html directory to load its contents, then locate and click the Upload button.
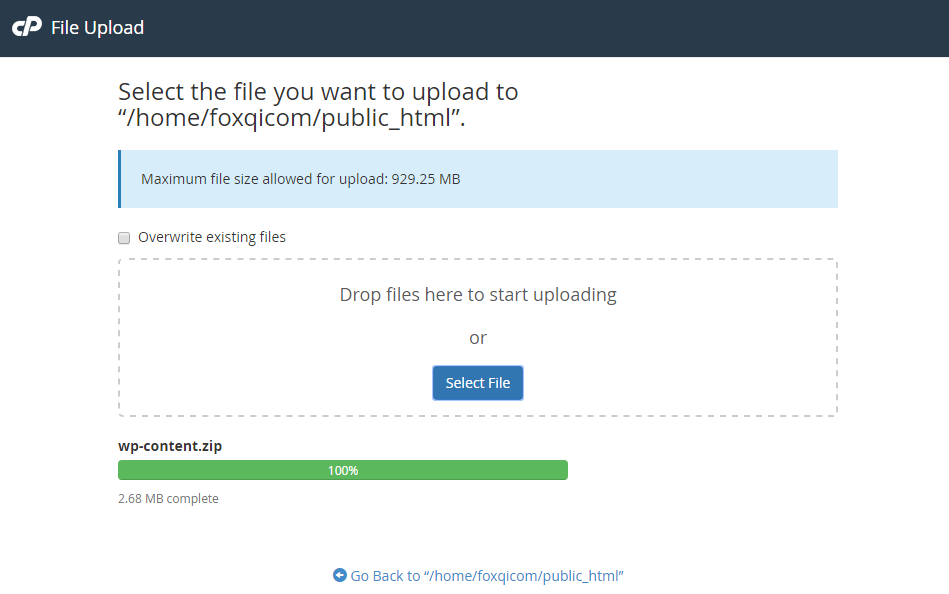
Step: 5 On the file upload page, select and upload the wp-content.zip file from your computer. Then return to the public_html directory.
Step 6: With your wp-content.zip file uploaded, right-click and delete the current wp-content directory.
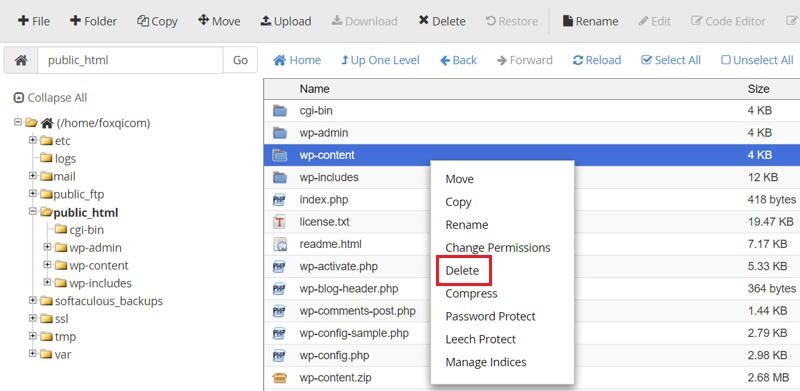
Step 7: Now right-click the wp-content.zip file and choose Extract.
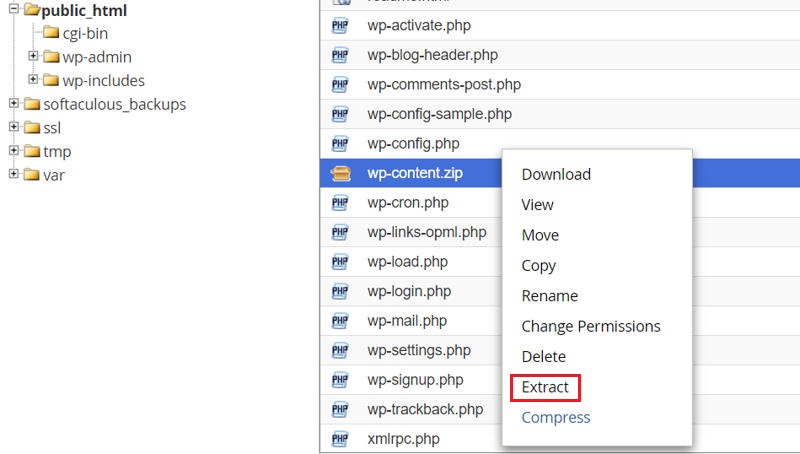
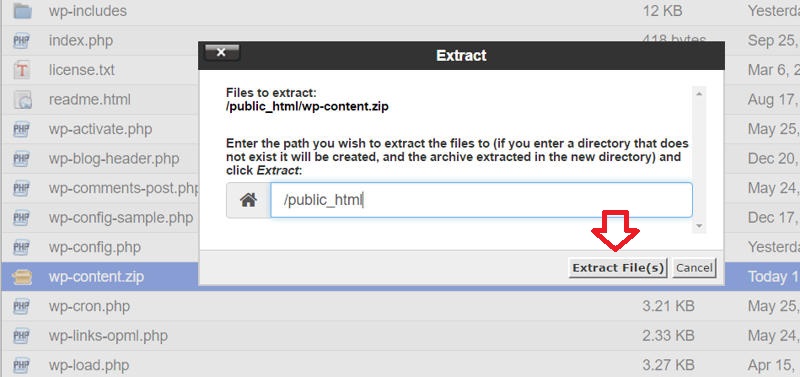
Step 8: Leave the default /public_html path as we want the zip file contents extracted to that path. Click Extract File(s).
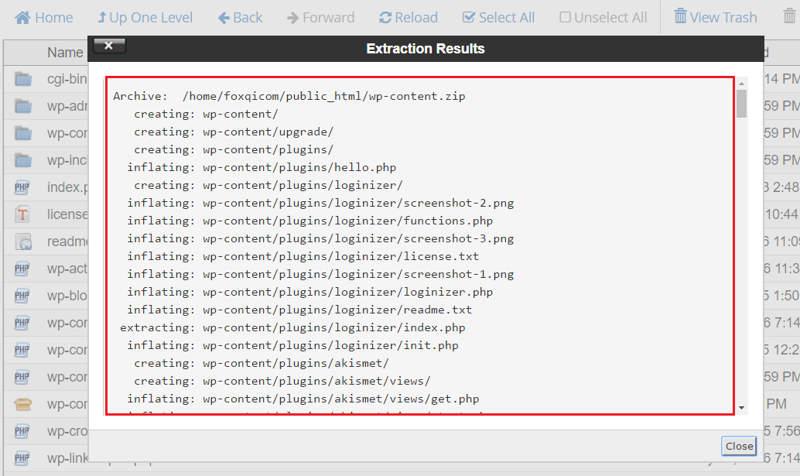
You’ll see a modal window displaying the extraction results.
Step 9: Your new wp-content directory is now ready to roll. Final step is to delete the wp-content.zip file.
cPanel Method 2: How to Backup Your WordPress Website Using Backup Application (very easy)
Now, what if I told you that most cPanel accounts feature a backup application that is perhaps a lot more convenient to use? Well, that’s ultimately for you to decide, but let me show you the solution.
In the previous tutorial, we focused on backing up the wp-content directory that sits inside the public_html root directory.
Using our demo account, the complete file path looks like this: /home/foxqicom/public_html/wp-content.
This next backup method, however, is broader in scope, because it backs up the /home directory and everything inside it. So, with this method, you’re sure to get every file you have, and you can use the same tool to easily download your site’s database.
But there is one caveat you’ll need to consider. If you have multiple websites installed on the same cPanel account, this method will backup all of them, which also means that when you restore the file, it will replace all the sites with their respective backup copies.
On top of multiple websites, you may also be using your hosting account to send and receive emails. This means:
- when you run the backup, those emails will be included
- when you then run a restore, all emails sent and received—after the backup file was created—will be erased
So if there is only a problem with one of your sites, this method will affect all other sites as well as your email account regardless.
For the speed and convenience, this method is only really perfect if you have a single website installed and do not use other services like email.
With that out of the way, let’s roll!
Step 1: Log into your cPanel account, then locate and open the Backup application within the Files section.
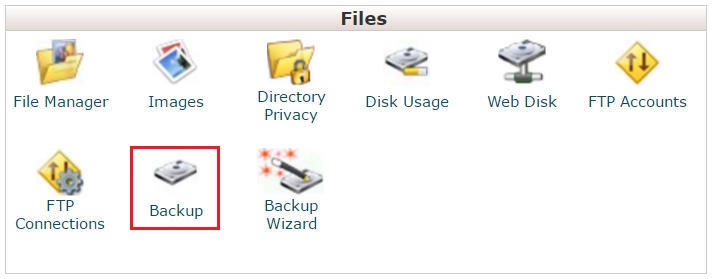
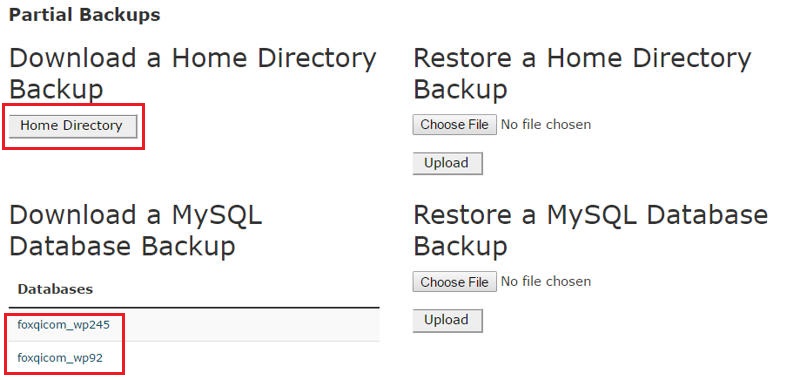
Step 2: On the Backup page, scroll down until you reach the Partial Backups section.
Step 3: Under “Download a Home Directory Backup,” simply click the Home Directory button to download your entire /home directory. Then click on the database link(s) under “Download a MySQL Database Backup” that you want to download.
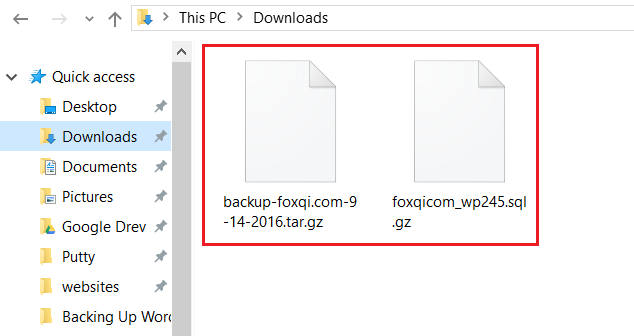
You should now have gzip-compressed files of your /home directory and your chosen database(s) ready for safekeeping.
cPanel: How to Restore Your WordPress Website with Backup Application (very easy)
Now let’s restore the /html directory and .sql database files.
Step 1: Like Step 1 in the previous tutorial, log into your cPanel account, then locate and open the Backup application within the Files section.
Step 2: On the Backup page, scroll down to the Partial Backups section.
Under “Restore a Home Directory Backup,” click Choose File, find and select your /html directory backup file (our demo file is called backup-foxqi.com-9-14-2016.tar.gz), and click Upload.
Do the same for your .sql database backup file under “Restore a MySQL Database Backup.” (Our demo file is called foxqicom_wp245.sql.)
Depending on the size of the files, it can take a while to upload.
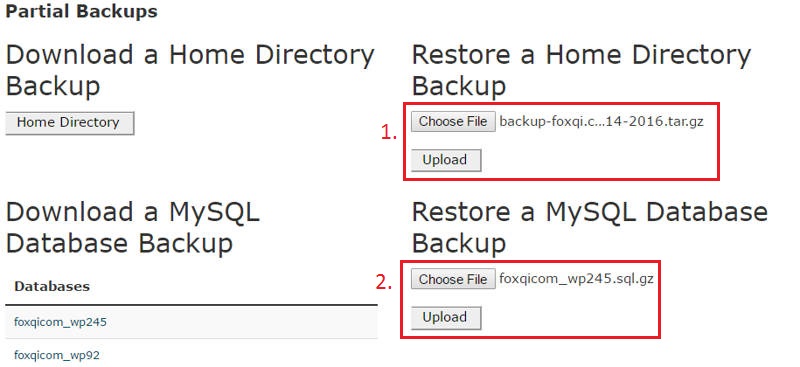
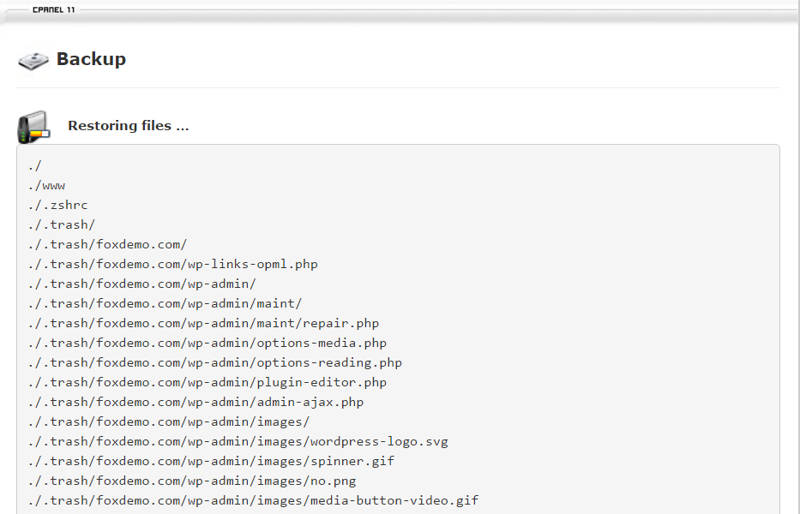
With each file, when you click Upload, a new browser tab should automatically open that will show the upload in progress and then give you an overview of all the directories and files that have been restored.
When you see the “Restoring files …” text and a long list of file paths, the restoration has already finished, so feel free to close the browser tab.
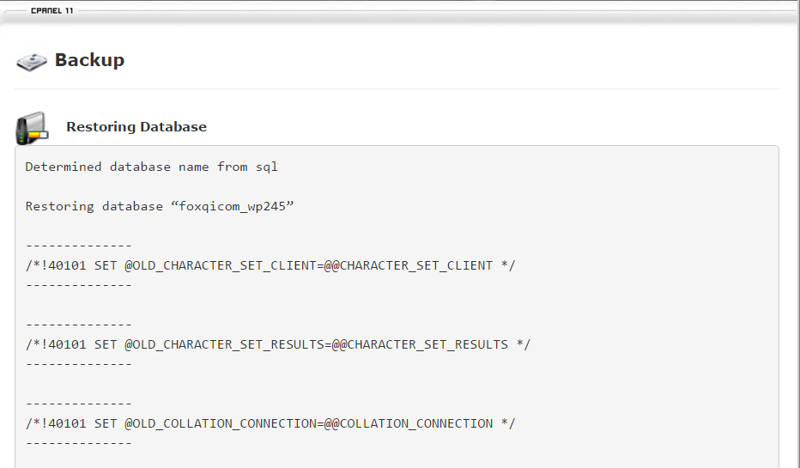
And here’s the one for the database upload.
There you go! You now know how to backup and restore ALL your files using the cPanel Backup application.
cPanel Method 3: How to Backup Your WordPress Website Using Softaculous (very easy)
Softaculous is essentially a library of install scripts that make installing different software easy. For example, Softaculous comes with a script that makes creating a ready-to-go WordPress site super quick.
If you’re using cPanel, chances are you were guided to install your WordPress site using Softaculous’ script.
But Softaculous also comes with backup functionality allowing you to easily backup and restore each of your sites individually.
This is a good alternative to the previous cPanel Backup application when you have more than one site or if you use your cPanel account to handle emails.
As an additional bonus, you can set individual automated backup schedules for each of your sites to be backed up once per day, week or month.
So, without further ado, let’s do this!
Step 1: Log into your cPanel account, then locate and open the Softaculous Apps Installer application within the Software section.
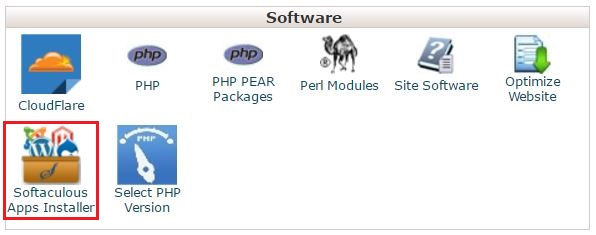
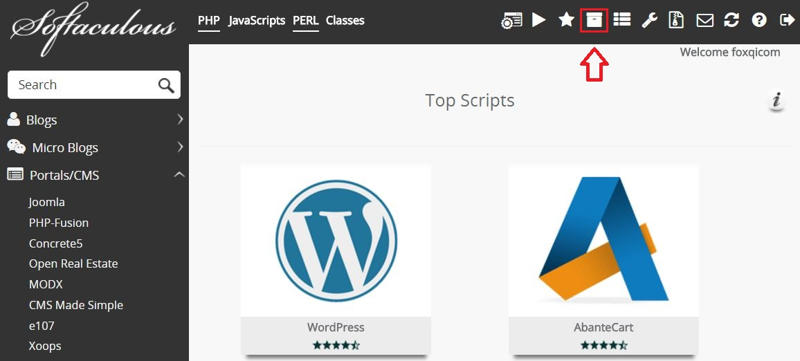
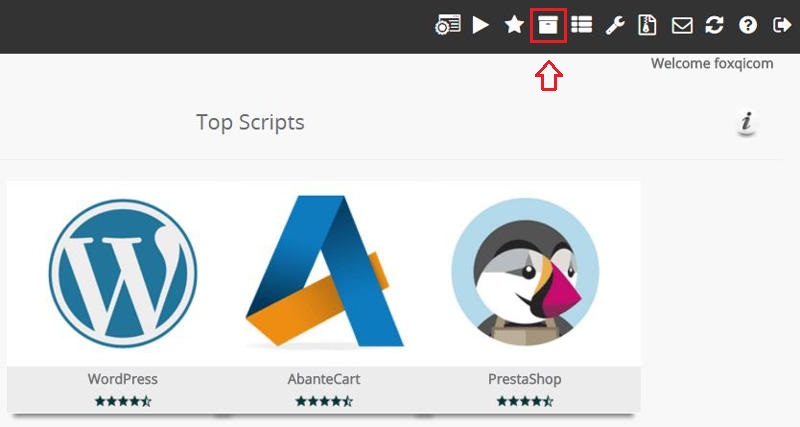
Step 2: In the Softaculous dashboard, locate and click the All Installations archive box icon.
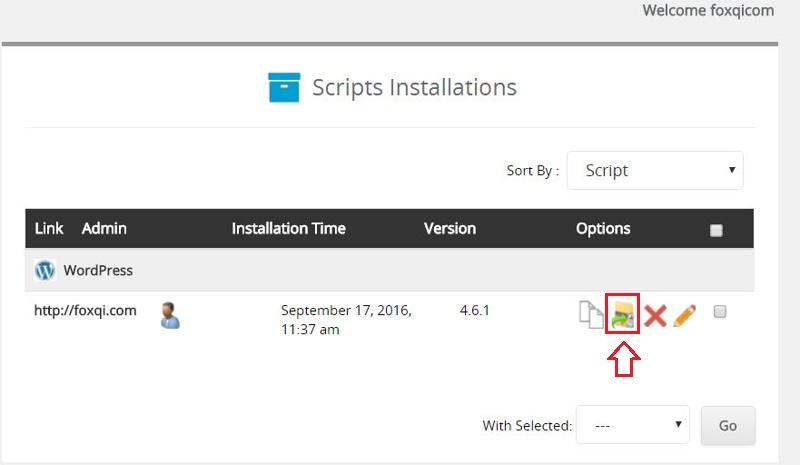
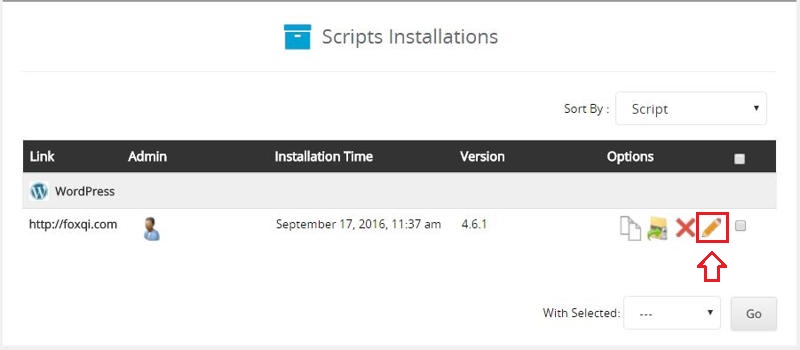
Step 3: On the All Installations page, you will see a list of all sites you’ve installed using Softaculous. In the below example, there is only our demo site. Adjacent to each website, you will have four options. You can Clone, Backup, Remove, and Edit Details for the chosen site.
We’re interested in creating a backup, so click that icon.
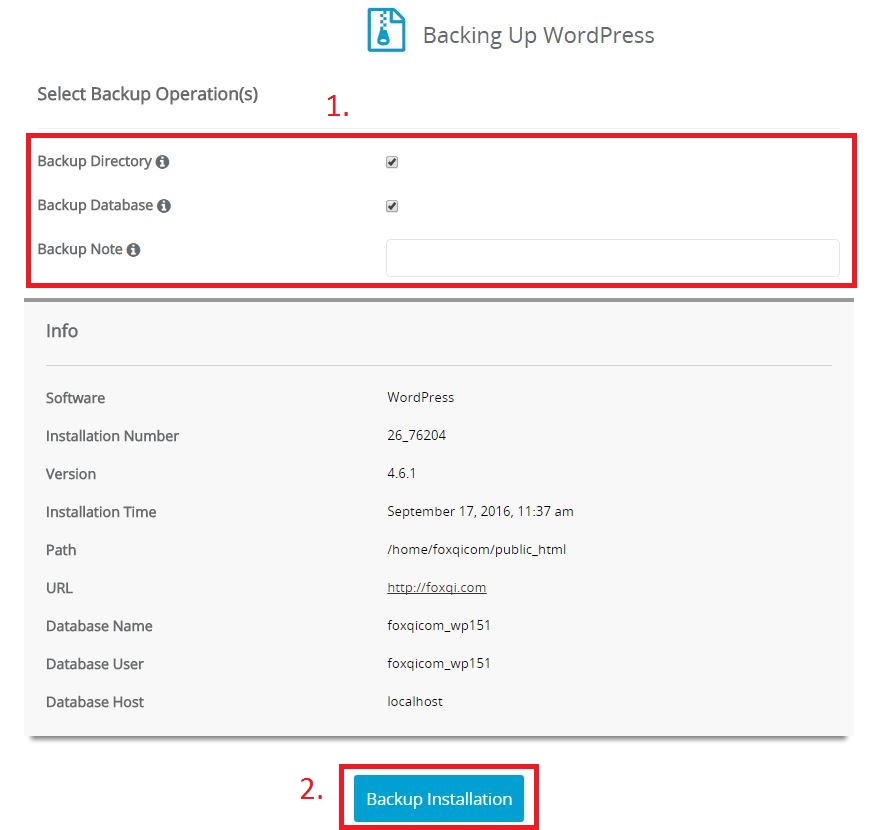
Step 4: On the following page, you can choose whether to backup your site’s files and/or database and optionally write a note for that backup.
Once ready, click the Backup Installation button toward the bottom of the page.
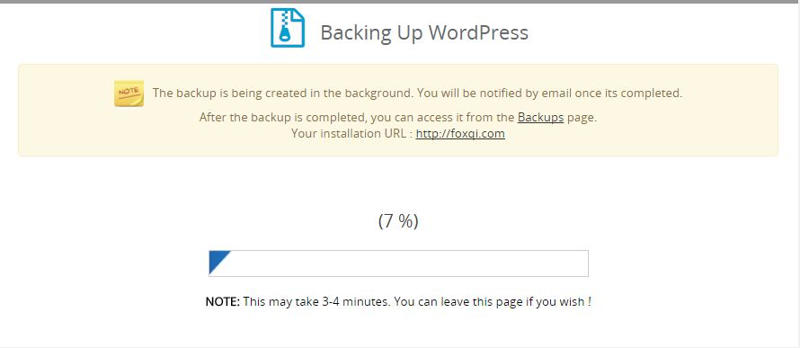
You will then see your backup in progress.
Once Softaculous is finished, you will be informed by a success or failure message. If all went well, you can then click the Return to Overview link.

Done! Next, I’ll show you how you can schedule automated backups with Softaculous.
Step 5: Return to the All Installations page by clicking the archive box icon.
Step 6: Click the Edit Details pencil icon.
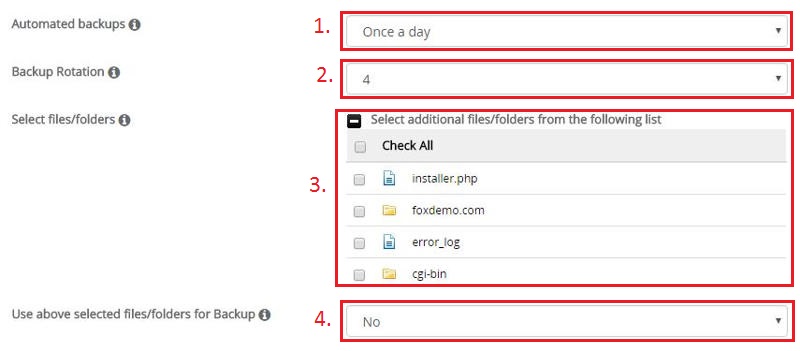
Step 7: On the following settings page, scroll down to the backup options. Start by selecting:
- the frequency of backups (once per day, week, or month)
- how many copies to retain before deleting the oldest backup to make room for the next one (be mindful of the amount of storage you have with your current hosting plan)
- optionally select which additional files and folders should be used for the backups (in most cases, you have no need to do this)
- if you chose any additional files and/or folders, you can choose to only backup these selections (again, in most cases you have no need to do this)
Once you’ve made your selections, scroll toward the bottom of the page and click the Save Installation Details button.
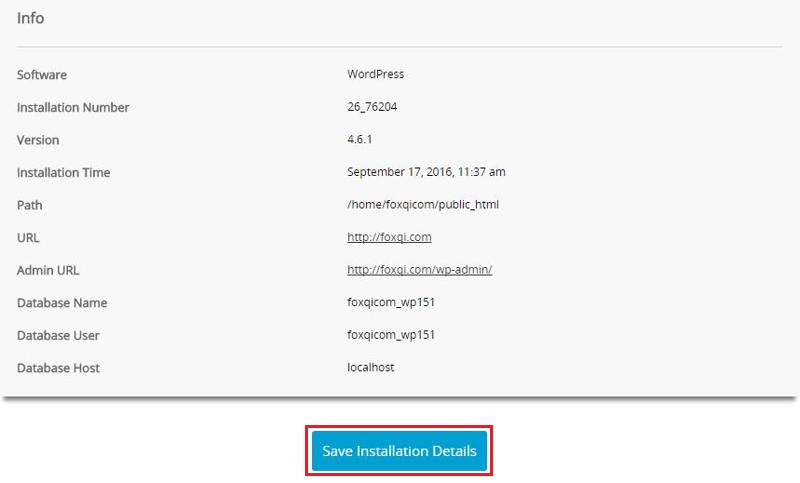
You’ll receive a confirmation message and can exit by clicking the Return to Overview link. You’re done!
Now let’s move on to restoring a Softaculous backup.
cPanel: How to Restore Your WordPress Website with Softaculous (very easy)
Previously, you learned how to backup your WordPress site using Softaculous and now I’ll show you to do a restore.
Step 1: Log into your cPanel account, then locate and open the Softaculous Apps Installer application within the Software section.
Step 2: In the Softaculous dashboard, click the Backups and Restore zip file icon.
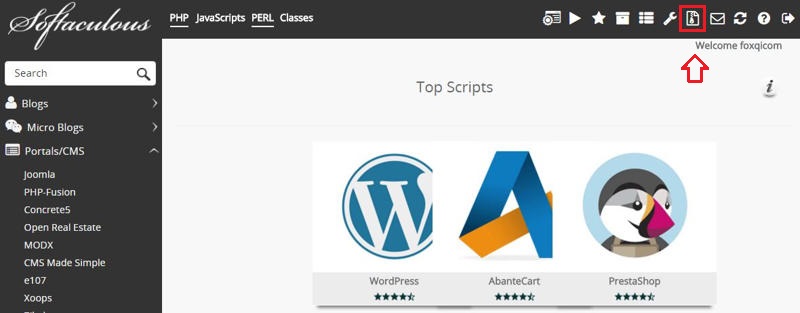
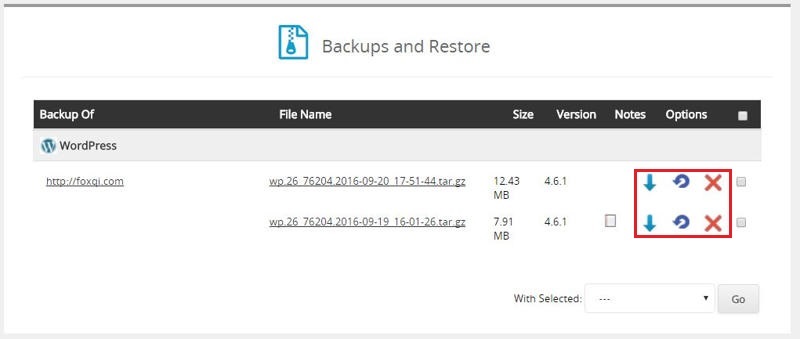
Step 2: On the following page, you will find a list of your available backups for each website.
Adjacent to each site and it’s associated backups, are three options. You can download, restore or remove your chosen backup file.
We’re interested in doing a restore, so click the relevant icon in the middle.
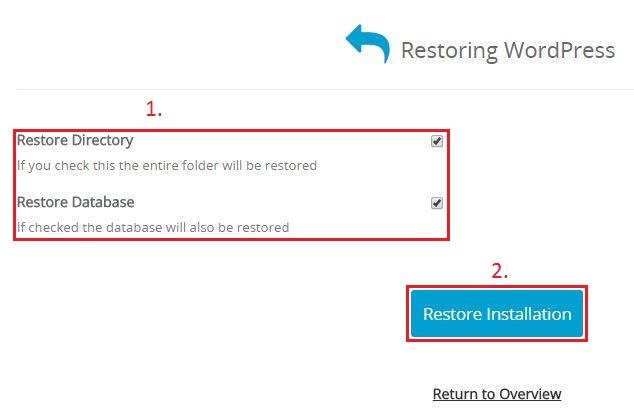
Step 3: Next, you can choose whether to restore the site’s files and/or database.
Once you’ve made your choice, click Restore Installation.
You will then see the Softaculous restore-in-progress screen.

Once finished, you will be informed by a success or failure message.

And your site has been restored; good job!
Complete Manual Backups Using WordPress’ Export Tool and FileZilla FTP Client
The low-down:
- Cost: free
- Difficulty: easy to setup
- Special requirements: FileZilla FTP client and (S)FTP login details
In this tutorial, I will show you how to first backup your WordPress website’s database using WordPress’ built-in export tool, then we’ll grab the wp-content file directory using the popular FileZilla file transfer protocol (FTP) client.
Of course, we’ll wrap up with how to restore your site’s database using the WordPress Importer plugin, as well as re-uploading your wp-content directory using FileZilla.
Let me mention beforehand that, yes, you CAN complete this tutorial using cPanel instead of FileZilla.
The goal here is simply to show you how an FTP client software can work by connecting you to your hosting server. This gives you an alternative option of managing your site’s files in case your hosting provider doesn’t offer cPanel or similar control software.
And off we go!
WordPress Export Tool and FileZilla: Step-By-Step Backup to Local Computer (fairly easy)
Let’s begin exporting your WordPress database, which is super quick, using the export tool.
Step 1: Log into the admin dashboard of your site.
Step 2: Go to Tools > Export.
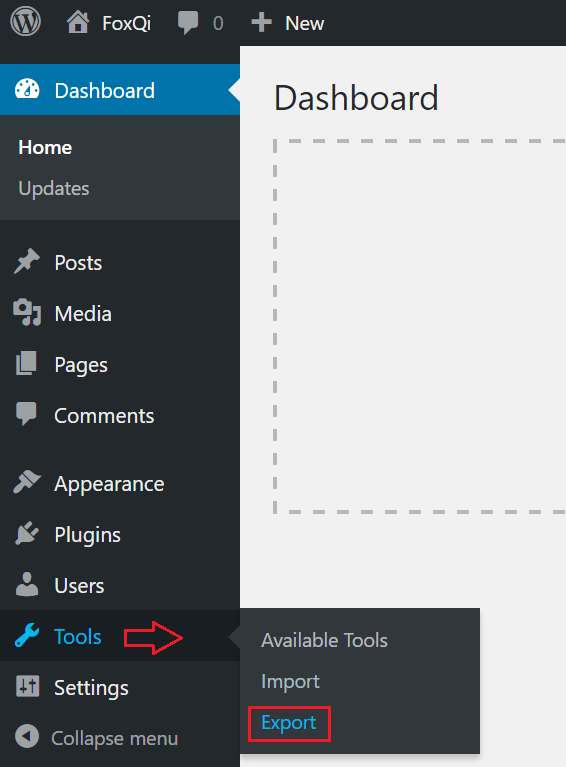
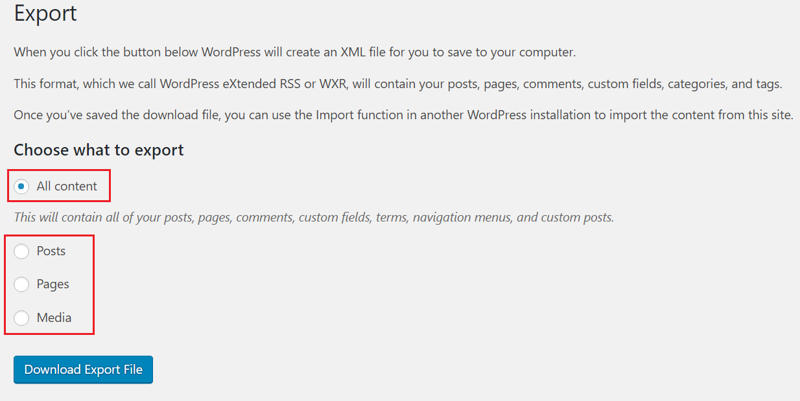
Step 2: From the Export page, as noted in the following image, you can download an XML file containing your:
- posts
- pages
- navigation menus
- comments
- custom fields
- custom post types
- categories
- tags
The All content option will be selected by default. But if you only want to export your posts, pages or media files, then select your preferred option. When ready, click the Download Export File button.
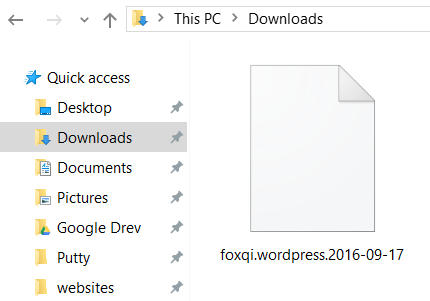
The download should begin shortly, and you’ll have your XML file ready for safekeeping.
Now let’s download a copy of your wp-content directory using an FTP client (FileZilla in this case).
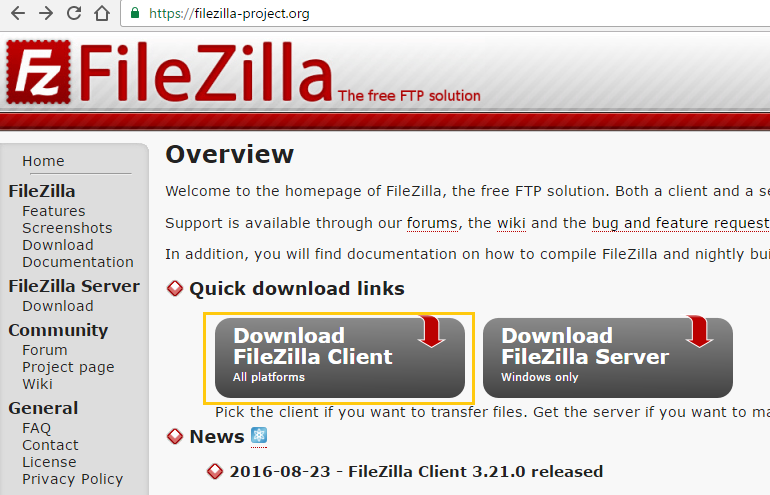
Step 3: If you don’t have FileZilla installed, head over to the official FileZilla project website. Click the Download FileZilla Client button.
Step 4: On the download page, click Show additional download options.
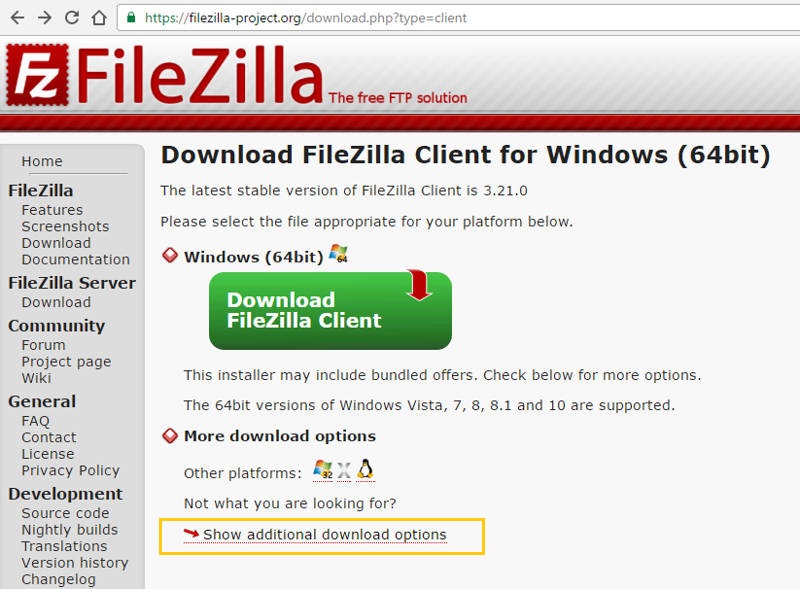
Now select the correct operating system that you’re using. If you don’t know or are not sure, then just return to the previous screen and click the green Download FileZilla Client button.
Step 5: Launch the downloaded FileZilla .exe file and follow the usual installation steps as you would with other programs. Launch FileZilla when ready.
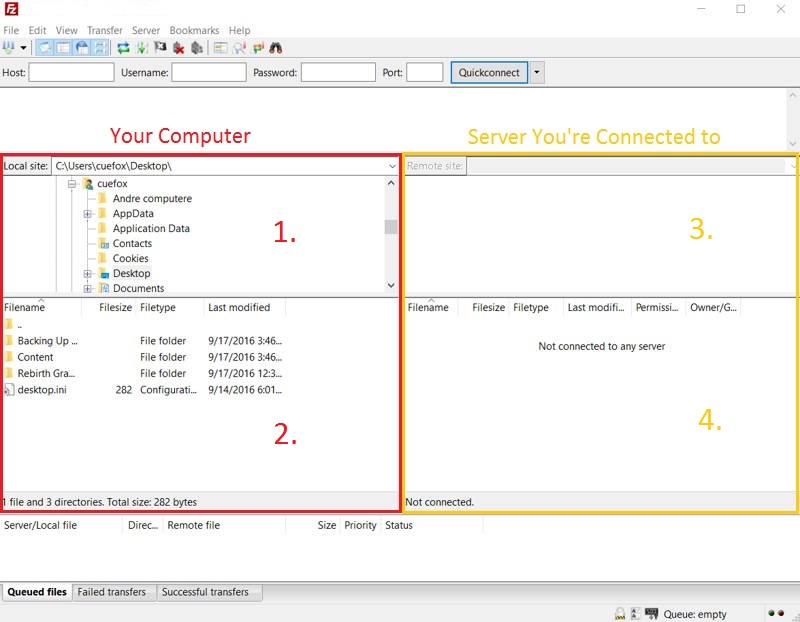
The directory navigation in FileZilla is divided into four quadrants.
The left-half quadrants let you navigate the directories on your computer, while the right half will show the directories on the server you’re connected to.
The top halves (1 and 3) show you a top-down directory tree to your current path, while the bottom halves (2 and 4) are what you will use to drag-and-drop folders and files to and from the server.
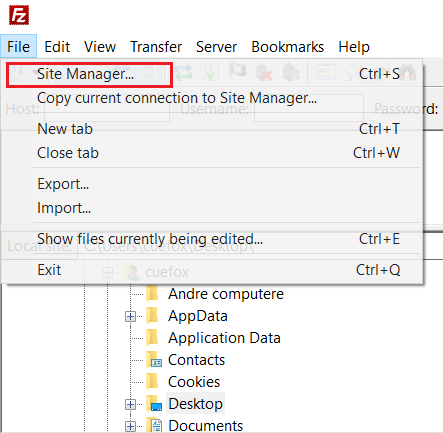
Step 6: Let’s connect to your FTP account. You should’ve received the login details by email from your hosting provider. Click File in the upper-left corner and then Site Manager from the dropdown.
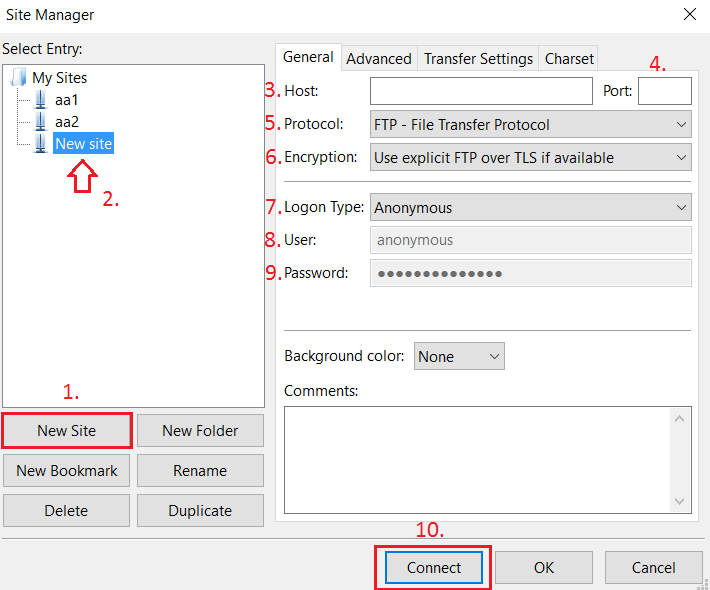
On the Site Manager interface, click New Site to create a new server connection. Give it any name you like. Complete the remaining fields as follows:
- Host: Fill in the hostname you received by email. This is typically your site’s domain name (e.g. example.com) or an IP address.
- Port: The default port for FTP is 21. So type 21 in the Port field.
- Protocol: Leave on the default option (FTP – File Transfer Protocol).
- Encryption: Leave on the default option (Use Explicit FTP over TLS if available)
- Logon Type: Set to Normal
- User: Type in the username your hosting provider sent you
- Password: Use the password your hosting provider sent you
(NOTE: if the server doesn’t support the Use Explicit FTP over TLS if available option, FileZilla will fail to connect. In this case, change the Encryption to Only use plain FTP (insecure) instead.)
Then click the Connect button.
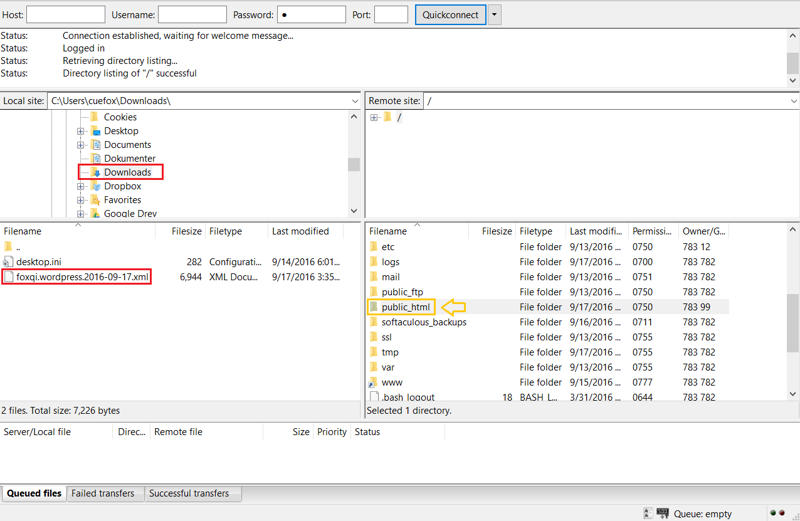
Step 7: You’re now connected to your FTP account on your hosting server. In the following example, I’ll browse to the Downloads directory on my computer.
The lower-left quadrant will then show the contents of the Downloads directory. It currently contains the XML file we exported from WordPress in the beginning.
If you’re familiar with using cPanel, you’ll recognize the public_html directory on the server. This is typically the web root directory for the first WordPress website installed on a cPanel account.
Step 8: Open the public_html directory and look for the wp-content directory.
Then either drag-and-drop the wp-content directory into the Downloads directory where your XML file is, or right-click the wp-content directory and click Download.
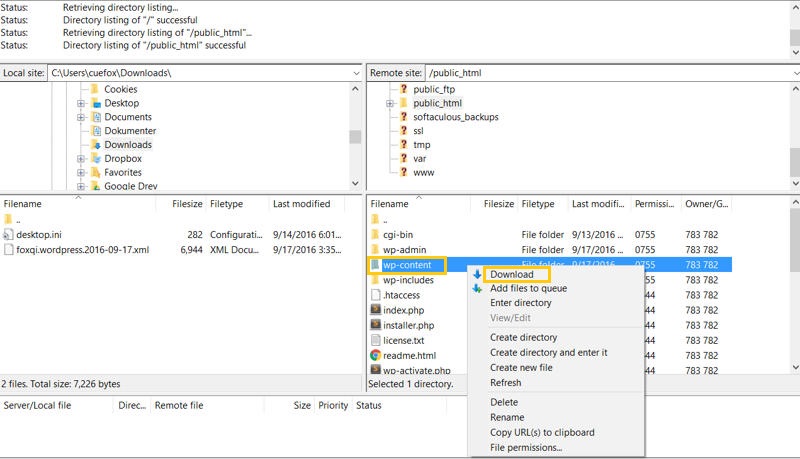
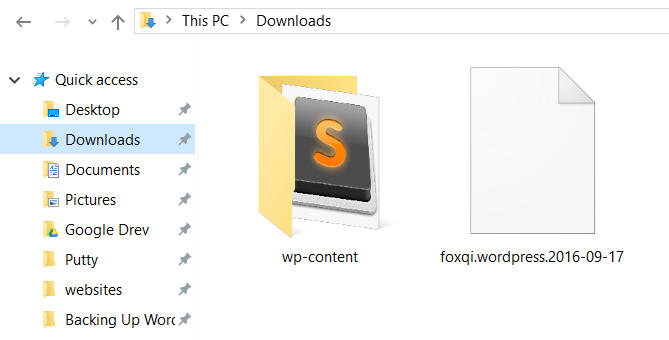
Once the download finishes, you’ll then see it in the Downloads directory.
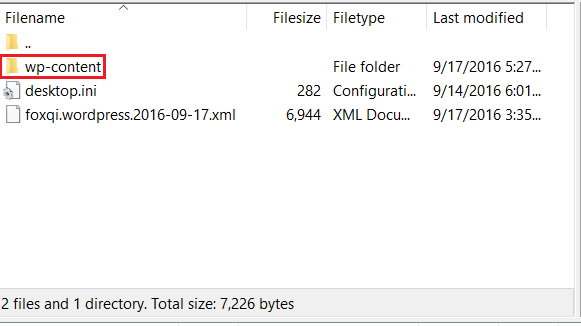
And now you have everything you need to restore your site.
WordPress Importer and FileZilla: Step-By-Step Restore (fairly easy)
Since you’re growing familiar with using FileZilla, restoring your site should be quick.
If your site was inaccessible, you would first need to reinstall WordPress from scratch, then follow the steps in this tutorial to first import the XML file and then upload your wp-content directory.
Roll up your sleeves again; we’re going to have some fun.
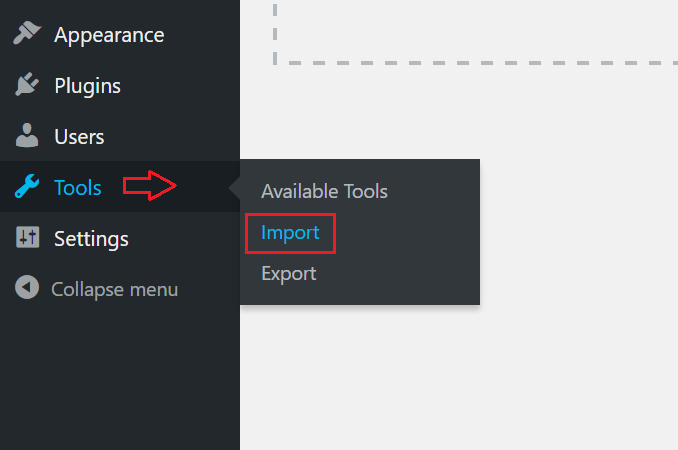
Step 1: Log into your WordPress admin dashboard. Go to Tools > Import.
Step 2: The Import page has a collection of tools used to import data files from various blogging and social platforms.
To import our XML file, we need to install the WordPress Importer plugin. Toward the bottom of the page, click Install Now under WordPress.
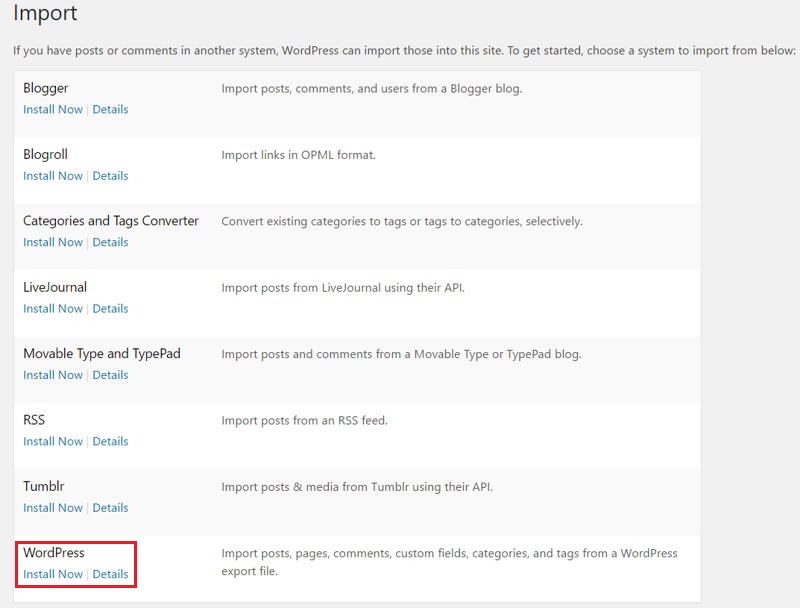
After installing, the link text will change to Run Importer. Click on it.

Step 3: On the import page, click Choose File and browse to the location on your computer where you saved your .xml file, and select it. Then click Upload file and import.

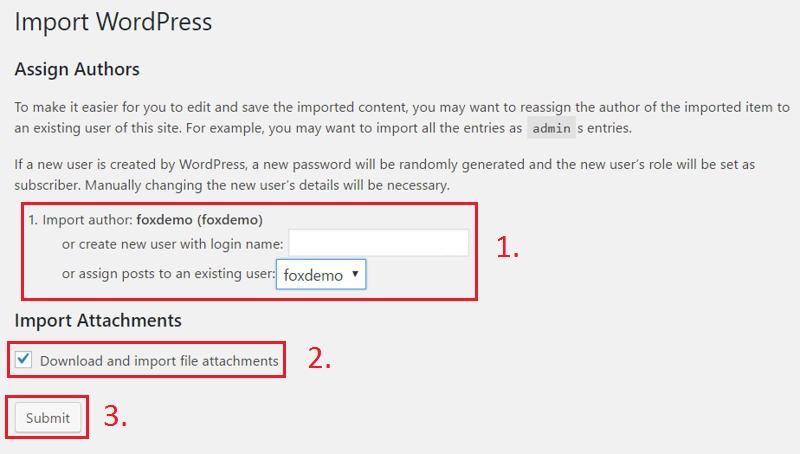
Step 4: Before the import can start, you will need to choose the user that will inherit any user-assigned content like posts. You can either create a brand new user or choose a pre-existing one. In the example below, I’ve selected a pre-existing user called “foxdemo”.
Tick the Download and import file attachments option to import image and file URL paths and click Submit. (This does not import the files themselves, but adds the URL address to them.)
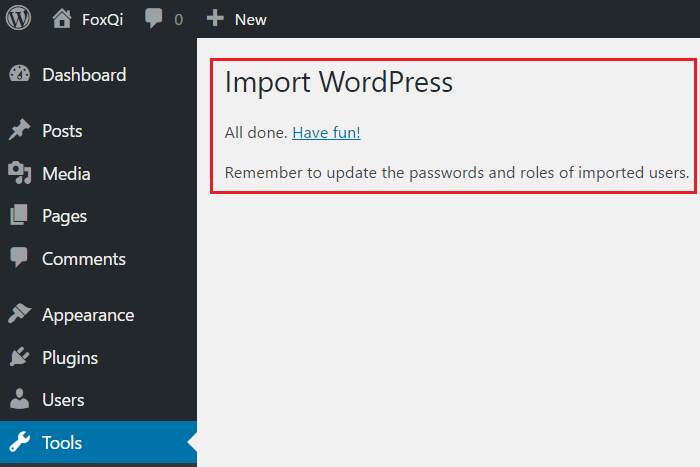
You will get a success message like the following, and you’re done! You can then proceed with uploading the wp-content directory, which I will show you next.
Step 5: Open the FileZilla FTP client you installed in the previous tutorial and connect to your FTP account.
Step 6: In FileZilla, browse to the location where you saved the wp-content directory on your computer.
On the server you’re connected to, browse to the website’s root directory. In our previous example, this was /public_html. Find and delete the existing wp-content directory.
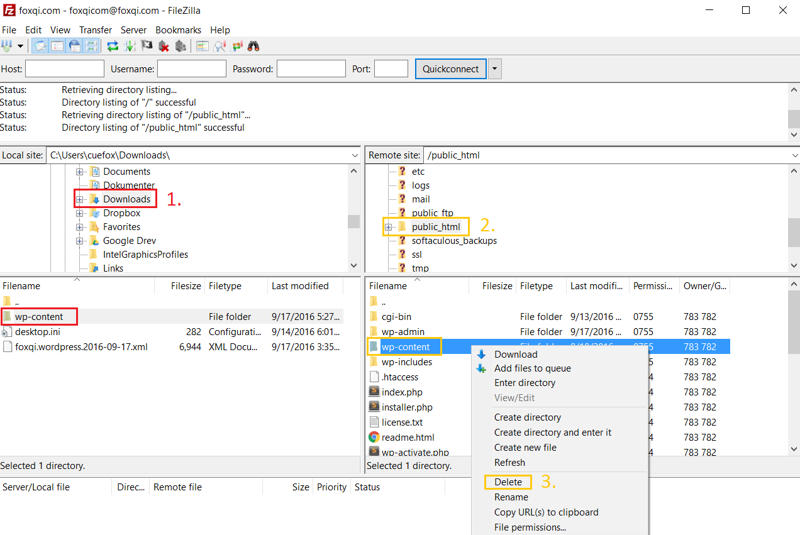
Step 7: Once the existing wp-content directory has been removed on the server, drag-and-drop or right-click your local wp-content directory and click Upload.
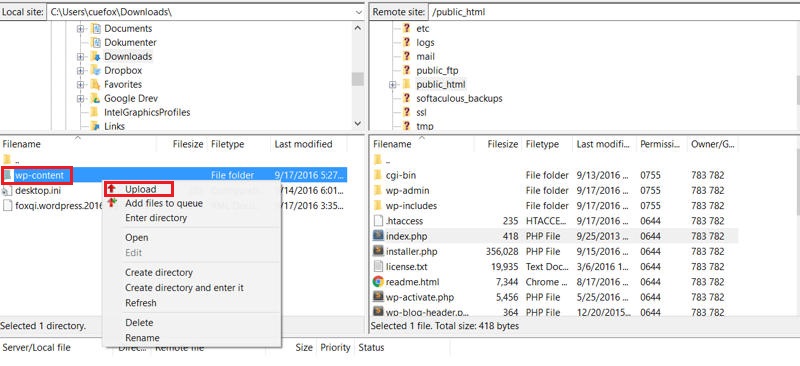
And you’re done!
Plugin Backup Solution 1: Duplicator

The low-down:
- Cost: free (download from official WordPress plugin repository)
- Difficulty: creating backup packages is fairly easy; restoring them is a little more involved
- Special requirements: you’ll need access to your site’s directories and files on the server
- Automatic backups: no, only in premium version
The Duplicator plugin is a fantastic and highly popular tool for WordPress professionals, with more than 800.000 active installs. This plugin saves me an absolute ton of time on a weekly basis.
At its core, Duplicator is a website migration tool meant for easing the complex task of moving a site from one server to another or changing the site’s domain name. But it also works well as a backup tool.
I use it almost daily to move sites between our live production servers and development/staging servers. Or I can also just download any sites to my computer so I can work on them offline, too, and transfer them back online when ready.
As mentioned before, our company uses the premium version of the plugin, and we do this for two main reasons:
- It features a backup scheduling solution that bundles the database and all your site’s files and can upload these to your cloud storage of choice
- The bundled components (“package”) contain everything you’ll need in order to migrate your site to an entirely different server or hosting provider (and can even create a new database for you at the destination)
By showing you how to create backups with the free version, I should mention that you cannot automate these. And while you can migrate your site to a different server, you will manually have to create a new database at the destination that Duplicator can connect with.
But don’t let that stop you from using the free version to take a backup every now and then. It’s a great tool for that.
So, let’s carry on, shall we? Yessir. I’m not giving you another choice.
Duplicator: Step-By-Step Manual Backup (fairly easy)
All right. We’ll start by creating a backup package of your site. There is one requirement before we can do this.
You will need access to your WordPress site’s wp-config.php file located in the website’s root directory.
In cPanel, the path to your site’s root directory is usually something like
- /home/user/public_html
- /home/user/public_html/demo.com
In the first path example, public_html is the root directory. In the second example, demo.com is the root directory.
From the wp-config.php file, you need the database name and privileged database user.
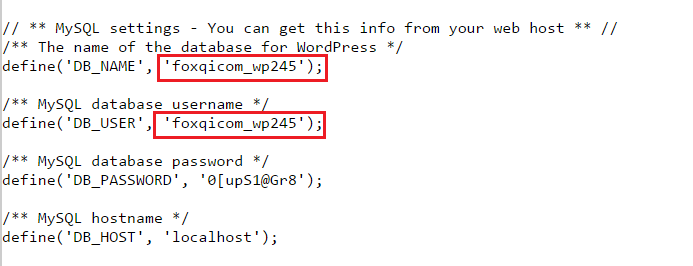
NOTE: Although the database name and username are identical in the above example, this is not always the case, so make sure to look for both.
If you’re using cPanel but having trouble finding your wp-config.php file, refer to the earlier cPanel backup tutorial where I show you where to find this file and view its contents.
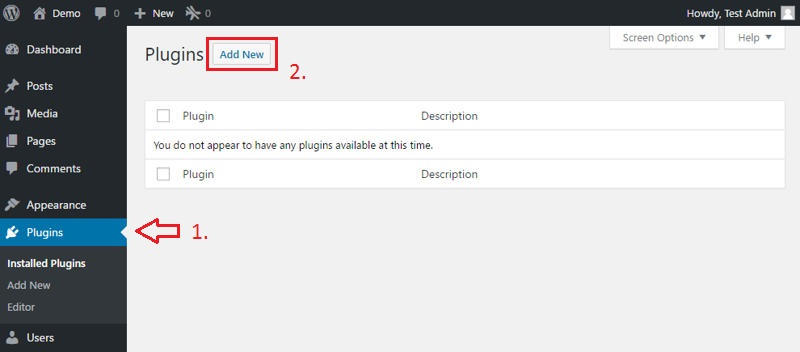
Step 1: Log into your WordPress admin dashboard, go to the Plugins page and click Add New.
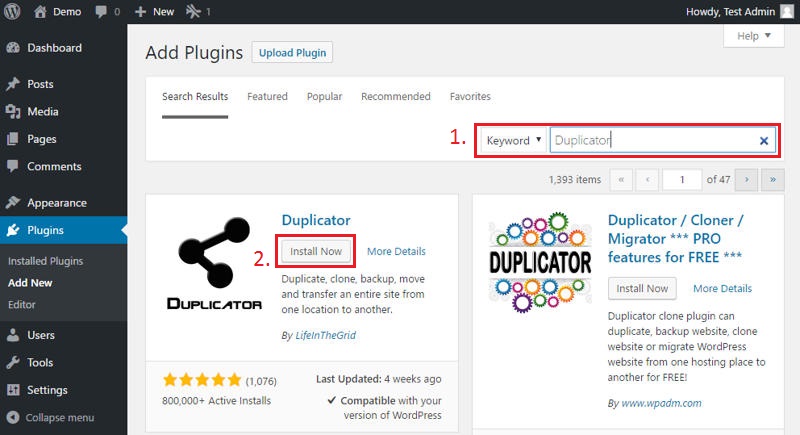
Step 2: Search for “Duplicator” and the plugin by LifeInTheGrid should appear as the first result on the left-hand side. Click Install Now and the plugin will be ready to activate shortly.
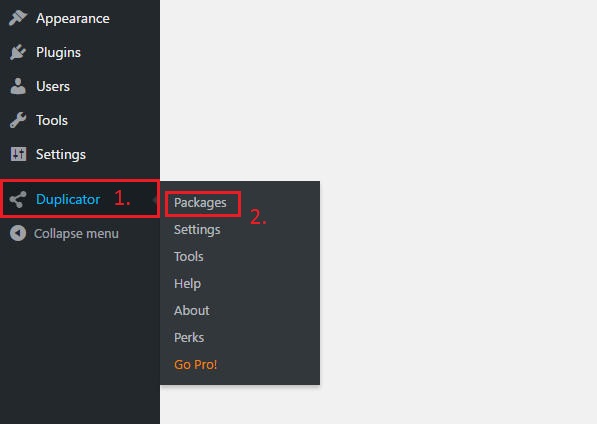
Step 3: Activate the plugin and you’ll now have a Duplicator menu item in the menu panel. Highlight it to get a fly-out of extra options, then click Packages.
Step 4: On the Packages page, you will see a Name field and 3 accordions (Storage, Archive, and Installer) containing settings for creating your package.
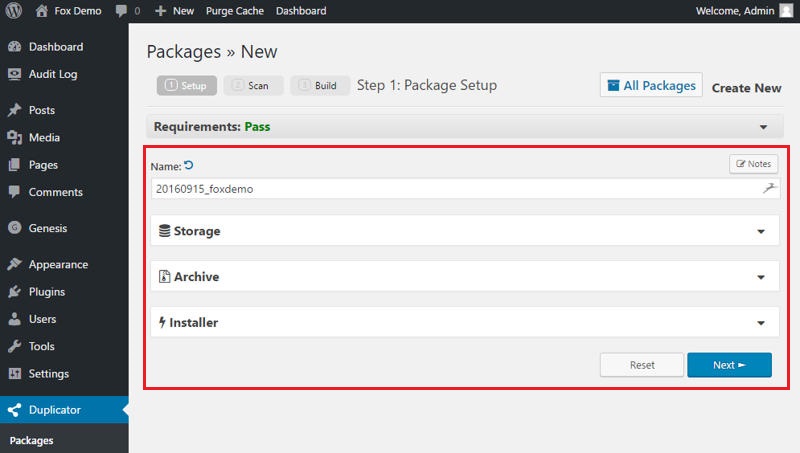
In the Name field, you can set the name for the package you will be creating. You can call it anything you want.

The Storage accordion shows you the full path where your package will be stored locally on your server.

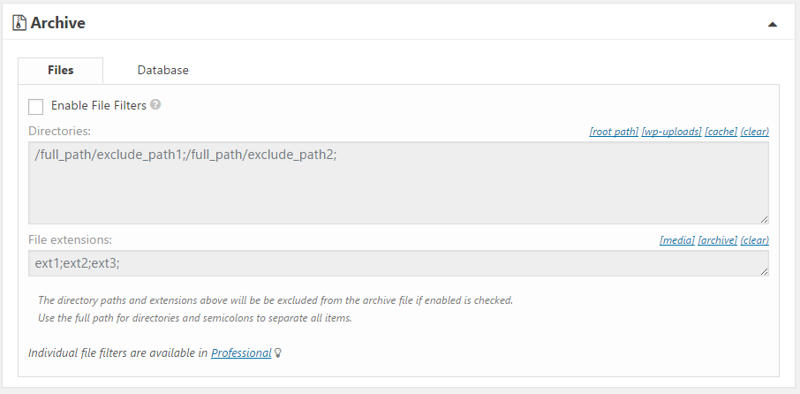
The Archive accordion allows you to exclude files and file extensions from being included in your package.
You can also filter your site’s database tables. This way, you can include or exclude any tables you don’t want in your package.
And finally, the accordion you’ll likely work with the most, and the only one you’ll need for this tutorial, the Installer.
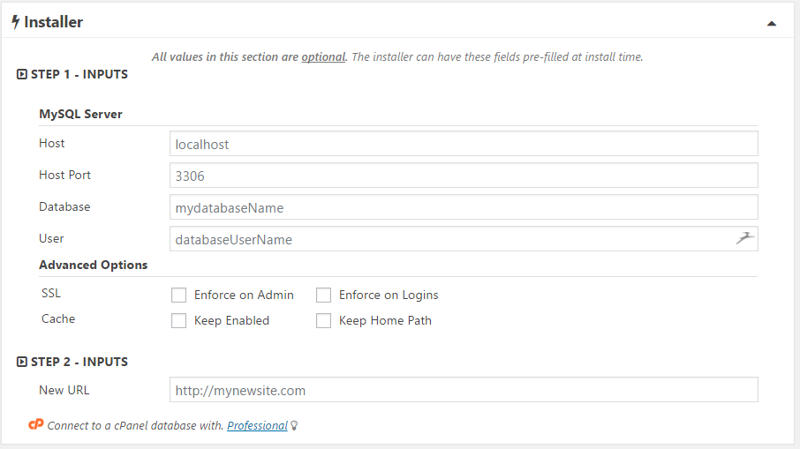
Step 5: As you can see, here is where you’ll need the database name and user from your site’s wp-config.php file.
If you have gathered these details from the file, excellent. Let’s carry on. We’ll use the settings for creating a typical package. This should work for most people.
MySQL Server:
- Host field: leave blank.
- Host Port field: leave blank.
- Database field: fill in your site’s database name.
- User field: fill in the database’s privileged user.
Advanced Options:
- SSL checkboxes: leave blank.
- Cache checkboxes: leave blank.
In the last field—New URL—you can optionally put in your website’s current URL address (e.g. http://example.com or https://www.example.com).
Once you’ve filled out the Installer input fields, click the blue Next button.
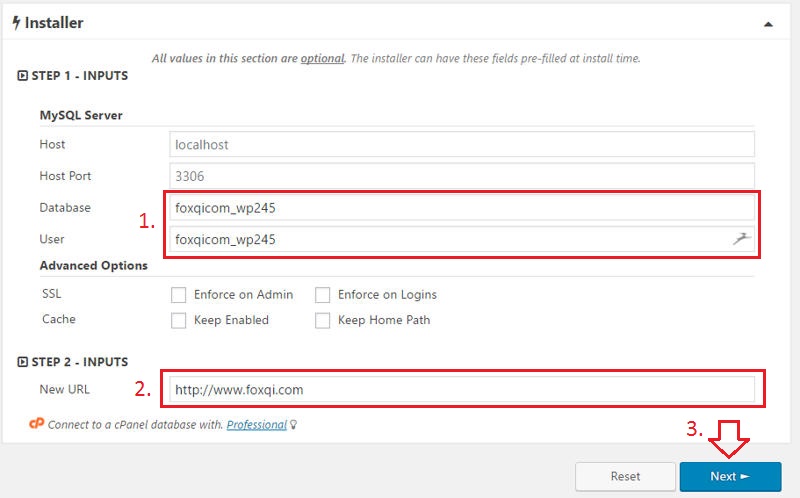
Step 6: Upon clicking the Next button, Duplicator will carry out a scan of your server, database, and files in an effort to alert you of potential problems. In the following image, you see an example of a couple of warnings for our demo site.
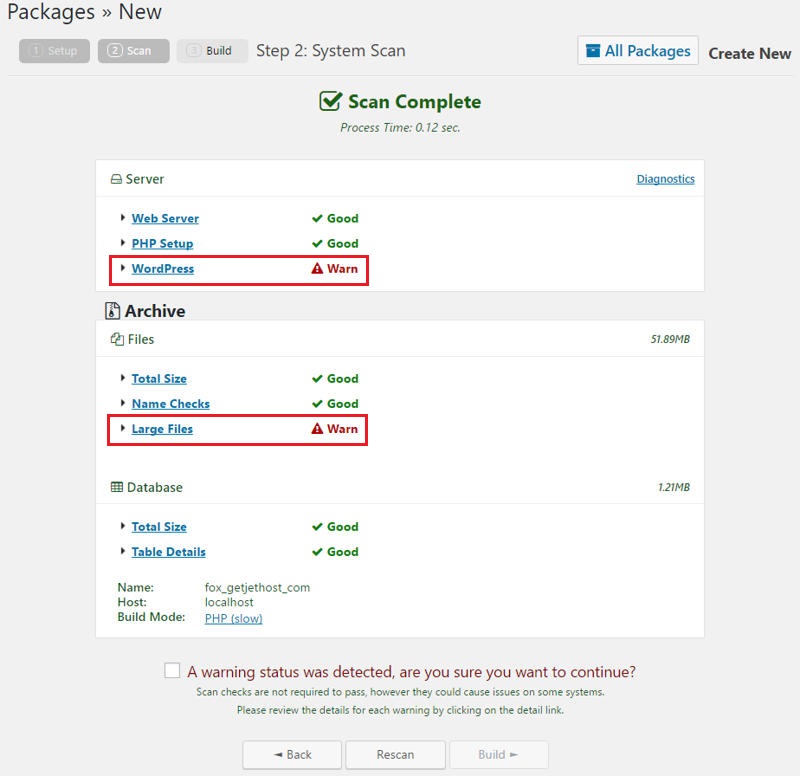
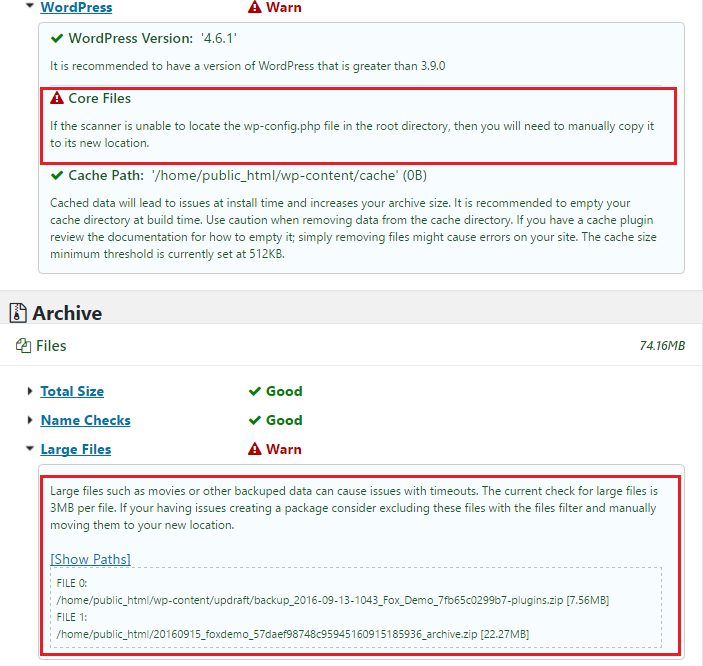
You can toggle each item to reveal the issue(s). The first problem with our demo site is that I’ve intentionally moved the wp-config.php file outside of its normal directory location, so Duplicator can’t find it.
The second issue is Duplicator alerting us of a large file because really large files can slow down the process of building our final backup package.
Although you might get some warnings like these, you can still build the packages. These warnings are mainly just for your information in case something doesn’t work right later on.
So, if you get all green checks or a minor warning(s), go ahead and tick the box if needed and then click Build at the bottom of the page.

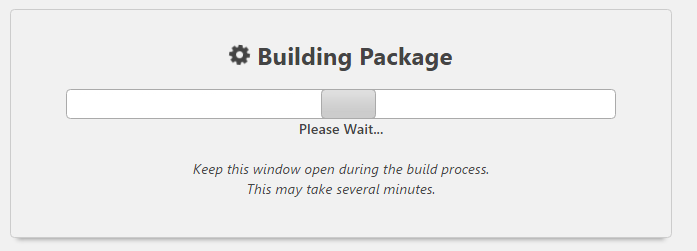
You will then be informed that the package is being built.
Once complete, Duplicator will let you know that the package was (un)successfully created.
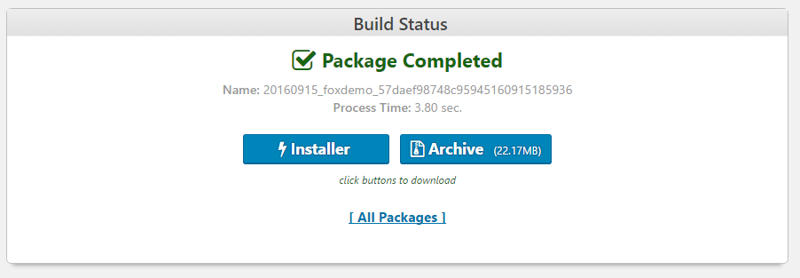
Step 7: Click the Installer and Archive buttons. This will download an installer.php script file and your website package archive respectively.
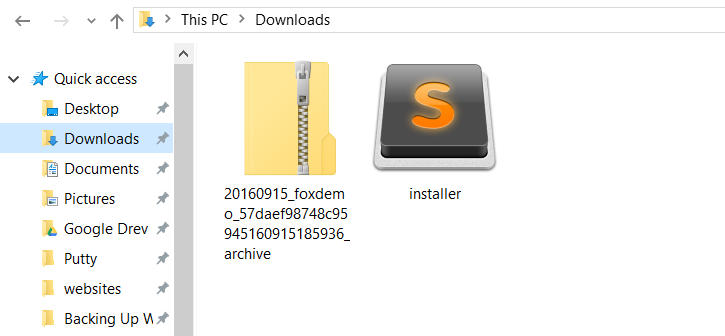
This is the part where I send you some congratulatory praise. How does it feel?
But… we’re not done yet! You also want to know how to restore your package, too, right? Yep, so let’s continue.
Duplicator: Step-By-Step Restore (intermediate)
I will now show you how to restore your website from the Duplicator package you created in the previous tutorial. For this tutorial, I will assume you’re using cPanel.
You will need to gather your site’s database password from the wp-config.php file.
The process for this tutorial is fairly straightforward:
- Optionally backup your website before getting started (use any backup method we’ve covered previously).
- Delete everything in your website’s root directory (e.g. /public_html or /public_html/example.com).
- Upload the installer.php script and package archive files to the now empty root directory.
- Navigate to the URL where the installer script file is located and go through the installation steps.
If this is your first time using Duplicator, I highly recommend that you backup your website using a different method before continuing.
NOTE: If you have an additional website(s) installed under your public_html directory, make sure NOT to delete that site’s directory.
All right, you ready? Go!
Step 1: Login into your cPanel account, then locate and open the File Manager application within the Files section.
Step 2: Open the public_html directory contents and delete all the directories and files inside, EXCEPT the directories of any additional websites you have installed under public_html.
For a quick select-all using the example below, you can left-click the cgi-bin directory at the top to highlight it, then scroll down to the very last item (in this case, the xmlrpc.php file), hold down the shift key and left-click that item.
This trick allows you to select the first item, the last item, and everything between them.
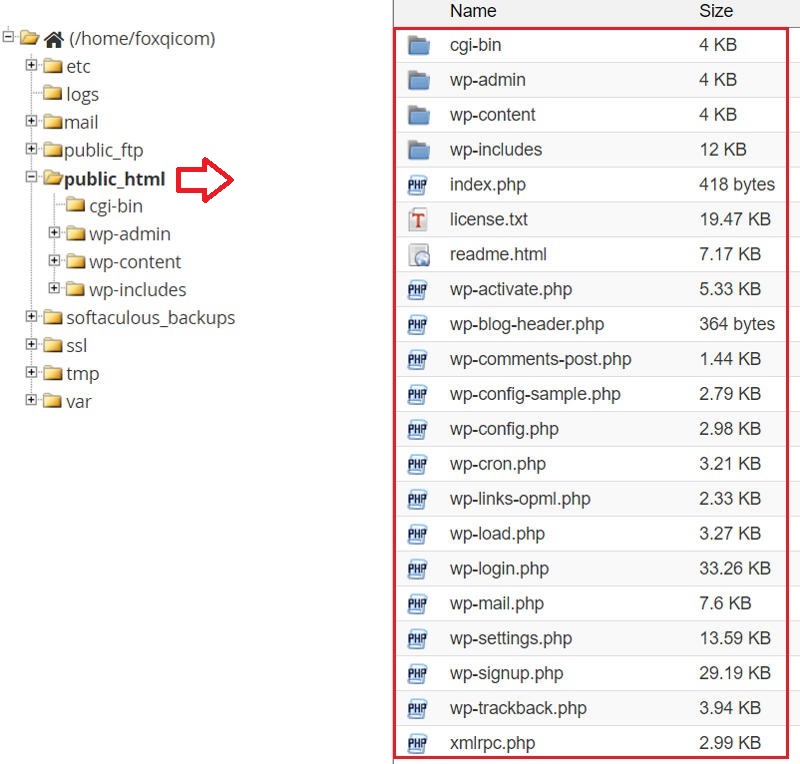
With all items highlighted, just press your delete key or click the Delete button in the top bar.
With the directory now empty, click the Upload button.
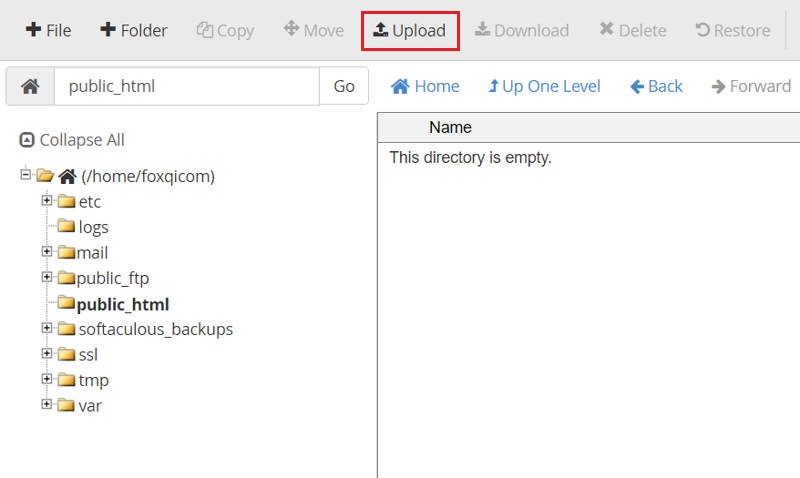
Upload your installer.php and Duplicator archive.zip files.
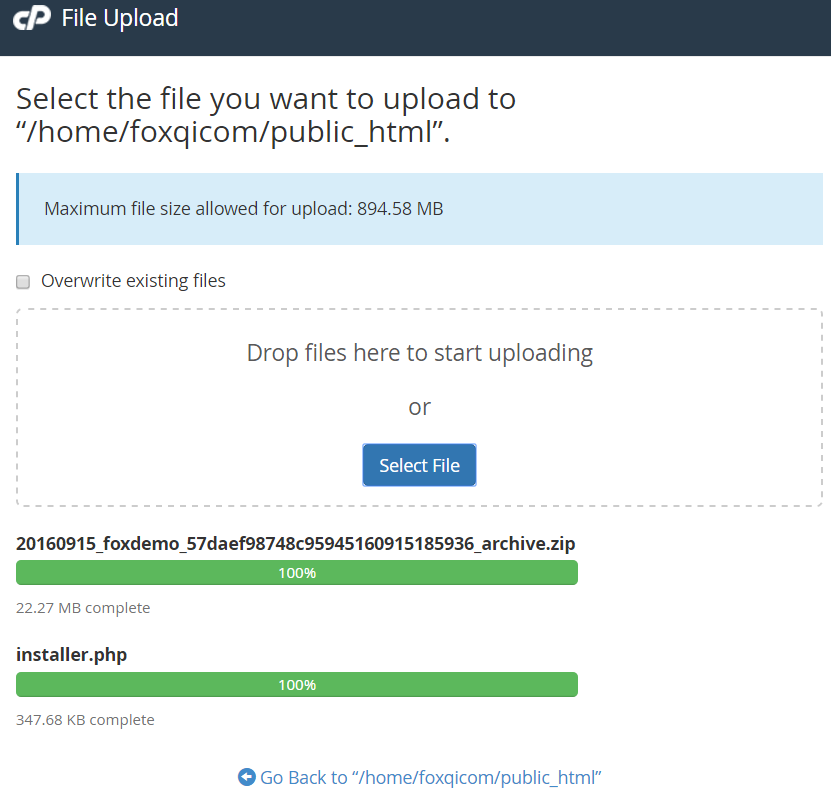
Now your Duplicator package files are stored in the public_html directory and ready for the installation.

At this point, you can bring up the installation interface by accessing the installer.php file through your domain URL address.
Step 3: Go to http://www.example.com/installer.php. Replace example.com with your actual domain name.
Pre-filled in the MySQL Database section, you’ll see the database Name and User details you supplied when you initially created your Duplicator package. If you didn’t supply those details, you will have the opportunity to do it here.
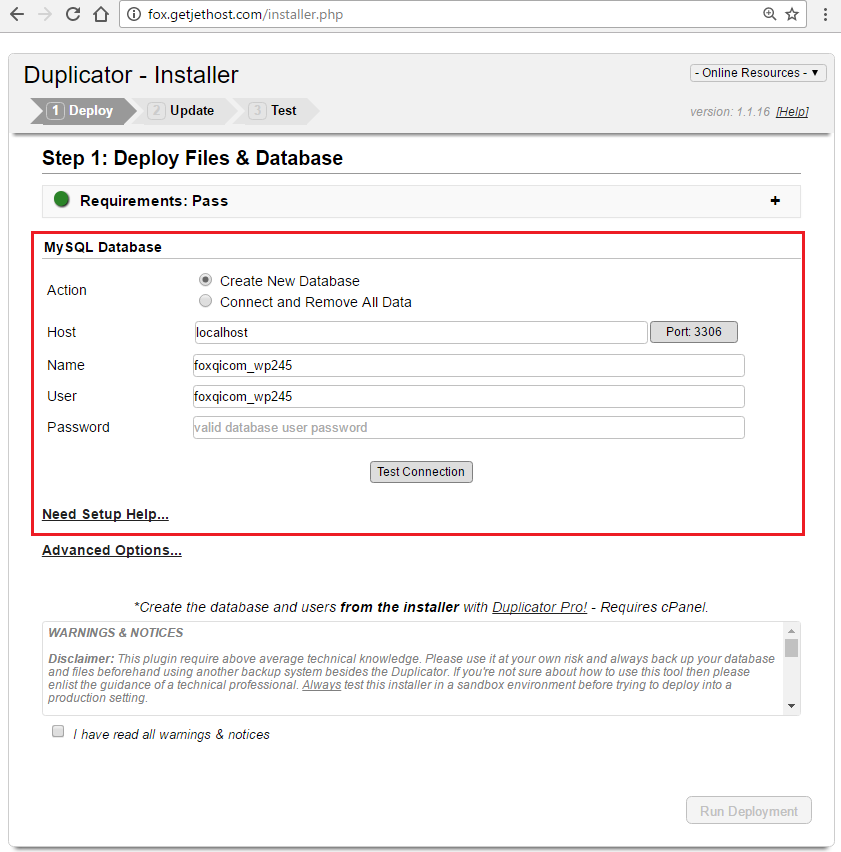
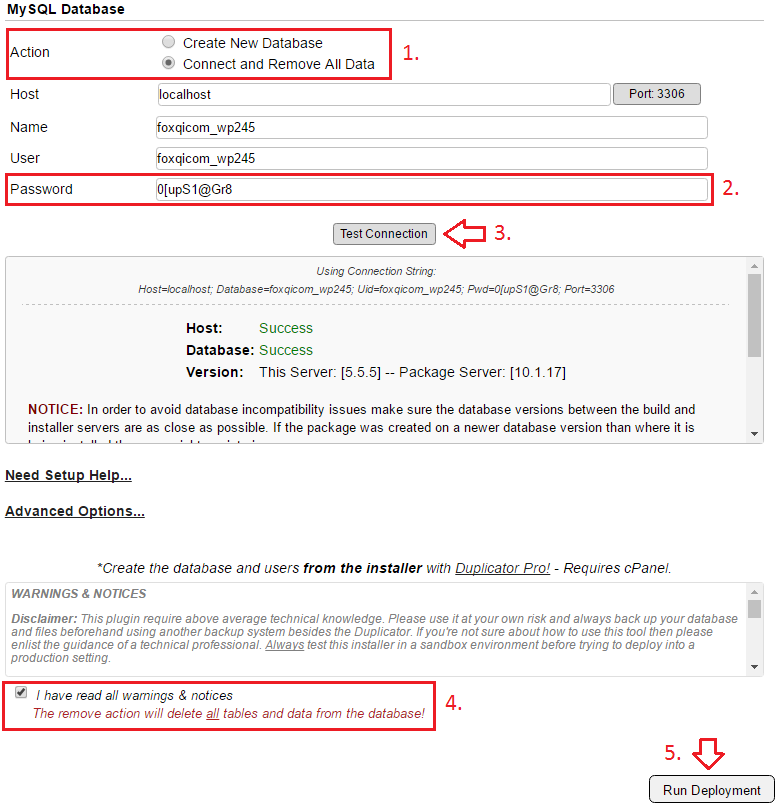
Step 4: Change the Action option to Connect and Remove All Data. Then fill in the database password you gathered from your site’s wp-config.php file.
Click the Test Connection button, which tells Duplicator to try connecting to the database, and await success message. Tick the “I have read all warnings & notices” checkbox and finish by clicking the Run Deployment button.
Step 5: Once the deployment has successfully completed, you can now run the update configuration to change file paths, URL address, and/or site’s title.
In the case of a restore, I recommend only changing the Title field if necessary.
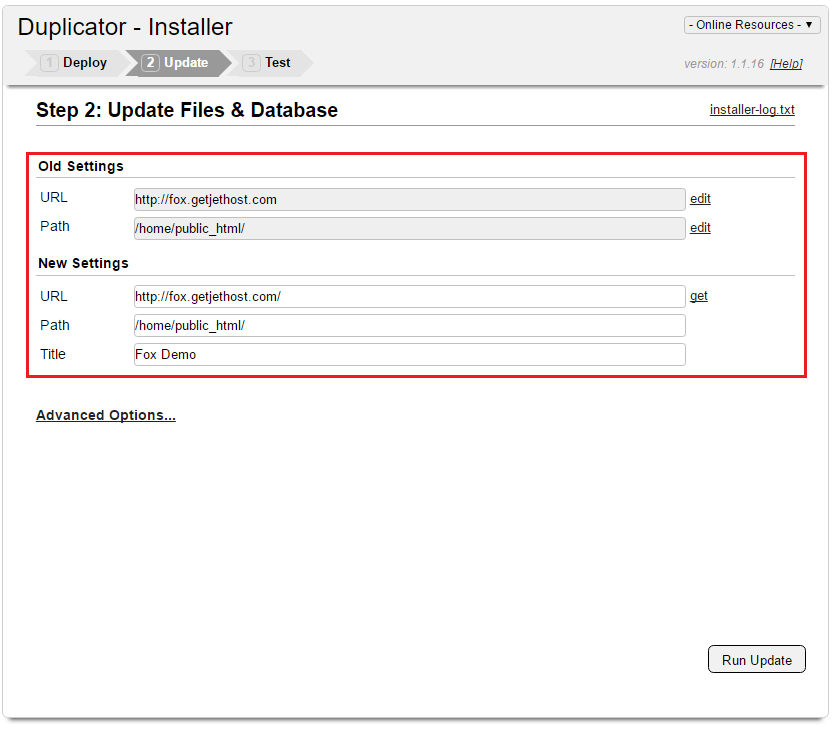
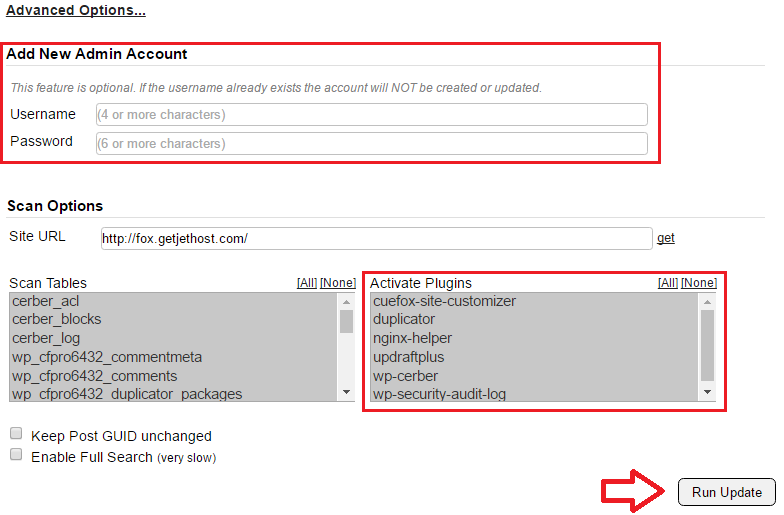
Most users can skip the Advanced Options. If you do toggle these, I only recommend adding a new admin user to your site and/or choosing which plugins should be activated initially.
If you really know what you’re doing, then feel free to configure the other settings as necessary.
Wrap up by hitting the Run Update button.
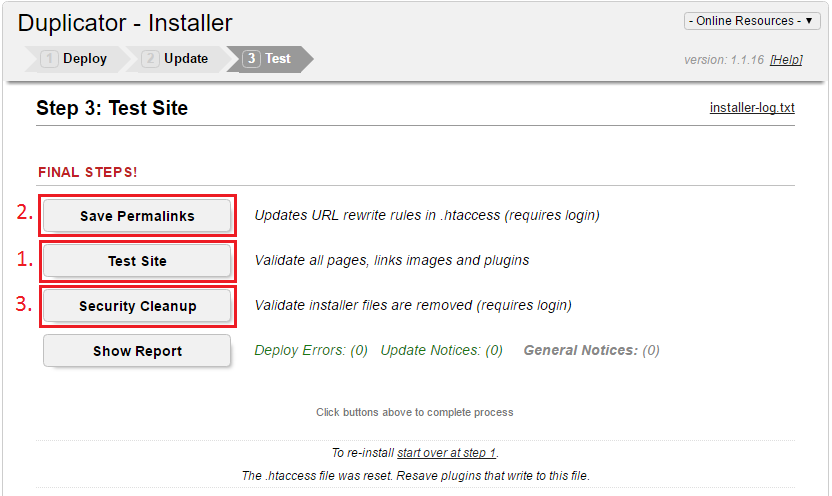
Step 6: You’re almost done! On the final page of the installer interface, I recommend doing things in the following order:
- Click Test Site to open your website in a new browser tab and make sure it’s online and working.
- Log into your site’s admin dashboard.
- Come back to the installer page, click Save Permalinks.
- Return one final time and click the Security Cleanup button.
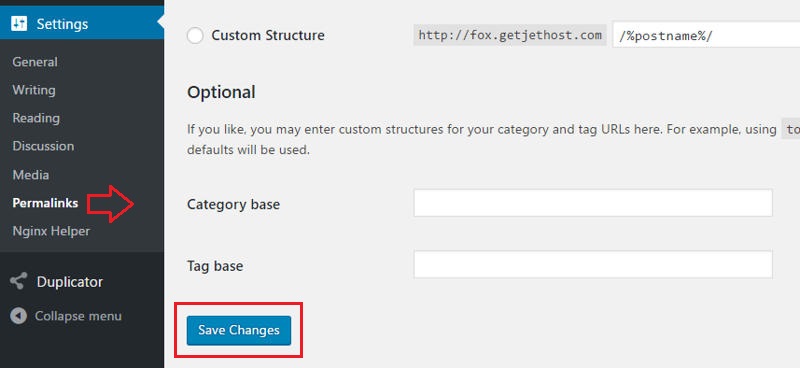
The Save Permalinks button will take you to your site’s Permalink Settings page. Here, just click the Save Changes button.
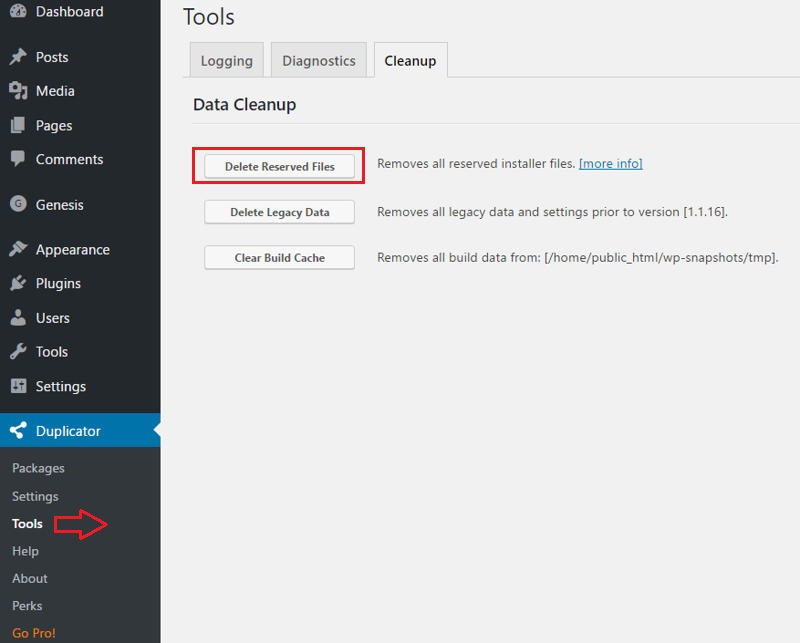
The Security Cleanup button will take you to the Cleanup tab of Duplicator’s Tools page. Click Delete Reserved Files to perform the security cleanup.
And you’re done!
Plugin Backup Solution 2: UpdraftPlus

The low-down:
- Cost: free (download from official WordPress plugin repository)
- Difficulty: easy to setup
- Special requirements: none
- Automatic backups: yes
UpdraftPlus is easy-to-use and one of the absolute most popular backup plugins available.
Like Duplicator, it also sports 800.000+ active installations, a near flawless 4.9-star rating, and is one of our go-to plugins for the job.
The free version of the plugin gives you the ability to schedule automated backups, as well as allowing you to upload these backups to a cloud storage of your choice.
One caveat you should be aware of is if your site goes down or for any reason, and you cannot access the admin dashboard, you will need to retrieve the backup files UpdraftPlus created from wherever you have them stored (your server, Dropbox, Amazon S3, Google Drive, etc.).
You then need to reinstall your WordPress site, re-install the UpdraftPlus plugin and then use the plugin to import your backup files so you can begin a restore.
As an alternative to re-installing UpdraftPlus, you can manually unpack the necessary files and directories from the backup files and upload these to the correct locations on your server.
Let’s begin.
UpdraftPlus: Step-By-Step Automated Backups to Hosting Server (very easy)
I will start with showing you how to create scheduled local backups of your WordPress website.
Step 1: Log into your WordPress admin dashboard, go to the Plugins page and click Add New.
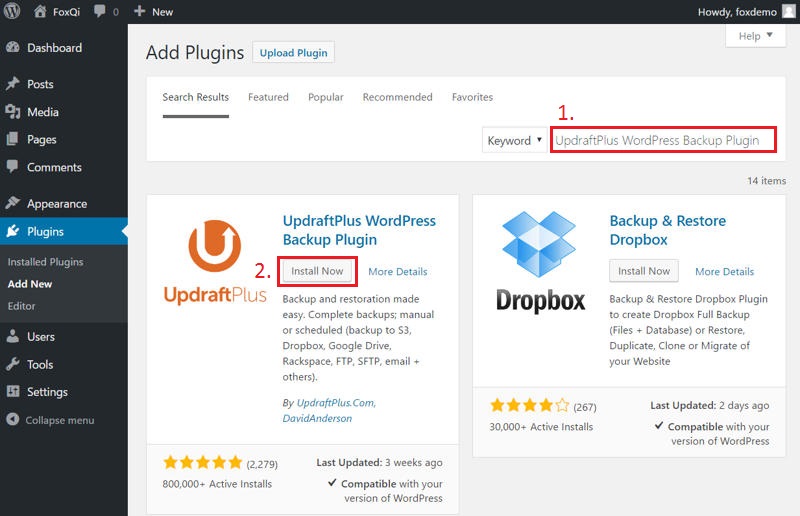
Step 2: Search for “UpdraftPlus WordPress Backup Plugin” and the plugin by “UpdraftPlus.Com; DavidAnderson” should appear as the first result on the left-hand side. Click Install Now, then be sure to activate the plugin afterward.
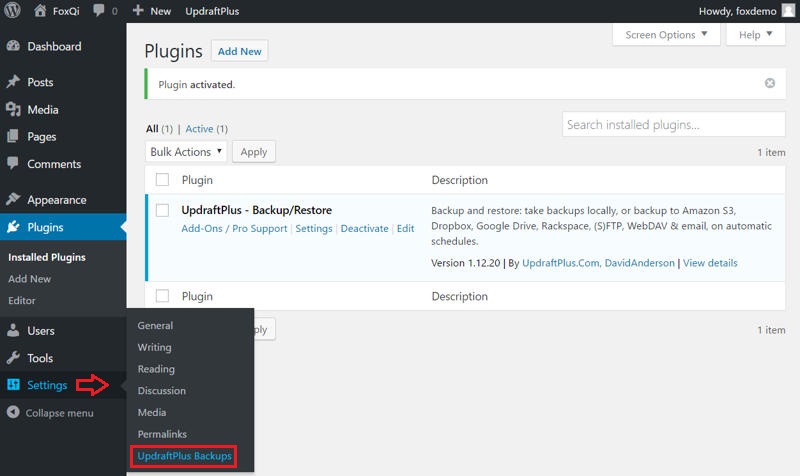
Once activated, UpdraftPlus will get its own sub-menu item under Settings. Open it.
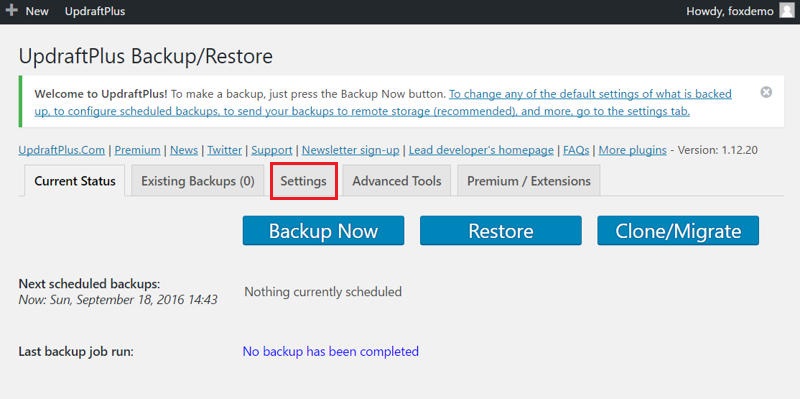
Step 3: On UpdraftPlus’ backup/restore task page, you’ll see three buttons. One for:
- launching a backup
- restoring a backup
- cloning or migrating your site. (Cloning and migration requires a premium plugin extension called Migrator.)
But before we do anything, let’s first go to the Settings tab.
Step 4: The first section of the settings page deals with scheduling automated backups. If Files backup schedule and/or Database backup schedule are set to Manual, then automatic backups are switched off.
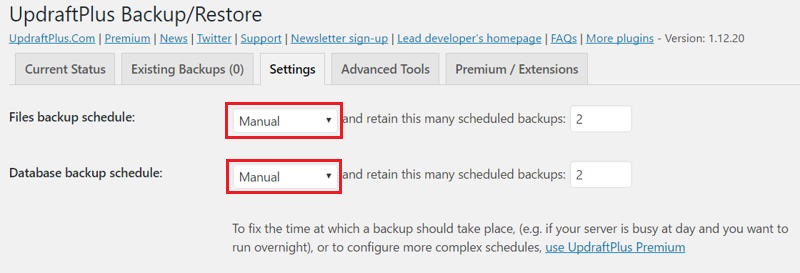
To change this, simply change Manual to your preferred frequency and set the maximum number of backups you would like UpdraftPlus to keep for you.

When finished, scroll toward the bottom of the page and you will see an option to enable email reports if you would like these. Once done, click the blue Save Changes button.
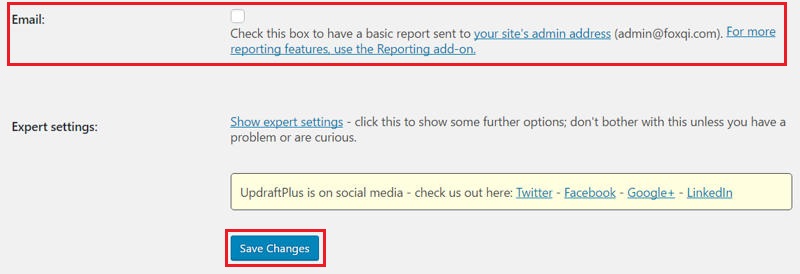
UpdraftPlus then launches the first backup and will automatically repeat the cycle based on your selected schedule.

If you enabled email reports, this is what you will receive in your inbox after every backup cycle:
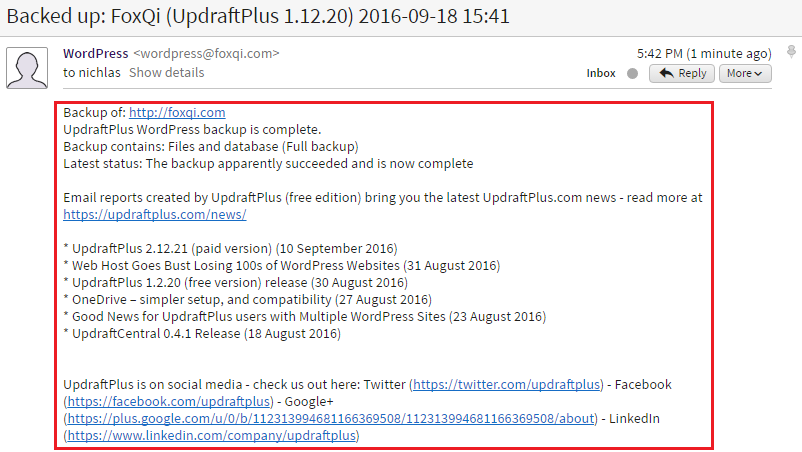
And that’s it, your site is now being backed up on a set schedule. Let’s wrap up by downloading a copy of the backup files to our computer.
Step 5: Click the Existing Backups tab. On this page, you will see a list of all your available backups and the date they were taken.

From here, you can download any segment of your backups. If you want to download your site’s database, click the Database button. Or click all the buttons to download everything.
You can optionally delete the files from your server after you’ve downloaded them to your computer.
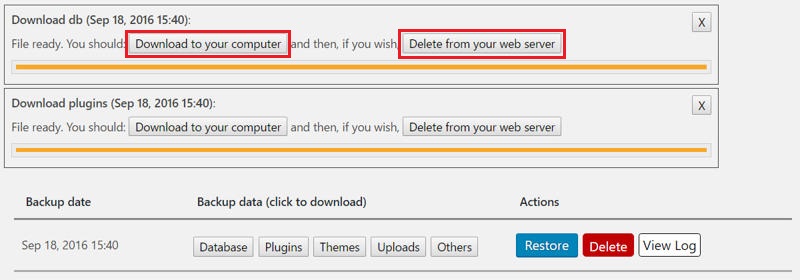
And voila, your backup files are ready for restoring and safekeeping.
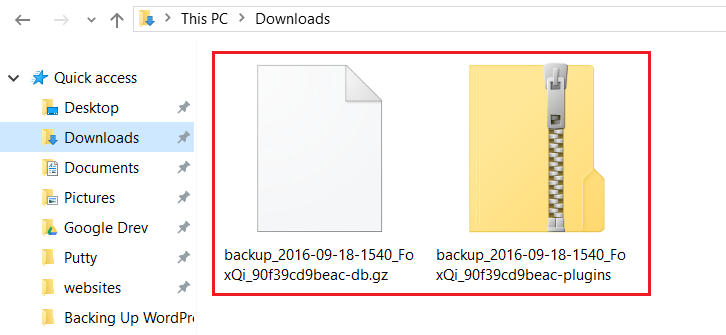
UpdraftPlus: Step-By-Step Restore (very easy)
How are you doing? Still with me? Good. It’s time to restore your UpdraftPlus backup.
Step 1: Log into your WordPress site’s dashboard and go to Settings > UpdraftPlus Backups. Then click the Restore button, which will open the Exisiting Backups tab. (You can also just click this tab instead.)
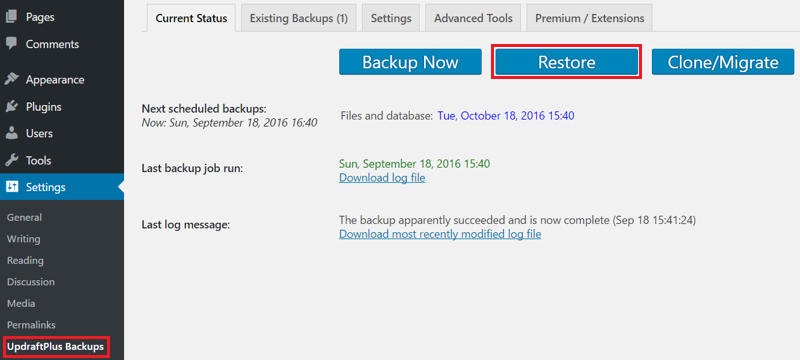
Step 2: On the Existing Backups page, you will see a list of all your available backups and the date they were taken. From the previous tutorial, we only took one backup, so you only see one listed in the following image.
When ready to restore, click the Restore button adjacent to the backup you want to restore from.

Step 3: Upon clicking restore, a modal window will appear. Choose all the segments of your backup that you want to restore. In most cases, you should select all of them.
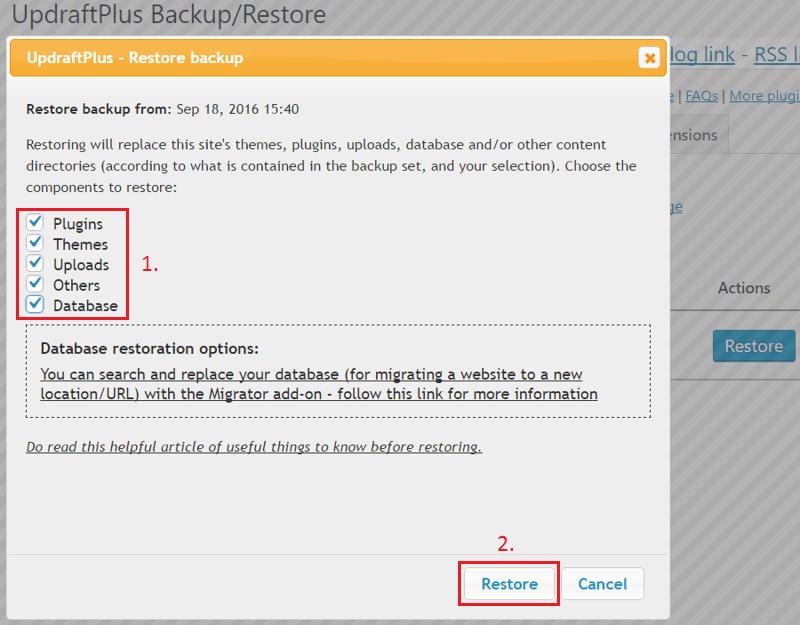
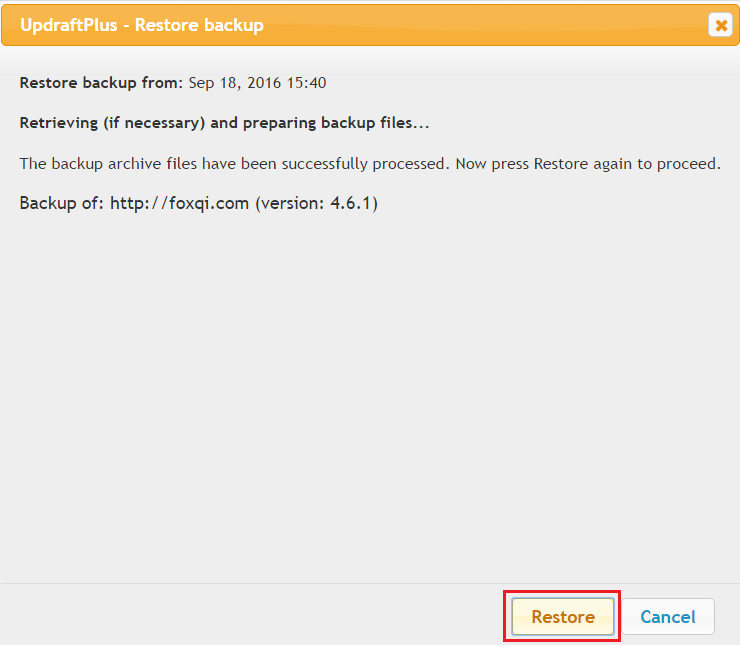
UpdraftPlus will process the files for restoring. Confirm the restore.
You now see a screen log of the restore process, which will finish with a success or failure message.
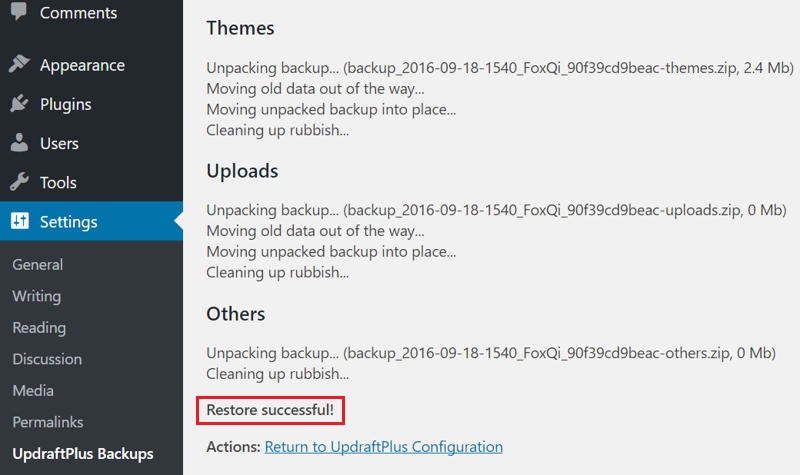
And you’re done!
Plugin Backup Solution 3: BackUpWordPress

The low-down:
- Cost: free (download from official WordPress plugin repository)
- Difficulty: easy to setup
- Special requirements: none
- Automatic backups: yes
BackUpWordPress is a nifty backup plugin for the job, developed with low-resource hosting environments in mind, and will help you easily create multiple schedules for automatic backups in no time.
This freemium-based plugin is battle-tested with over 200,000 active installations and is well-received with a 4.7-star rating.
Some things to consider with BackUpWordPress are that:
- the free version of the plugin stores your backups on the hosting server and does not give you the ability to automatically upload to an external cloud storage
- the plugin does not come with one-click restore functionality and requires FTP access (e.g. cPanel File Manager or FileZilla FTP client) and a method of importing your site’s database (e.g. phpMyAdmin or importing through the MySQL command line) to make a complete restore
However, don’t fret. I’ll show you exactly how to backup and restore your WordPress website using BackUpWordPress.
You can also just take a couple of minutes to download one of your backups every once in while. Then either keep it on your computer or upload it to your external storage of choice.
In this tutorial, I will assume you have a cPanel account, as we will use File Manager and phpMyAdmin to restore the backup files.
BackUpWordPress: Step-By-Step Automated Backups to Hosting Server (very easy)
First up, we’ll take a complete backup of your website, so get ready.
Step 1: Log into your WordPress admin dashboard, go to the Plugins page and click Add New.
Step 2: Search for “BackUpWordPress” and the plugin by “Human Made Limited” should appear as the first result on the left-hand side. Click Install Now, then be sure to activate the plugin afterward.
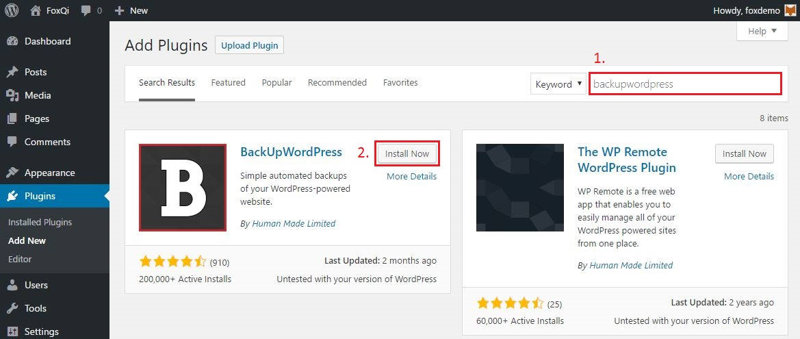
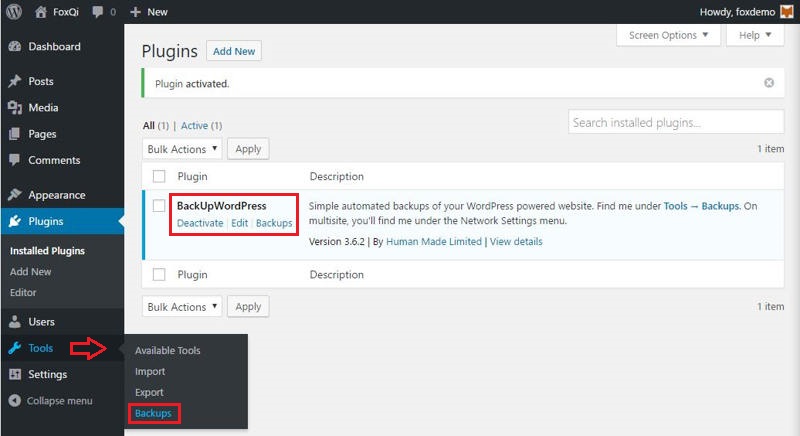
Once activated, BackUpWordPress will get its own sub-menu item under Tools. Open it.
On the backups management page, you will see a default, horizontal list of backup schedules (on a fresh install, there will be two schedules plus the add schedule tab).
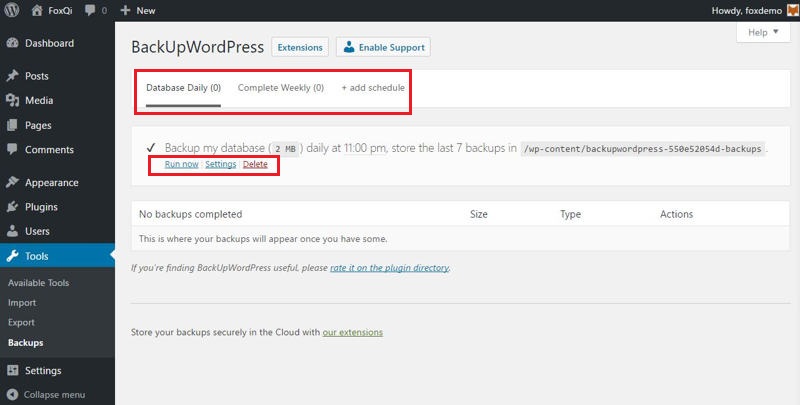
NOTE: By default, without you having to do anything, BackUpWordPress will backup your database once every 24 hours and then make a complete website backup (database plus files) every 7 days.
The selected schedule (in the below example, “Database Daily”) will be underlined.
When you’ve clicked to select a schedule, you can then choose to run it immediately, change its settings, or delete it.
Step 3: Let’s create a new schedule, then you can optionally delete the existing schedules. Click add schedule.
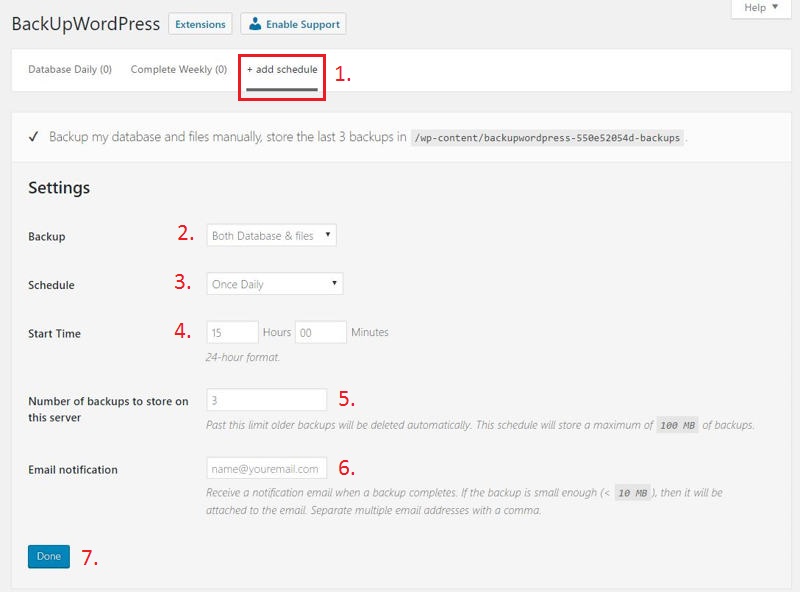
The first option allows you to select whether to backup just the database, just the files, or both.
Next, you will choose how frequently you want this schedule to run and at what time of the day (if relevant also which day of the week) it should run the first time.
Wrap up by deciding how many backups to store at any given time and optionally put in your email address to receive notifications.
Finished? Click Done.
In the example below, I added a schedule that will run twice daily at 10:00 AM and 10:00 PM, and I’ve told BackUpWordPress to keep a maximum of 3 backups (meaning once 3 backups have been created, the last one will always be thrown out to make room for the next one).
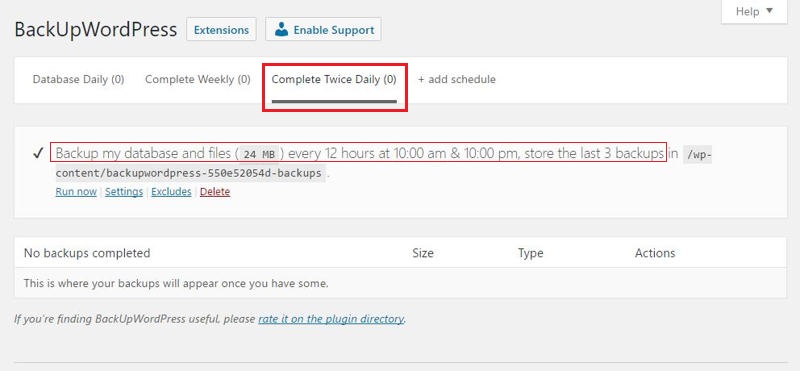
Step 4: I can’t wait until 10 PM, so let’s quickly create a backup by clicking the Run now link. I will run it twice just for the thrills.
Once the backups have completed, it will be listed in the table below.
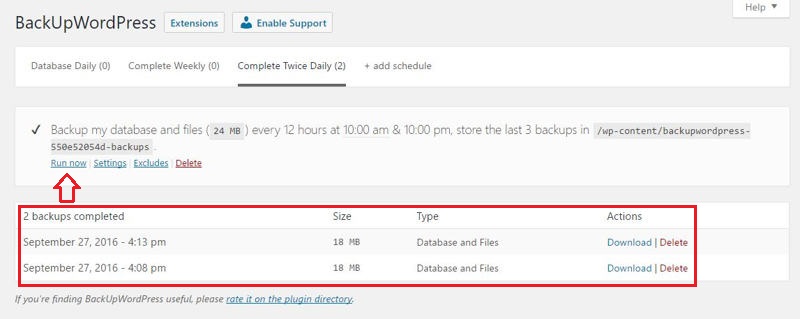
Step 5: Okay, we’re making progress!
Your backups are currently stored on the server. You can optionally choose to download any of your backups to your computer.
Simply click the Download link adjacent to the backup you want.

Once the download has completed, you will have a zip file containing all your site’s files and a .sql database file ready for safekeeping.
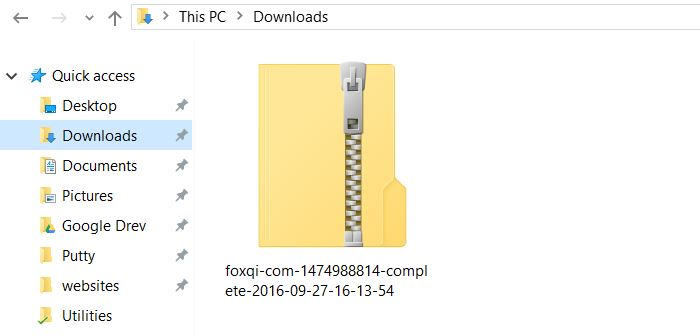
You’re now ready to restore your site, which we’ll do next.
BackUpWordPress: Step-By-Step Restore (fairly easy)
All right! We’ve got the backups going; now let’s figure out how to use them.
Step 1: Login into your cPanel account, then locate and open the File Manager application within the Files section.
Step 2: Open your site’s web root directory (if this is the first WordPress site you’ve installed on your cPanel account, the directory will typically be called /public_html) and locate the wp-content directory.
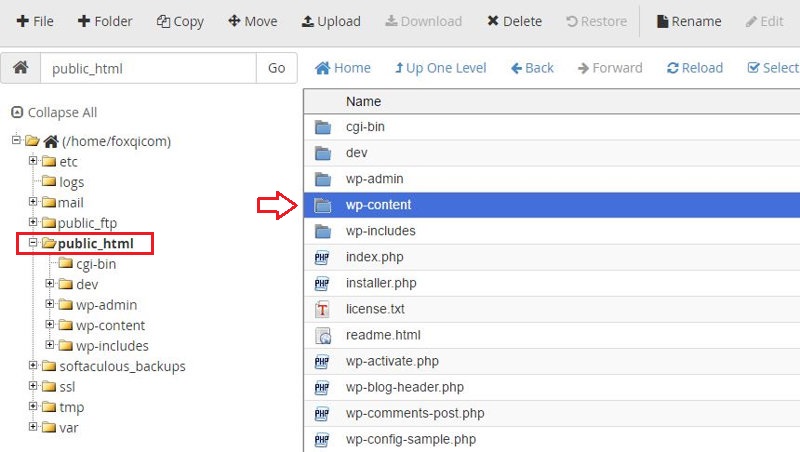
Within the wp-content directory, BackUpWordPress will create a directory to store the backup zip files it creates for your site. Open this directory.
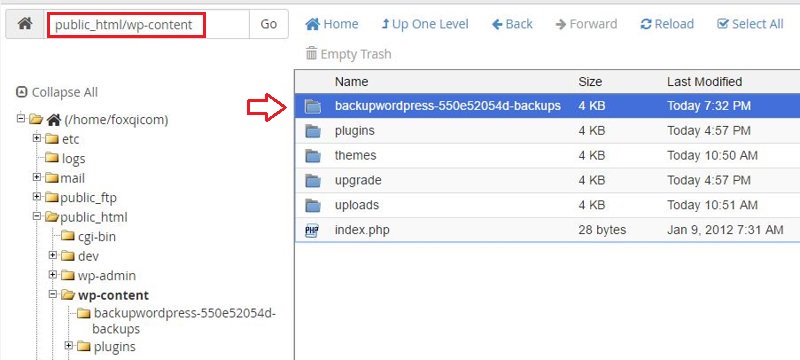
Step 3: In the previous tutorial, I ran two complete backups, so there will be two zip files, each containing the complete contents of our demo website.
In your case, just right-click the file with the date you want to restore and click Move.
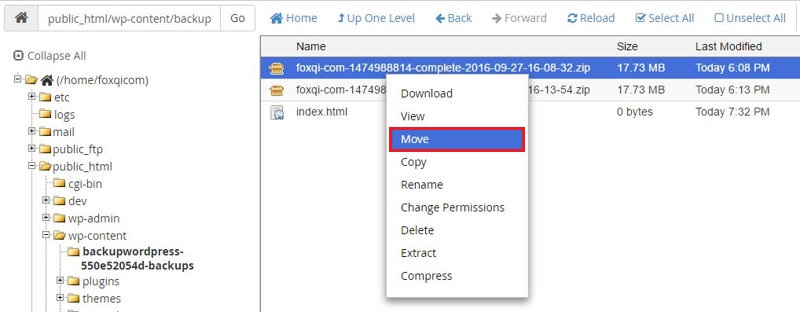
A modal window will appear. In the file path field, it will show you the full path to the file’s current location.
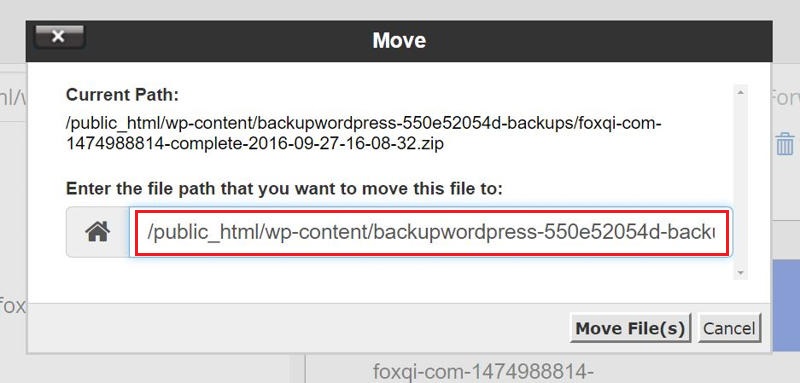
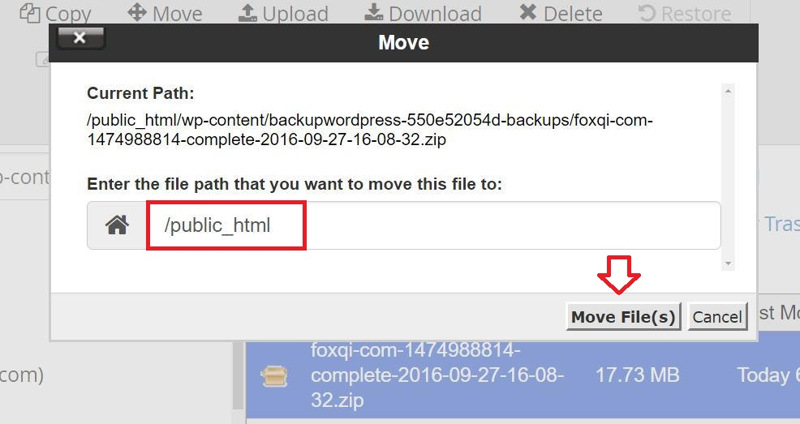
We want to move the file up two levels, so change the path so it only says /public_html and click Move File(s). This will move the zip file to your site’s root directory where we will extract its contents.
Step 4: Head back to the /public_html directory. Delete all contents in the /public_html directory EXCEPT the zip file and any directories containing complete websites.
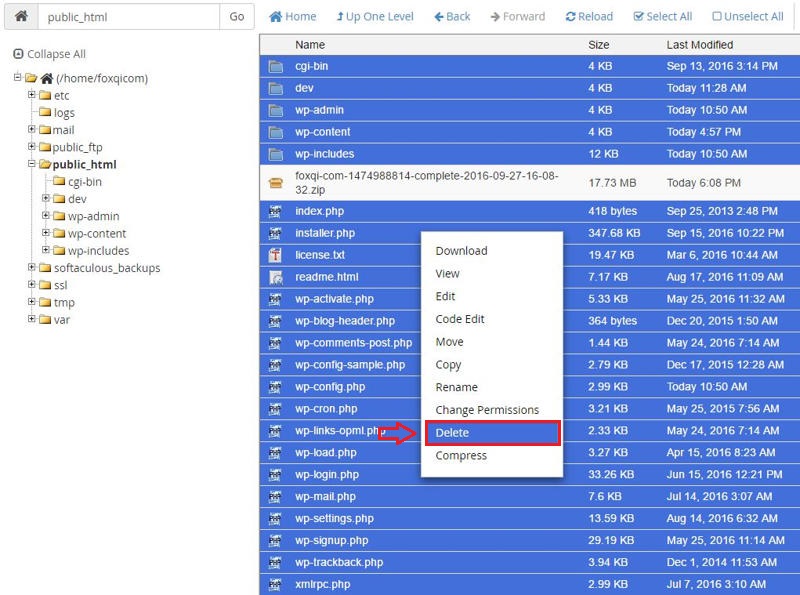
How did I highlight them, you ask? Easy.
- Click the first item in the list (cgi-bin), then hold down your Shift key and click the last item (xmlrpc.php).
- This will select the first and last items and everything between them. Now hold down the CTRL key (or Command key for Mac users ) and left-click the zip file to unselect it.
- Right-click any of the highlighted files and click delete.
Step 5: With only the zip file left in the public_html directory, it’s time to extract the goodies. Right-click the file and click Extract.
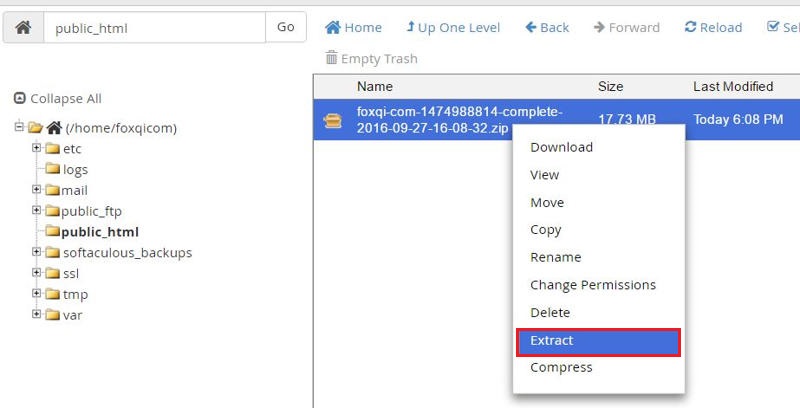
Another modal window will appear. Make sure the file path only says /public_html and click Extract File(s).
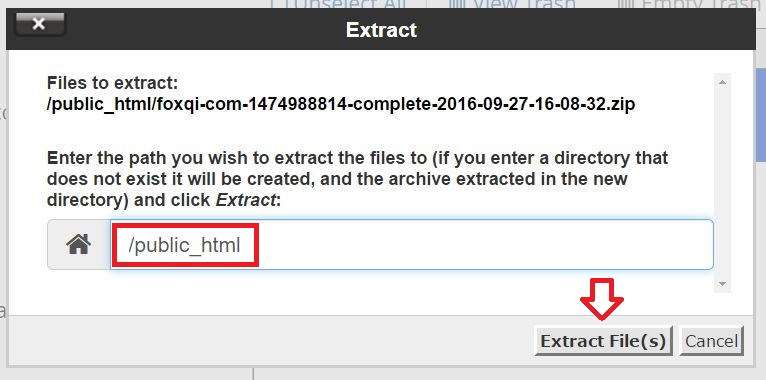
When you see the extraction results window, just close it.
Step 6: With the contents extracted, right-click the .sql database file and click Download.
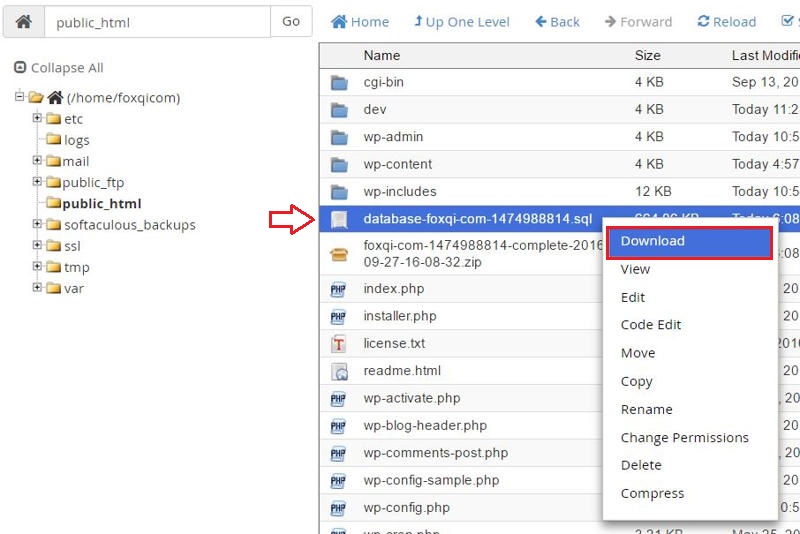
Once the download is complete, delete both the .sql and zip files from the /public_html directory.
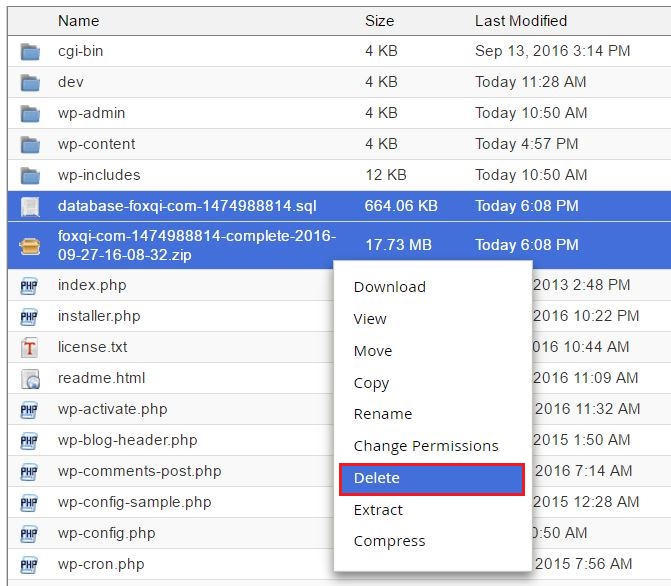
Step 7: While we’re at it, let’s grab your site’s database name. Right-click the wp-config.php file and click View.
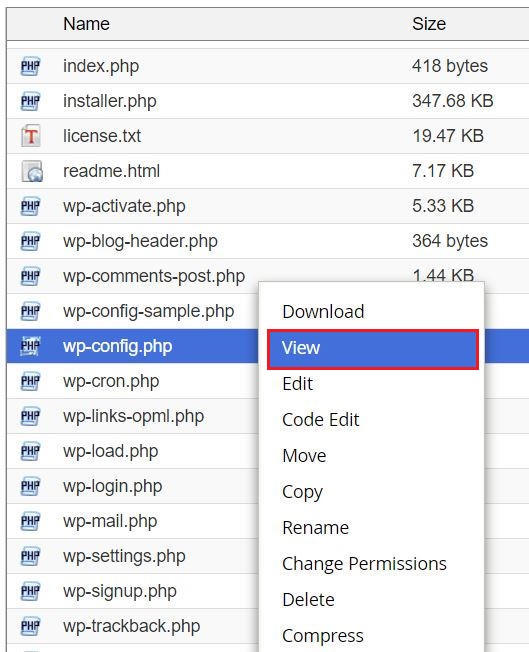
Scroll down the file contents until you see the following database details. Note down the database name. For our demo site, it’s foxqicom_wp597. We’ll need this information to identify the correct database in phpMyAdmin.
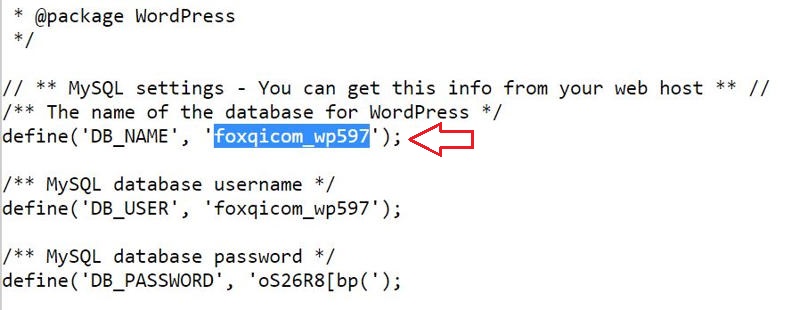
Step 8: Return to the cPanel dashboard, then locate and open the phpMyAdmin application within the Databases section.
In the panel on the left, you’ll see a list of available databases. I’ve installed two WordPress sites, so there are two databases. In my case, the wp-config.php file told me it’s the foxqicom_wp597 database I want to mess with. So let’s click that one and load its tables on the right.
Then click the Import tab.
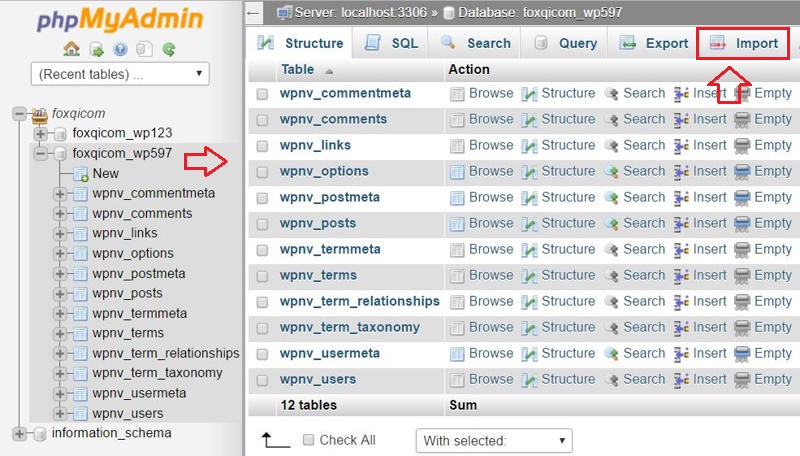
On the import page, click Choose File and upload your .sql database file. Finish by clicking the Go button.
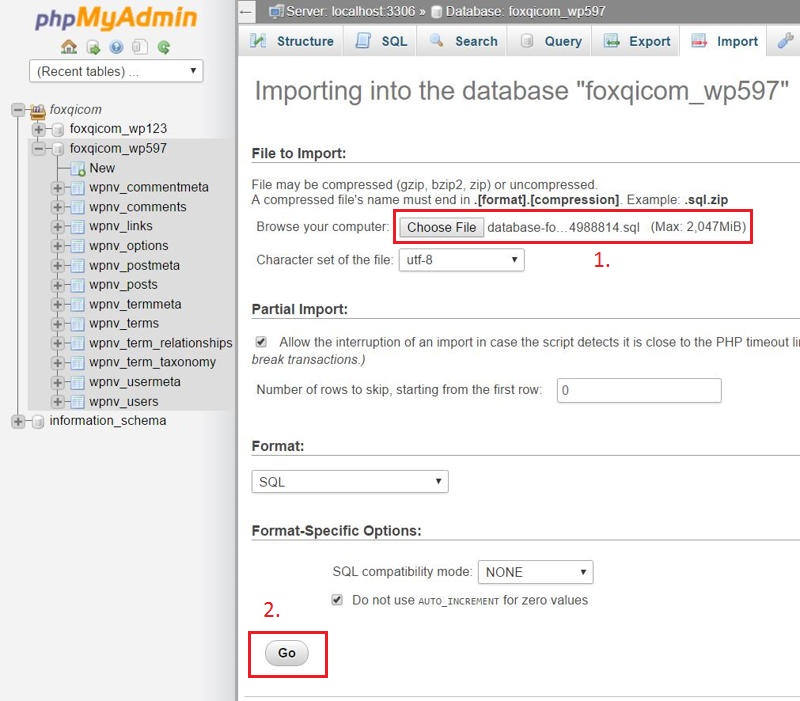
Once the import has finished, you’ll receive a success (or failure) message.

Not bad, huh? Good job!
Backups Via 3rd Party Service 1: VaultPress

The low-down:
- Cost: per website subscription plans start at $5.00-29.00 dollars per month
- Difficulty: fairly easy to setup
- Special requirements: you’ll need a WordPress.com account to sign up, and your hosting server’s FTP or SSH access details to enable one-click restores
- Automatic backups: yes
- Feature list: vaultpress.com/features/
VaultPress is a subscription-based backup solution worth considering and uses its own proprietary cloud servers to store your backups offsite.
So you can set it, forget it, and not have to worry much about losing hours of work from a site or hosting server meltdown, or you being locked out.
The people behind VaultPress are also the same people behind WordPress.com and popular WordPress solutions like the JetPack plugin and Akismet anti-spam service. Namely, Automattic.
This may also partly contribute to VaultPress’ popularity amongst WordPress professionals.
Connecting your site to the VaultPress service is done by installing the official plugin and entering your site’s registration key.
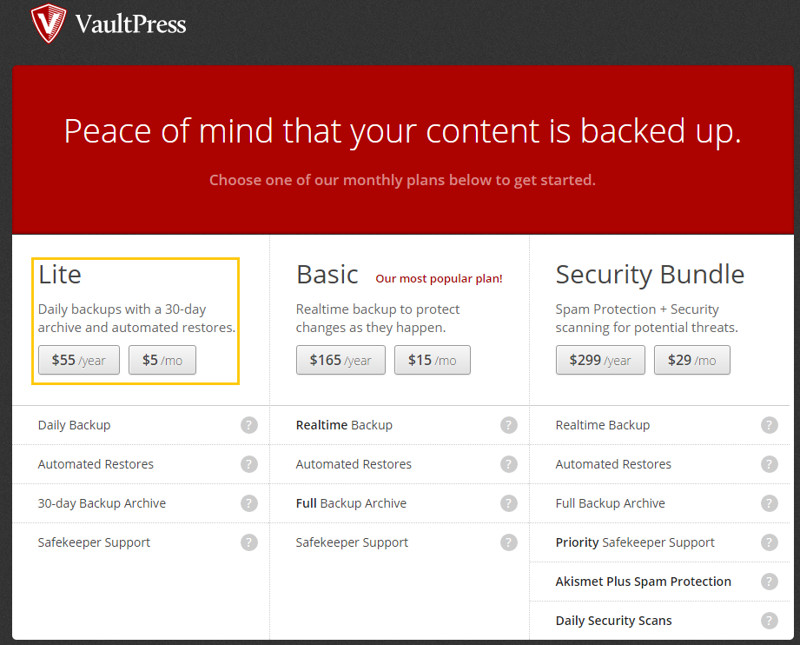
For casual users, bloggers, and small-to-midsize websites, the Lite plan at $5 per month should be just fine for peace of mind.
The Lite plan gives you a 30-day archive of backups, one backup for each day.
For large and active sites generating revenue, you should consider the $29-per-month Premium plan for the following key benefits:
- real-time backups
- automatic removal of detected malware
- priority support for any problems
Real-time backups mean that once VaultPress has made the first complete backup of your entire site, it will then start monitoring your site for all changes you make and will backup those changes immediately on the fly.
For those that want the sweet spot between the pricing of the Lite plan and the premium features of the Premium plan, VaultPress also comes with a Basic plan at $9 dollars per month.
This is particularly beneficial for very large sites as you would otherwise have to wait hours or days for every backup to complete.
To account for most users, I will carry out this tutorial purchasing a Lite plan for a WordPress site hosted with cPanel and FTP access.
VaultPress: Step-By-Step Automated Backups to VaultPress Cloud Storage (fairly easy)
My goodness. We’ve come far, don’t you think? But the journey isn’t over yet.
Time to backup your site with VaultPress. Here we go.
Step 1: Log into your WordPress admin dashboard, go to the Plugins page and click Add New.
Step 2: Search for “VaultPress” and the plugin by Automattic should appear as the first result on the left-hand side. Click Install Now and the plugin will be ready to activate shortly.
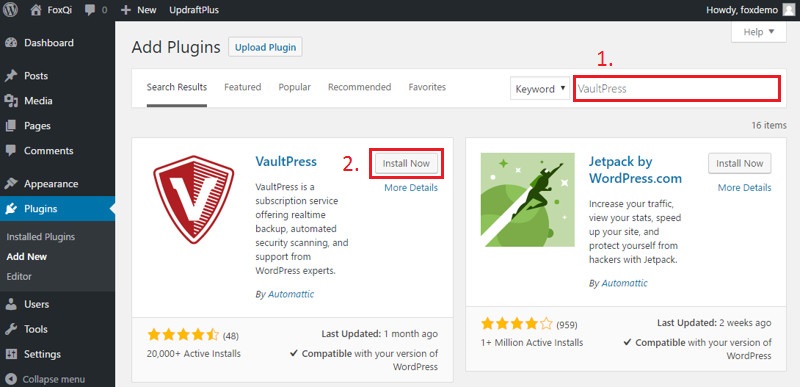
Following activation, a VaultPress admin menu item will now appear.
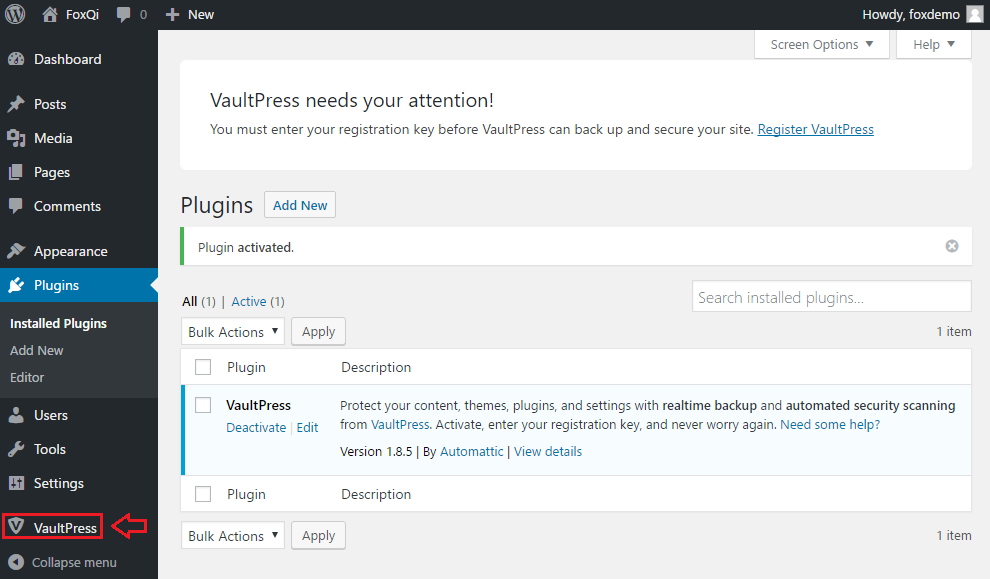
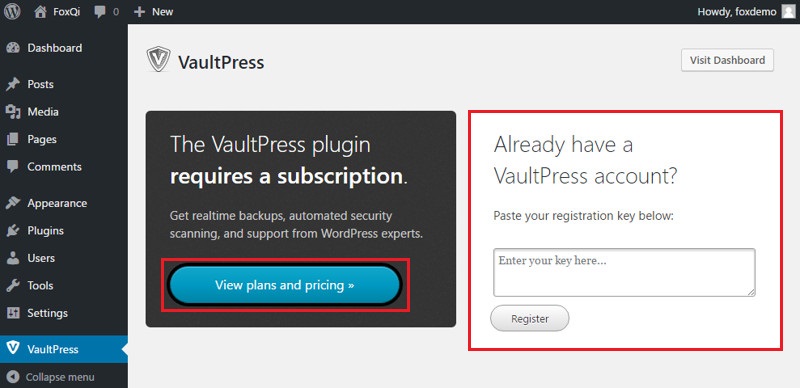
Clicking the menu item will take you to the VaultPress plugin page asking for the registration key you will need to purchase.
Let’s do this by clicking the View plans and pricing button.
On the plans and pricing page, I will choose the $5/month Lite plan. If you wish to pay annually or want more features, feel free to select your preferred plan and pricing schedule.
https://vaultpress.com/tryit/
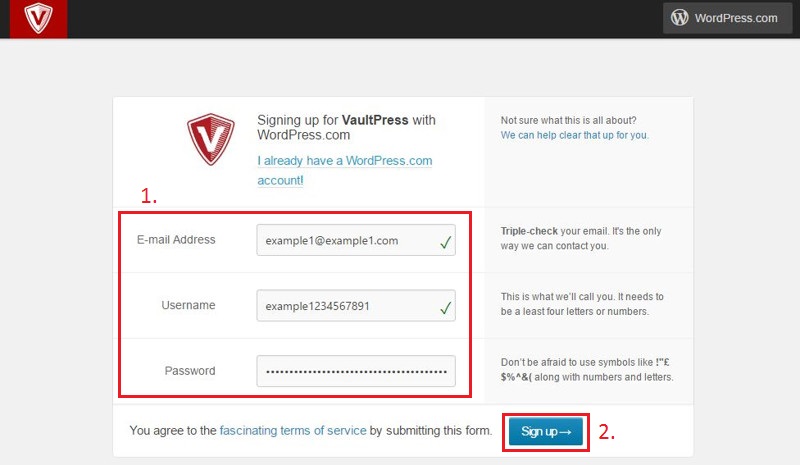
Step 3: Use your existing WordPress.com account if you have one, otherwise fill in the fields and click Sign Up to get a new account.
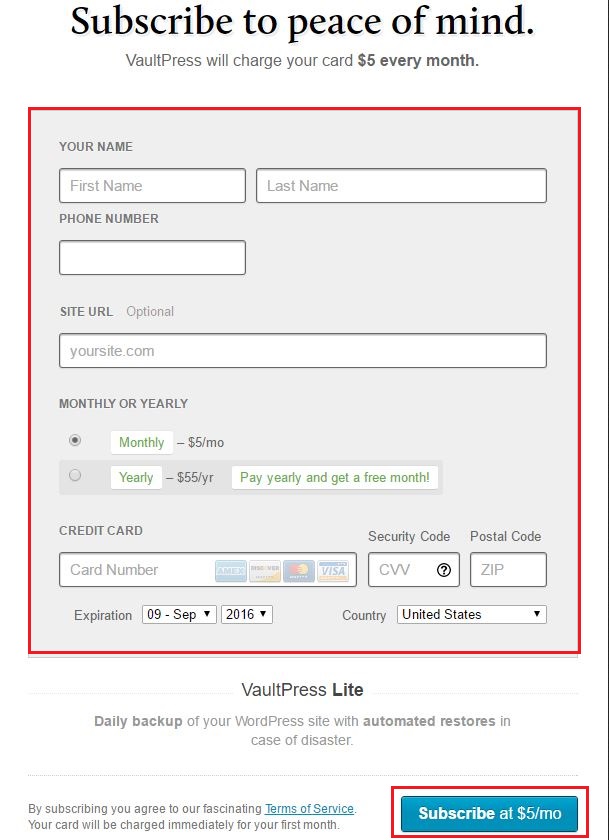
Step 4: Complete your payment details and click the Subscribe at $5/mo button.
Step 5: Following successful payment, VaultPress will then ask for the access details to your website’s server files. You can optionally skip this step, but you will need to provide this access for VaultPress to restore your backups.
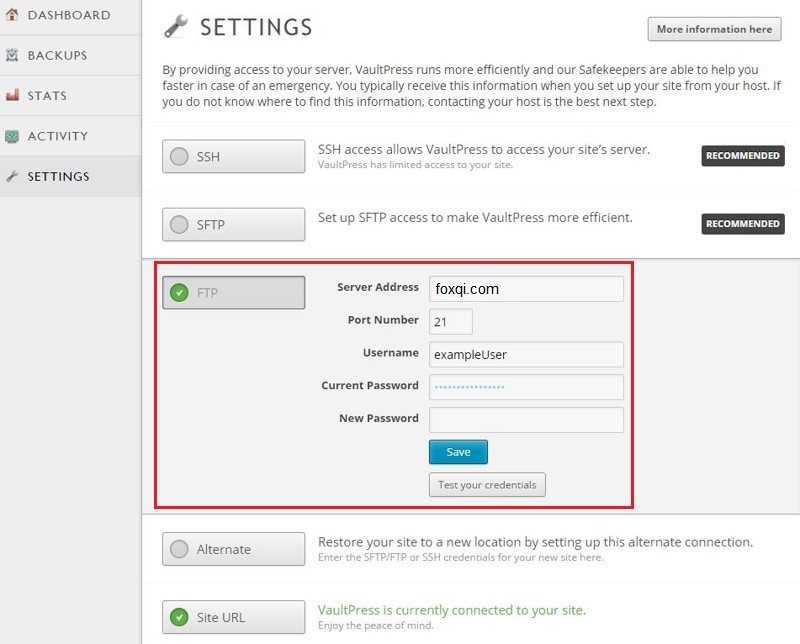
For our demo site, we’ll be using the most common form of access, FTP, which defaults to port 21. Fill in the details and click Test & Save.
For cPanel users, the username and password are usually the same as what you use to log into your cPanel account, while the server address is the domain name for the site you want to backup.
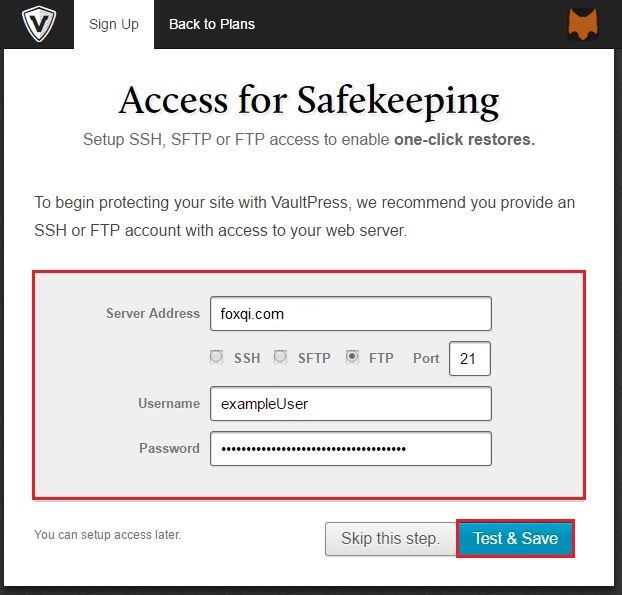
After clicking Test & Save, VaultPress will test and save the connection.
If you skipped this step and want to do it later, just sign into VaultPress and go to the dashboard page (https://dashboard.vaultpress.com/). Once there, click Settings.
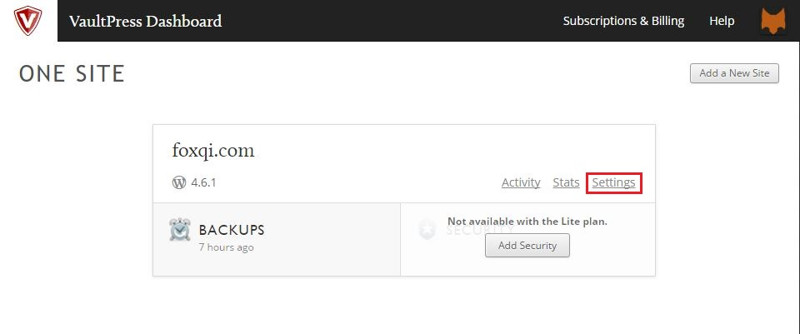
Select your preferred connection method (in this tutorial, FTP) and you’ll toggle a drop-down of input fields similar to earlier.
Step 6: Whether or not you skipped step 5, you will still get the following screen. Copy your registration key and click View Dashboard.
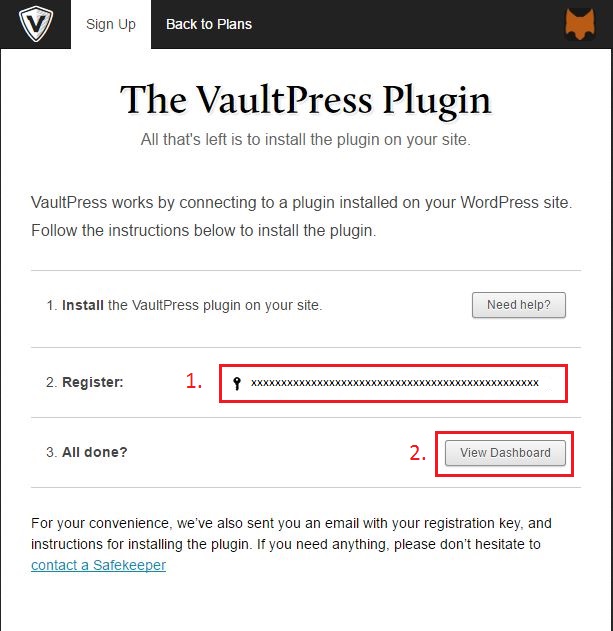
Step 7: You will be instructed to install the VaultPress plugin and register your key. So just return to the VaultPress plugin page on your site and enter your registration key and click Register.
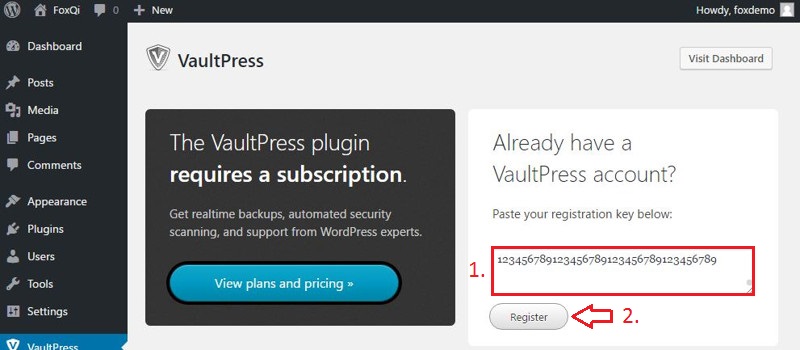
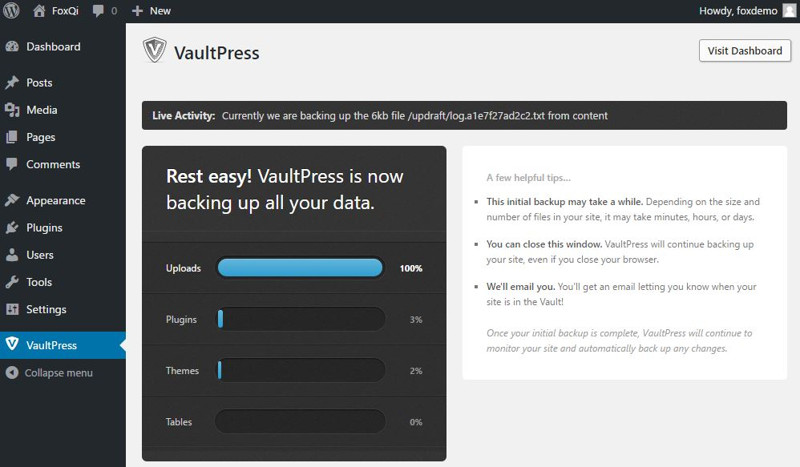
VaultPress will then launch the first backup of your site and will repeat this on a daily basis.
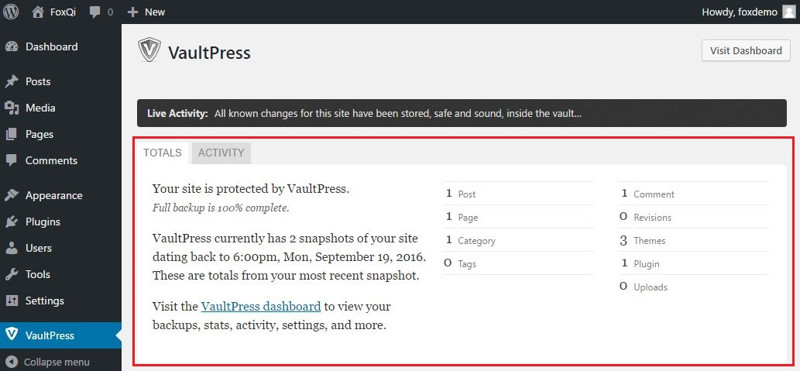
Once the initial backup is complete, the page will now show you an overview of what VaultPress has stored on the cloud servers.
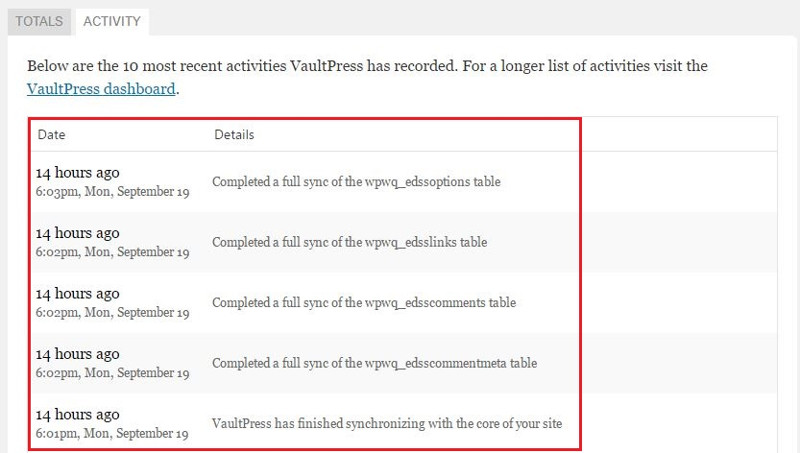
You can also see a brief list of the most recent tasks VaultPress has completed.
And we’re done here! Now for the restore.
VaultPress: Step-By-Step Restore (very easy)
Got your backups with VaultPress ready to go? Great. If you ever need to do a restore, it’s only a matter of a few clicks, nice and easy.
Step 1: Sign into your VaultPress account and you should be redirected to the dashboard. Once there, click the Backups button.
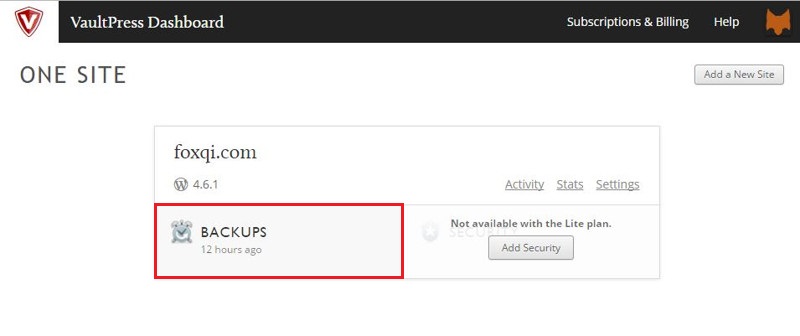
Step 2: On the backups page, you will see a calendar of backups taken by date, as well as a vertical list of backups in order of earliest to oldest.
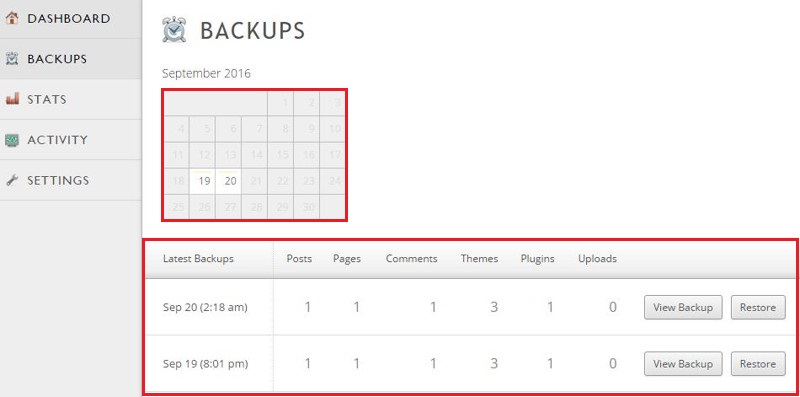
If you select an available date from the calendar, the list below will show the backup taken on that specific date.
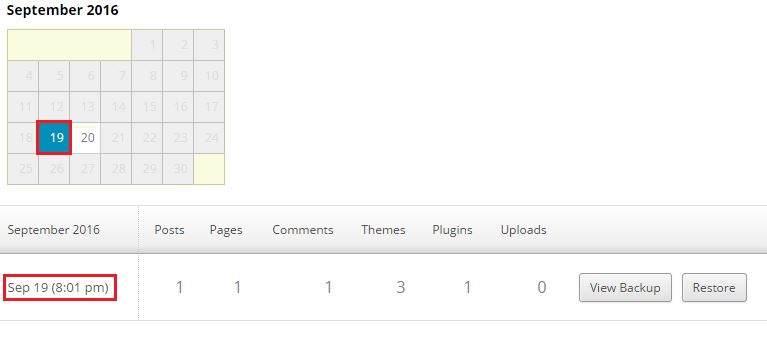
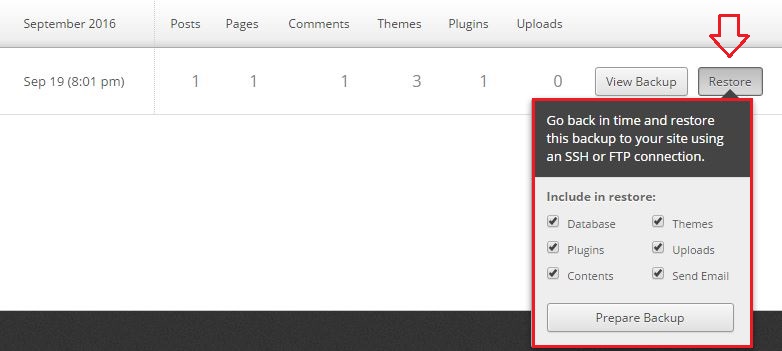
Once you’ve decided which date to restore, click the adjacent Restore button. In the box that appears, you can optionally uncheck any segment of your backup that you don’t want to restore, then click Prepare Backup.
VaultPress will proceed to test the connection to the server.
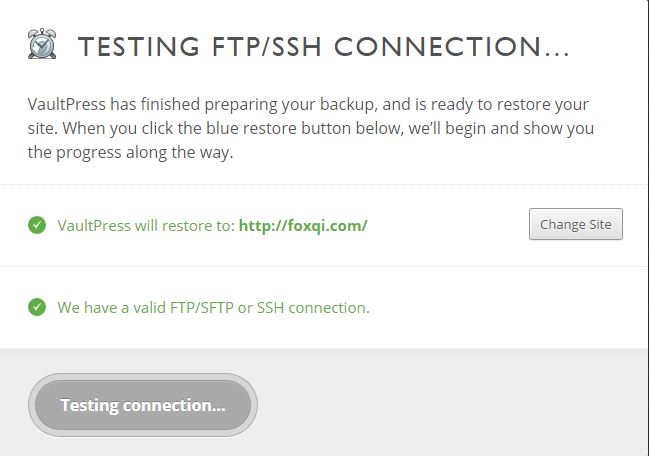
Once finished, the restore will begin.
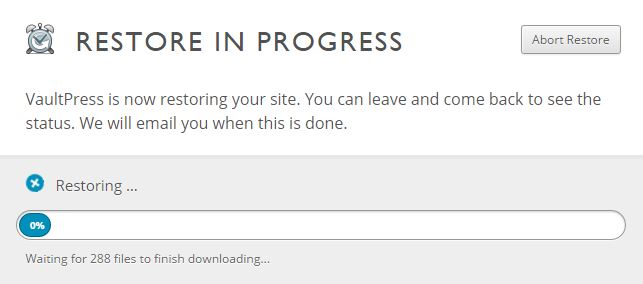
At the end, you will be informed by a success or fail message.
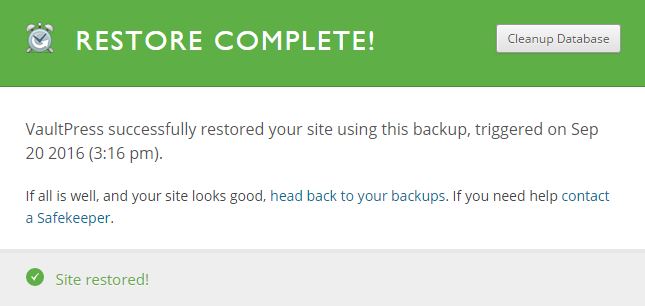
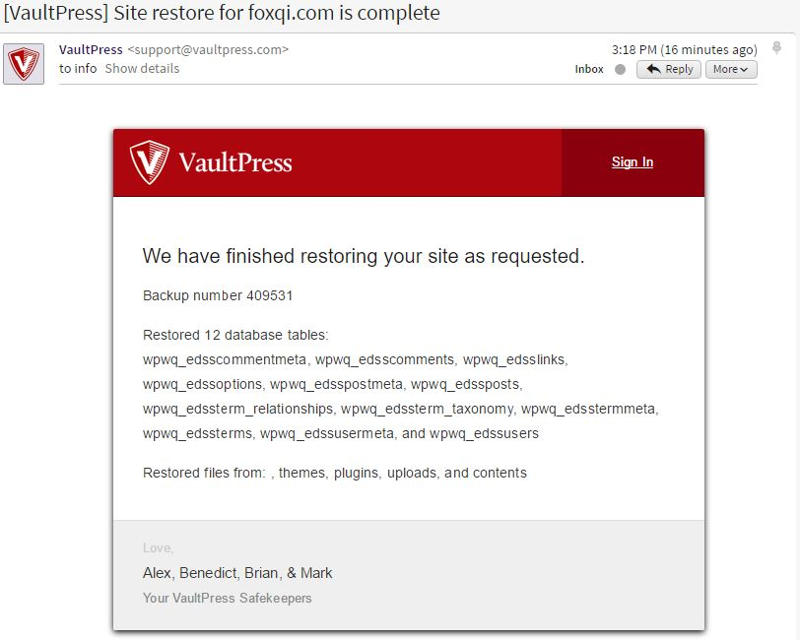
If all went well, then that’s it! Your website has been restored and you will receive an email confirmation.
Backups Via 3rd Party Service 2: CodeGuard

The low-down:
- Cost: subscription plans start at $49.00-299.00 dollars per month or $60.00-2,868.00 dollars per year
- Difficulty: easy to setup
- Special requirements: you may need a cPanel account or FTP client to upload CodeGuard’s plugin
- Automatic backups: yes
- Feature list: codeguard.com/pages/plans
CodeGuard is another automatic backup service that will give you peace of mind and is also an option worth considering if you’re looking for a similar alternative to VaultPress.
After connecting CodeGuard to your site using their official WordPress plugin, CodeGuard will carry out an initial complete backup of your site’s files and database, then run automated daily backups afterward.
Your site is also monitored for changes on a daily basis.
If changes to your site’s files and source code are detected, you will receive an email alert (you can configure which kind of changes will trigger these alerts) from CodeGuard’s ChangeAlert monitor™.
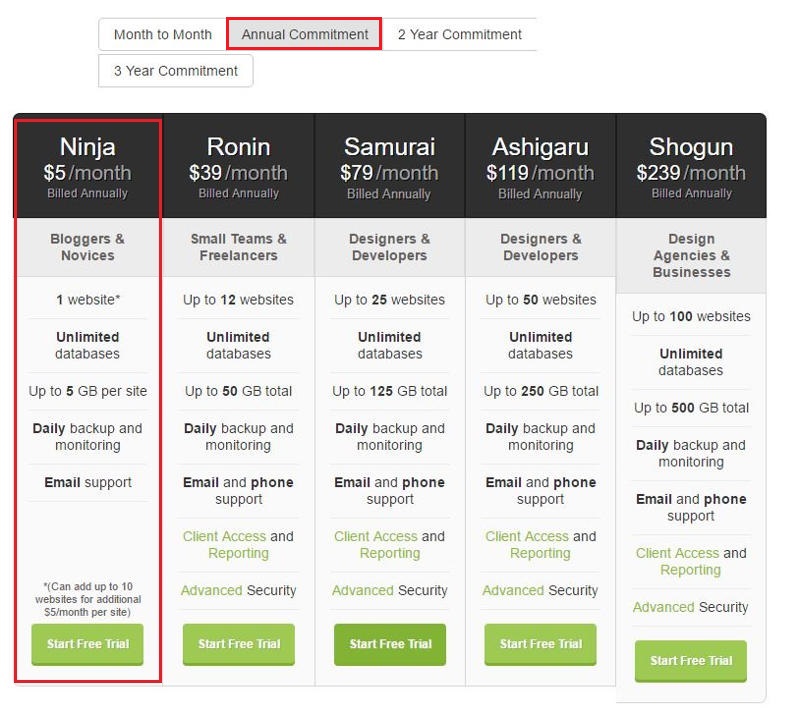
I will carry out this tutorial using cPanel and CodeGuard’s Ninja plan, priced at $60.00 for an annual commitment. You cannot pay month-by-month for the Ninja plan for the first website.
This plan is suitable for 1 site using less than 5 GB of space.
A maximum of 10 additional sites can be added for the cost of $5 per month for each new site you add.
CodeGuard WordPress Plugin Method: Step-By-Step Automated Backups to CodeGuard Amazon S3 Storage (very easy)
Let’s start out by installing CodeGuard’s WordPress plugin, then we will sign up for the Ninja plan and prepare our demo site.
Step 1: Go to CodeGuard’s plugin information page and click the download link.
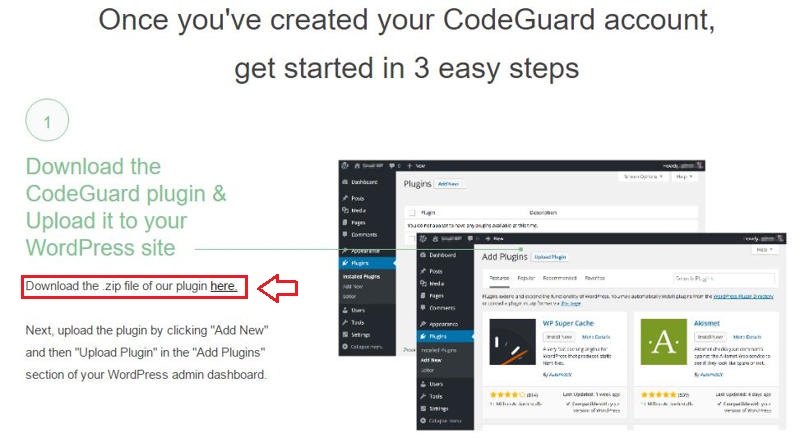
Step 2: Browse to the location you downloaded the CodeGuard plugin.
Step 3: We will now be uploading the plugin to your site. If you need more detail on the following steps, refer back to Step 4 of the cPanel File Manager restoring tutorial.
Log into your cPanel account, then locate and open the File Manager application within the Files section.
Step 4: Click the public_html directory to load its contents, then go to wp-content > plugins.
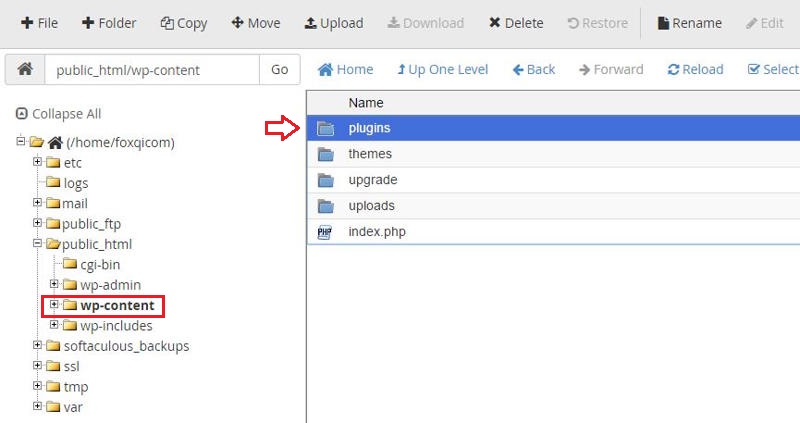
Once inside the plugins directory, locate and click the Upload button.
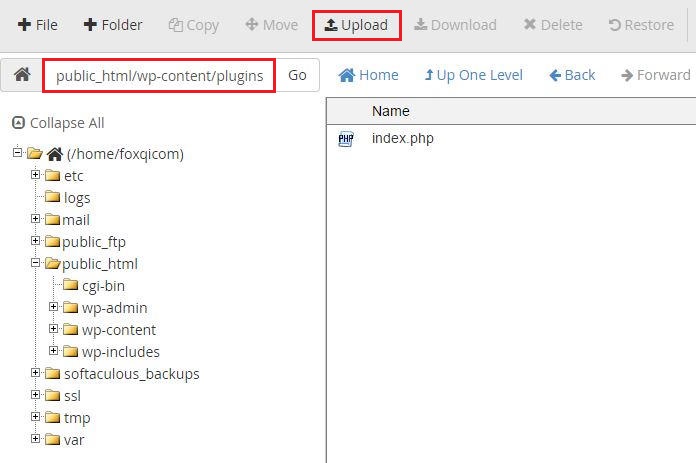
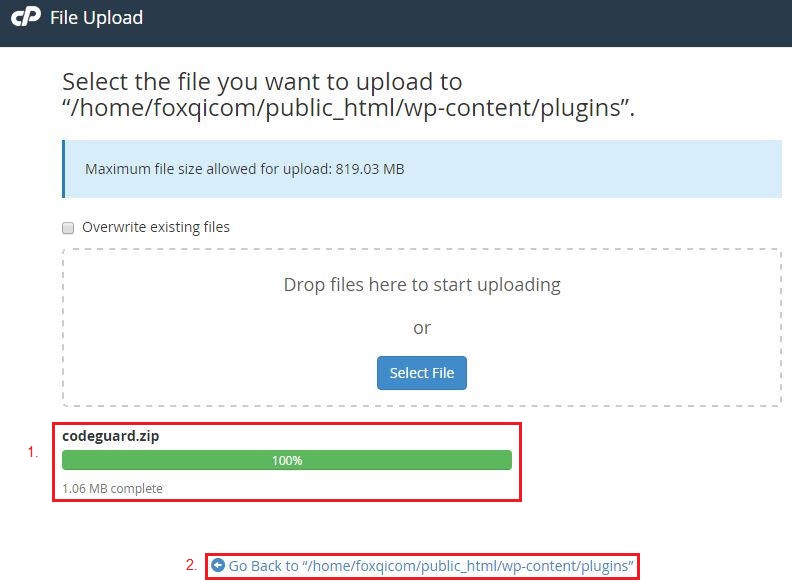
Step 5: Upload the CodeGuard plugin .zip file and then click the Go Back to “/home/<example>/public_html/wp-content/plugins” link.
Step 6: Right-click the plugin .zip file and click Extract.
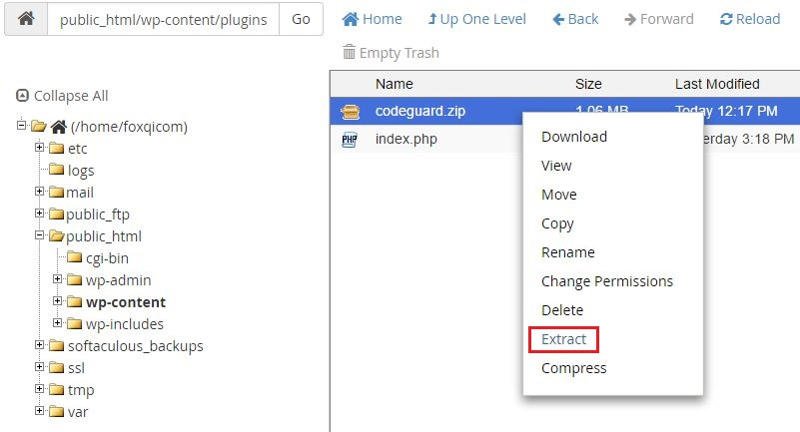
In the modal window that appears, just click Extract File(s) and close the Extraction Results window when it appears.
Step 7: Right-click and Delete the codeguard.zip file.
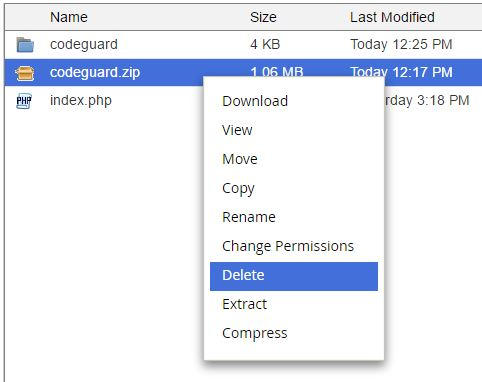
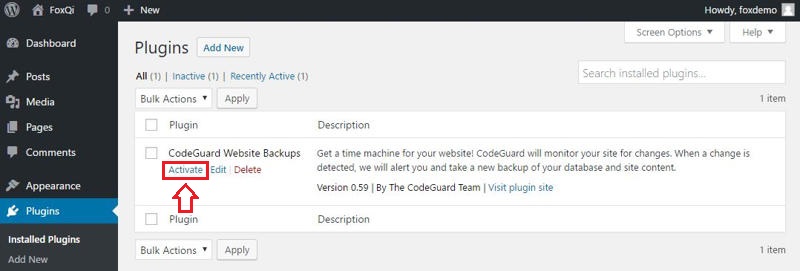
Step 8: Log into your site’s admin dashboard and go to the Plugins page. Once there, activate the CodeGuard Website Backups plugin.
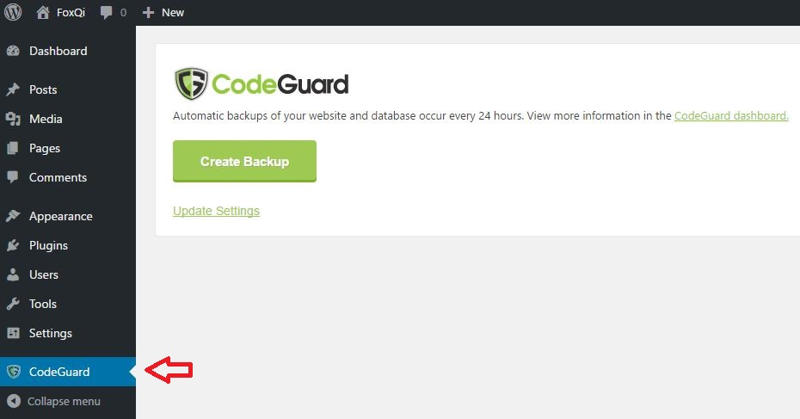
CodeGuard will get its own proprietary admin menu item.
Step 9: Go to CodeGuard’s service plans page.
With the Annual Commitment tab toggled, click the Start Free Trial button within the Ninja plan column.
Step 10: Complete your payment details to start the 14-day trial.
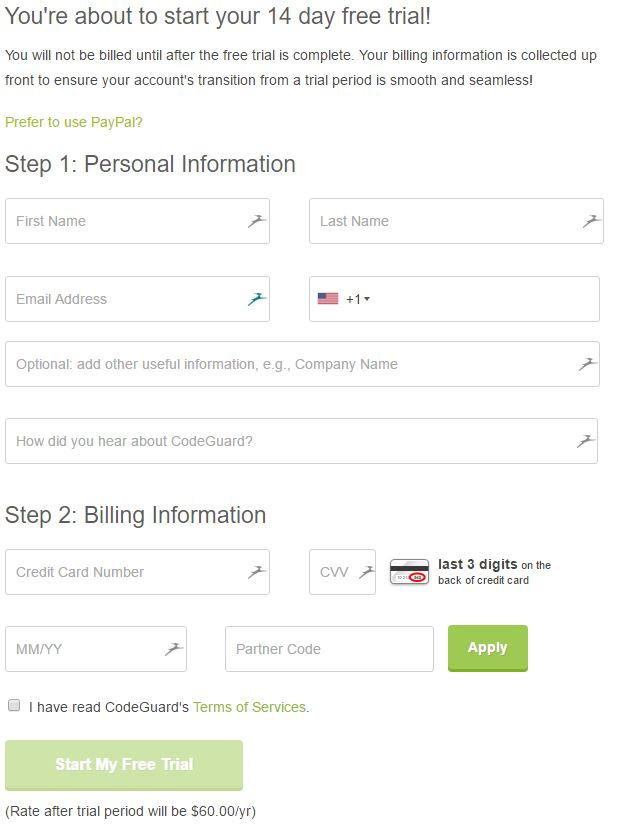
Step 11: Once you’ve successfully signed up, it’s time to add your site to CodeGuard and you should be automatically directed to the following page.
Click the ADD WORDPRESS WEBSITE button.
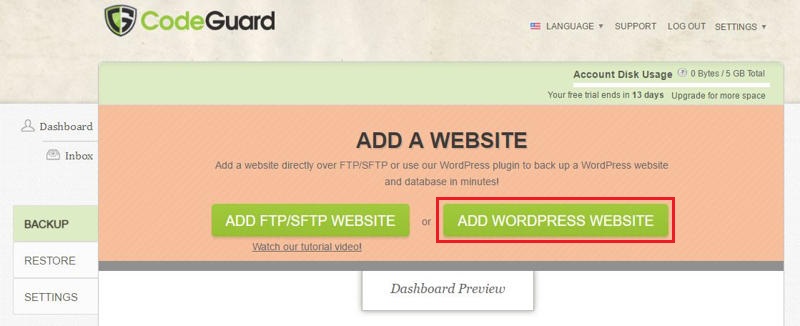
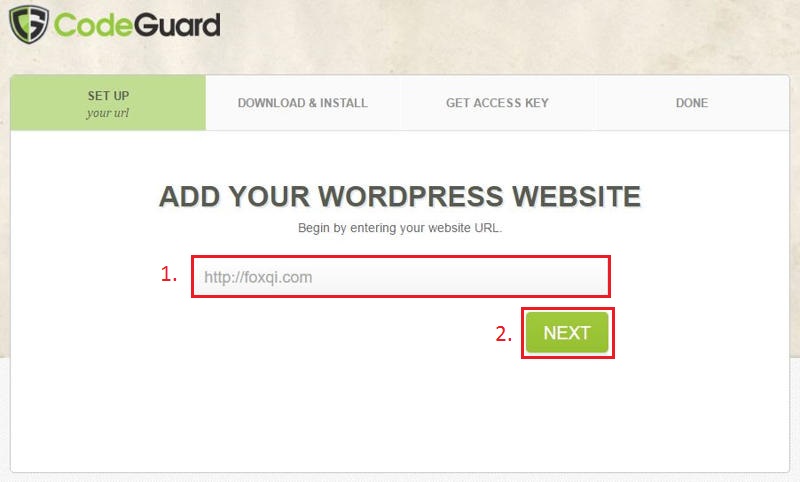
Step 12: Input your website’s full URL address and click the NEXT button.
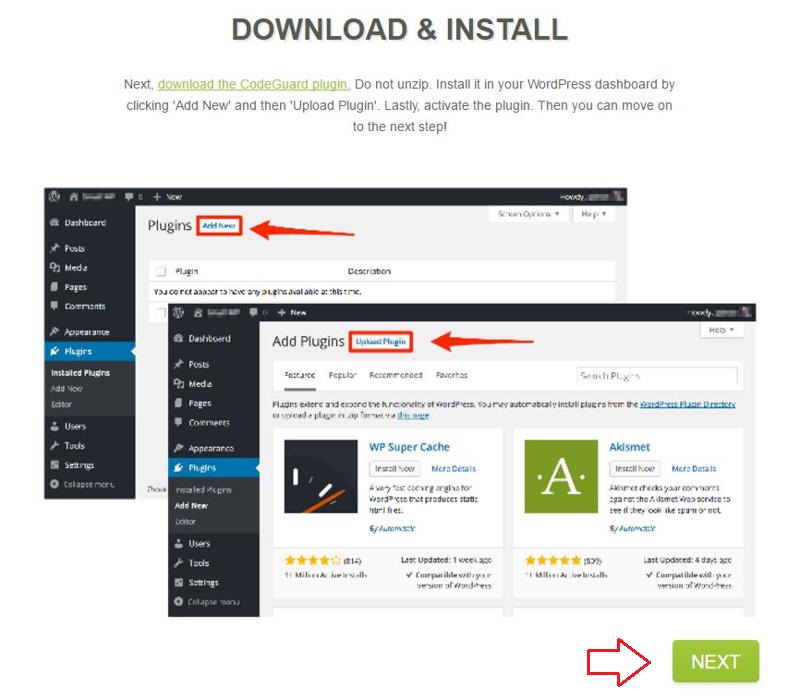
Step 13: On the following page, CodeGuard will ask you to install their plugin. We’ve already done this, so just click NEXT.
Step 14: On the next page, you will get your unique access key.
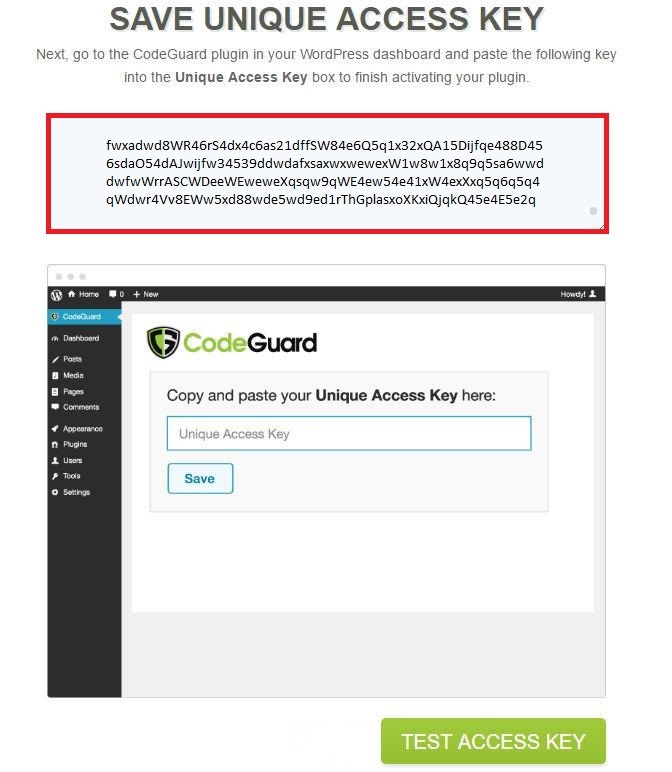
Copy the key, then open a new browser tab and go the CodeGuard plugin page in your site’s admin dashboard. Click the Update Settings link, enter your unique access key, and click Save.
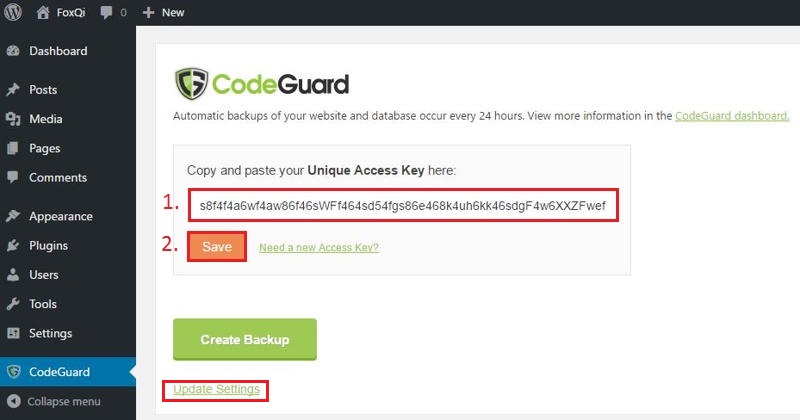
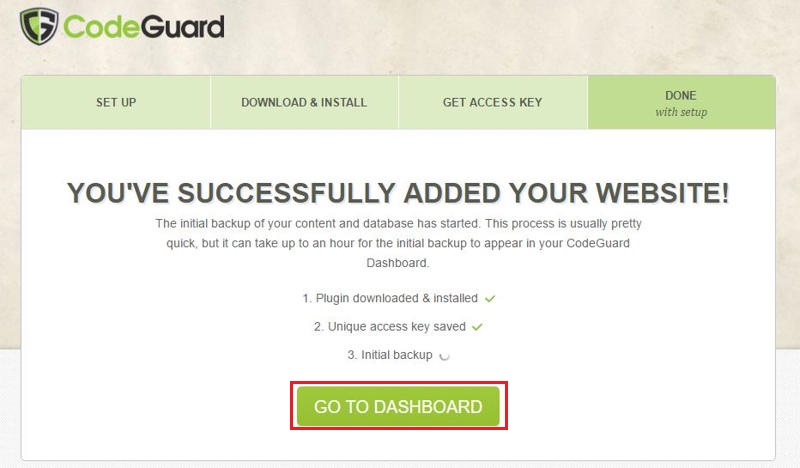
Step 15: Return to the unique access key page and click the TEST ACCESS KEY.
If successful, CodeGuard will launch the first backup in the background. So just click the GO TO DASHBOARD button.
On your CodeGuard dashboard, you will see an overview of your registered websites (in our case, just foxqi.com).
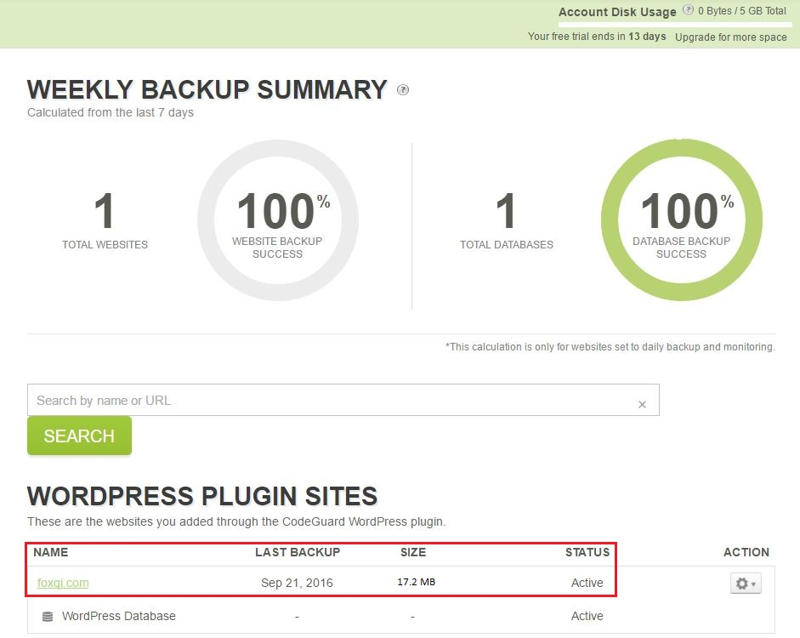
The SIZE column shows the combined size total of all backups made for foxqi.com.
Step 16: CodeGuard allows you to download a zip file containing a copy of your site’s wp-admin, wp-content, and wp-includes directories. In case you want to download these, click the foxqi.com link in the NAME column.
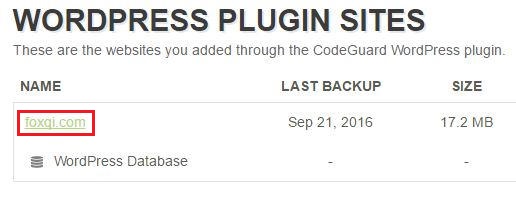
Step 17: On the Backup Schedule page, you will see a calendar overview of all available backups.
I’ve only had backups taken on September 21st so far. So I would click that date and then CodeGuard will display all available backups from September 21st on the right-hand side.
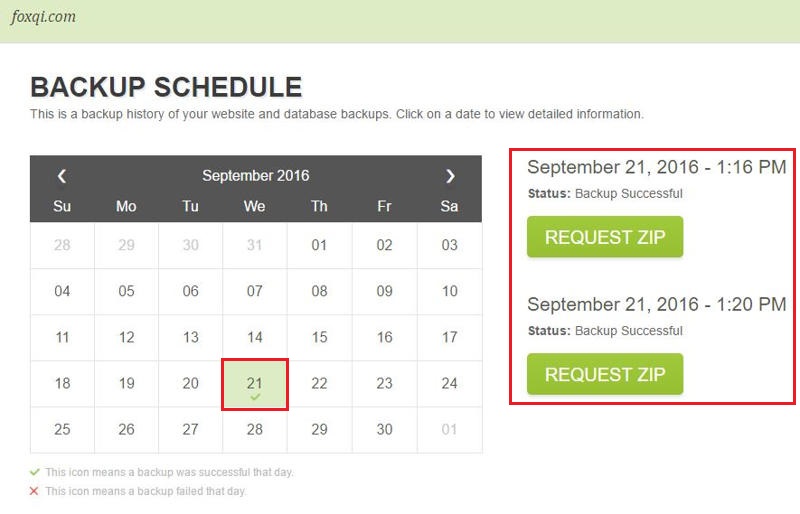
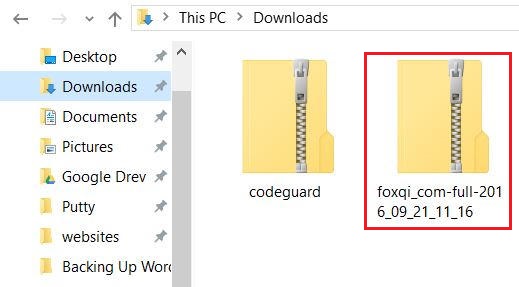
So let’s say I want the backup from 1:16 PM. I’ll click REQUEST ZIP and wait a bit.
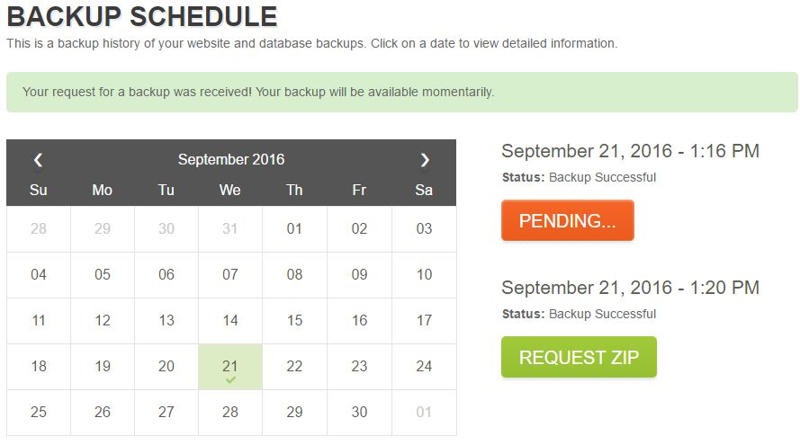
Once the zip file is ready, click DOWNLOAD BACKUP.
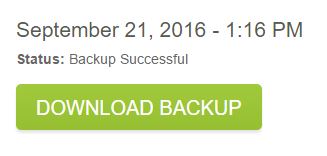
A copy of your site’s files is now ready for safekeeping.
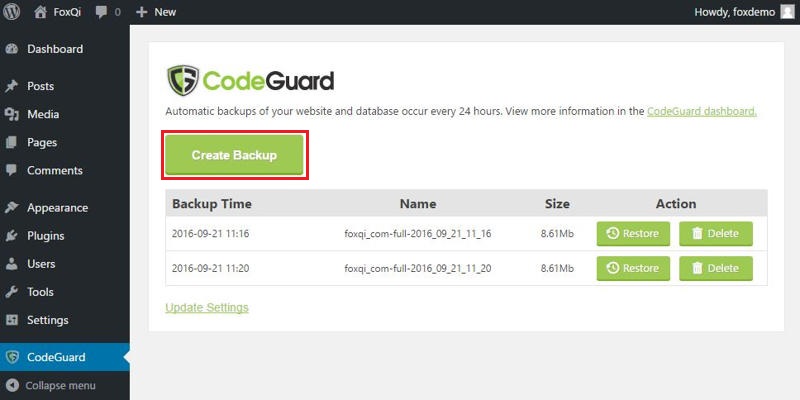
Step 18: CodeGuard will launch an automatic backup of your site once a day, but if you want to manually create a backup, you can very easily do this.
Log into your site’s admin dashboard and visit the CodeGuard plugin page again. Once there, click the Create Backup button.
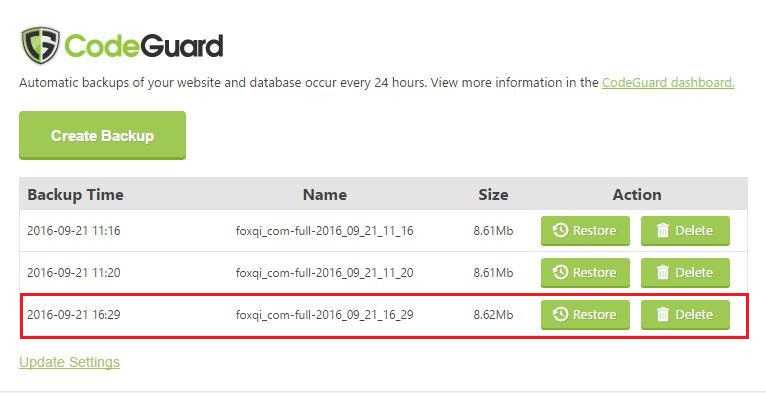
All you need to do now is wait for the backup to finish, and it’ll appear on the list.
Sweet, we’re done. Now let’s take a look at how to restore your website with CodeGuard next.
CodeGuard WordPress Plugin Method: Step-By-Step Restore (very easy)
Restoring with CodeGuard is very easy. The prior couple of screenshots pretty much reveals how to do it with one click.
Step 1: Log into your admin dashboard and head to the CodeGuard plugin page.
Step 2: Decide on which date you want to restore, then just click the adjacent Restore button.
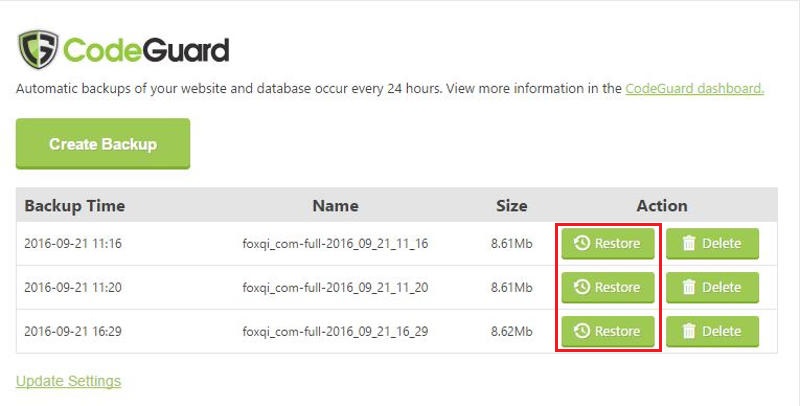
You will get a message that your site is being restored shortly. Now simply wait for the restore to complete, and make sure you don’t make any changes in the meanwhile, as they’ll be reversed.
We’re at the end of the journey. Wow. “Backup” is not exactly the word I’d ever think I would end up writing so many times in my life.
 [/thrive_2step]
*Phew*. You made it to the end! High-five!
If you’ve already been backing up your WordPress sites, please let us know in the comments below what solutions you’re using.
And if this guide was helpful to you at all, we’d super appreciate you giving it a share.

Leave a Reply