Okay, so you’ve got a WordPress website but probably haven’t done much—if anything—to secure it. Am I close? Yeah? Then I’ve got a special treat for you with this awesome beginner’s tutorial to WordPress security. So get ready, friend, and let’s do this.

In this tutorial, I will take you through a mix of basic and intermediate tricks you can use to strengthen your WordPress site’s security.
While I say “intermediate,” don’t worry, because I’ll cover all of it in a step-by-step fashion.
At the end, your site will enjoy stronger protection from malicious attacks, and you’ll be prepared for future security posts covering more advanced tricks.
Oh, and without ever having written a line of code, you’ll build your very own super simple WordPress plugin without breaking a sweat. Slick, huh?
Take action now so you can prevent your site getting hacked and exploited and having to sort out the mess afterward. As one of the U.S. Founding Fathers (Benjamin Franklin) once said, “An ounce of prevention is worth a pound of cure.”
Being the most popular blogging tool and website content management system available today, WordPress is naturally a huge target for hackers and spammers.
In 2012, some sources claimed over 170,000 WordPress sites were hacked.
While a number like that seems alarming, just keep in mind most of us are still needles in a massive haystack. There were over 74 million WordPress sites in 2014, and likely millions more today.
But regardless, some needles do end up being found, so securing your site is critical for protecting your reputation, content, users, customers, and to avoid yourself ending up in the next security statistic.
As website owners, we have some responsibility towards making the web a more secure place for everyone.
[thrive_2step id=’1509′] [/thrive_2step]
I love Jeff Starr’s work over at Perishable Press and DigWP. Being a great developer and renowned WordPress security expert, he rightly emphasizes that real security happens in layers. Every additional layer you implement makes your site more secure.
This means you don’t really create strong security by using an all-in-one security plugin, switching a single setting somewhere, or copy/pasting a miracle piece of code.
You create it with a holistic approach which includes thinking about:
- Your computer and network connection
- Browsing the internet securely
- Good password management
- Having a quality hosting provider
- Managing your site’s files securely (e.g. using SFTP instead of FTP)
- And, finally, tightening your WordPress site’s security
I’ll let you in on a small secret, though: it’s impossible to make any website 100% bulletproof, and sheer bad luck can strike the best of us.
Why? You see, hacking methods get more sophisticated with time and new vulnerabilities are always being discovered in the various software we use.
That’s why a big part of web security always comes from keeping yourself educated as a user and making sure your website and hosting provider is up-to-date. This way, your site will be shielded well against most attacks and exploits.
If you take the time to apply the things I’ll walk you through in this tutorial, you should have very little to worry about as a general WordPress user.
All right. Ready to dig in? Here’s what we’ll cover:
Toggle Table of Contents- Why You Need to Backup Your Website
- Preparing Your Starting Point
- How to Change Your Password
- How to Protect and Hide Your Username from Enumeration
- Three Tricks for Protecting Your WordPress Login Page
- Why and How to Disable Admin Theme File Editing
- Maintain Security by Always Keeping Your Website Up-to-Date
- Protect Your WordPress Website from Malicious Crawlers with Blackhole for Bad Bots
- Adding Simple Firewall Protection to Your WordPress Website with Block Bad Queries
- How to Check Your WordPress Site’s Integrity with Look-See Security Scanner
- Stay Up To Date with WordPress Security News
- Share / Sign Up / Comment (We Appreciate It!)
Why You Need to Backup Your Website
Most WordPress users I’ve spoken with, have never backed up their sites.
But if I could only give you ONE tip, it would be to start frequently backing up your website as soon as possible. At least once daily or weekly for most sites.
While having backups can’t undo any external damages caused, or any sensitive data a hacker or script might’ve stolen from your site, it can definitely help reverse any damaged or malicious files leftover and help you get back on your feet quicker.
It gives you a second chance to go back, make things right, and minimize your chances of being hacked again.
If you want to learn how to backup your WordPress site, check out our step-by-step beginner’s guide. I highly recommend you do this before you move on with this tutorial so you can restore your site if anything goes wrong.
Preparing Your Starting Point
For this tutorial, I have set up a brand new installation of WordPress on a hosting cPanel account, and we’ll secure this demo site from scratch.
It also runs on an Apache web server, which is what most hosting providers will give you by default.
So if you’re just starting out, you should have barely any trouble following along, but I will assume you know how to access your cPanel account.
If you’re uncertain about your web server or how to access cPanel, make sure to ask your hosting provider.
Choose Your Hosting Provider Carefully
One of the most important first steps you can take to boost your site’s security is choosing a quality WordPress web hosting company that cares about providing decent support and protecting their customers.
The point here is to start out with a secure foundation for your site. That’s why my team decided to create a fully-managed WordPress hosting solution exclusively for our clients.
It saves us and our customers a lot of headaches not only from a security standpoint but also in terms of performance and not having to experience your site dropping offline every week.
Start by bookmarking Michael Bely’s extensive hosting resource over at ResearchAsAHobby.com.
Here’s a list of hosting companies from Michael’s site that my team, partly out of customer support experience, also strongly agree you should stay away from.
And here’s Michael’s list of hosting providers you can safely consider instead.
Our own recommendations at different price tiers are (in order of least to most expensive):
- SiteGround (decent hosting provider for beginners)
- Lightning Base (managed WordPress hosting)
- WPX Hosting (managed WordPress hosting)
- Pressidium (managed WordPress hosting)
- Kinsta (managed WordPress hosting)
I’ll end by saying the one company we’ve had to “rescue” people from frequently, and arguably the one you’ll hear mentioned and promoted almost everywhere, is Bluehost. (Surprise, surprise!)
So when you read the next money-hustle blog article recommending you sign up with Bluehost—using the author’s slick affiliate link of course—run the other way.
Seriously, pull a Usain Bolt and sprint as if the livelihood of your business depended on it.
Use A Complex Username and Password
When you install WordPress, especially using cPanel installer software, make sure NOT to use “admin” as the username.
“Admin” is often pre-filled in the username field, and if you also end up using a weak password, like 987654321 a hacker using an automated login script will eventually be able to break into your site very easily.
To give you a basic idea, what follows is the login activity log for one of the sites we manage.
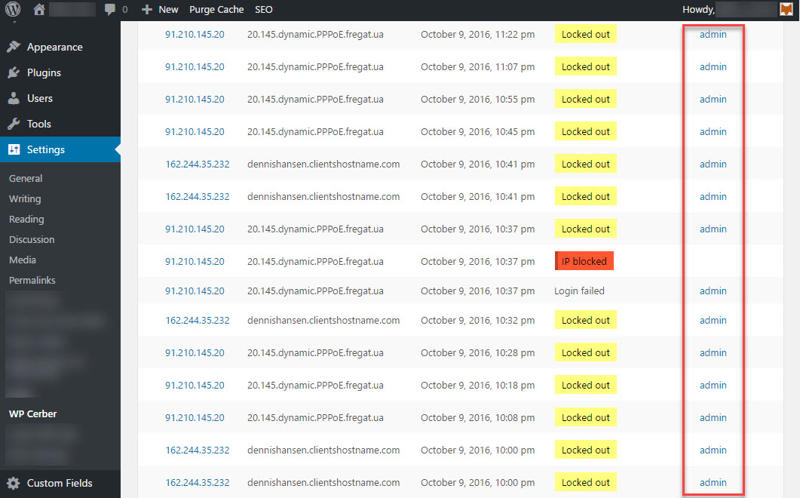
What you see is a very mild form of what are called brute-force attacks, or in this case a brute-force login drip attack as Jeff Starr would describe it. These kinds of attacks are carried out by repeatedly trying to guess your username and password until successful.
In the above example, an attempt is made to log in using “admin” as the username every handful of minutes. But it can get as bad as many attempts per second, which can reduce your site’s performance.
Once you’re using strong login credentials, performance is really the biggest concern with brute-force attacks as opposed to your details being randomly guessed.
An example of a much better username would be: @david_user
An example of a strong password no one will guess: Gx6Q7eXx"13A4#64Fv1t#47x+A
Alternatively, you can also use a passphrase as your password, which is easier to remember. For example: 56 Butterflies Will Make Me Beautiful
Make sure your passphrase isn’t something that’s used in regular conversation. Make it out of the ordinary and at least 5-6 words long.
Also, don’t use the password for your site anywhere else and vice versa. Your passwords should be unique.

I’ll visit HowSecureIsMyPassword.net for a second and plot in the above password:
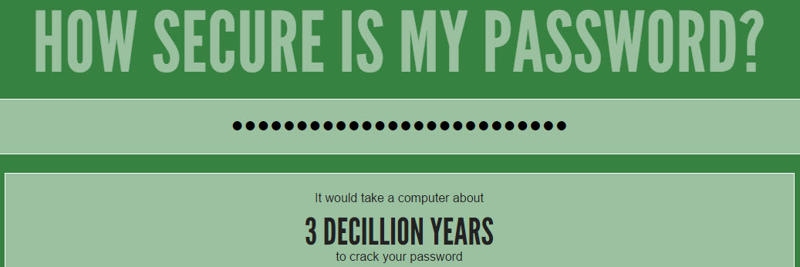
3 decillion years, baby. Now we’re talkin’.
But chances are you’ve already installed your site using admin and maybe a weak password. So let’s change that.
By default, WordPress does not allow you to change your login username from the dashboard. So to do this, we’ll need to create a new administrator account with a new username that will replace your existing account.
Step 1: Log into your admin user account on your WordPress site.
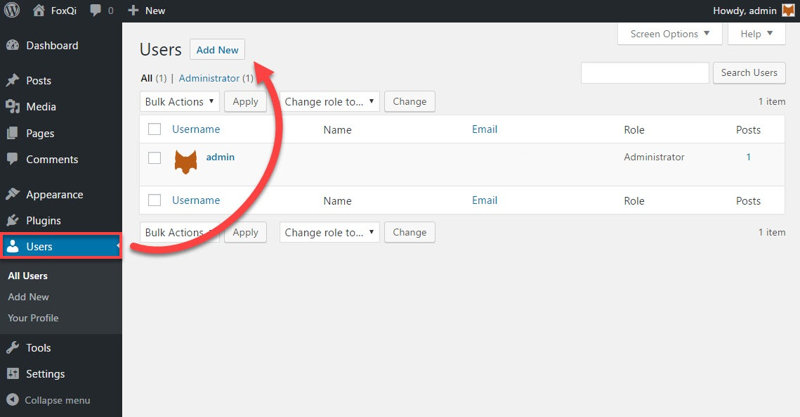
Step 2: Go to the Users admin page and click Add New.
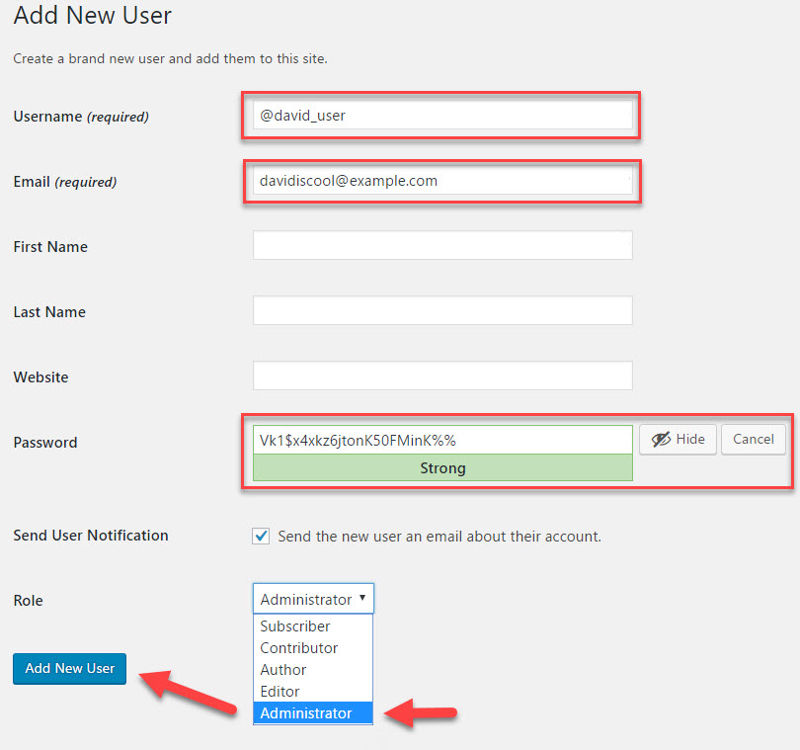
Step 3: Fill out the required fields (replace @david_user with your own desired username) and click the Show password button which will reveal the complex password WordPress has generated for you.
Copy and save the password on your computer.
Optionally choose if you want WordPress to email you brief details about your new account, then make sure to select Administrator from the Role drop-down and click Add New User.
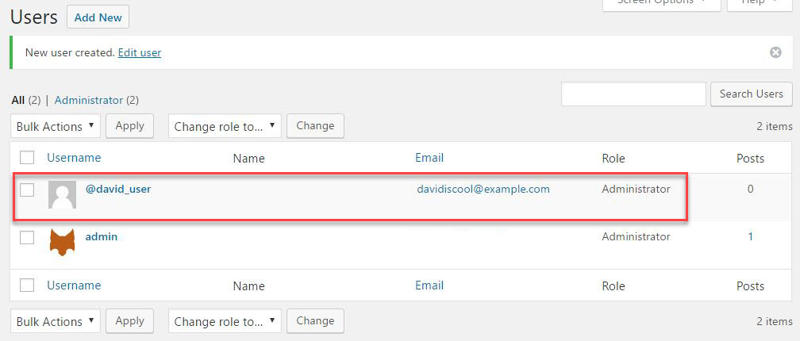
Your new administrator account is now ready.
Go ahead and log out of admin and then log into your new @david_user account.
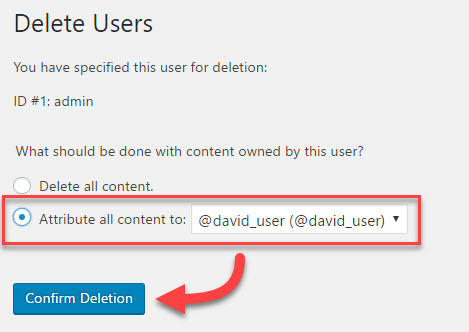
Step 4: Go back to the Users admin page and Delete the admin user.
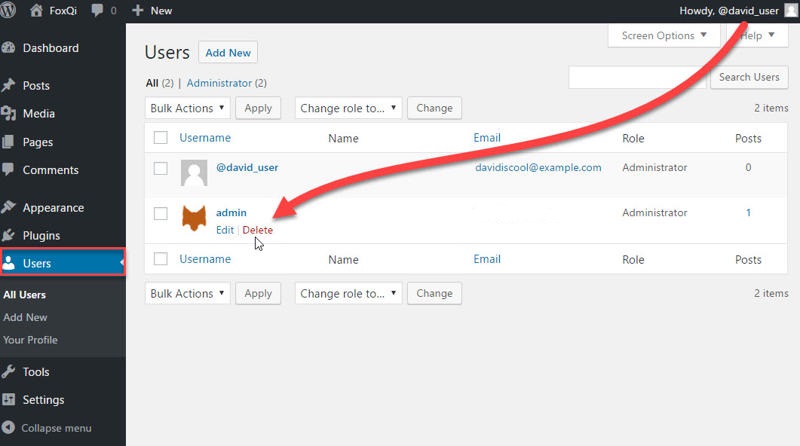
Attribute admin’s content to your new @david_user account and click Confirm Deletion.
A Word on Choosing Themes and Plugins
As a WordPress site owner, the four most important things you should be concerned with for security are:
- having a security-conscious web host
- using strong login credentials
- always keeping your site up-to-date
- using high-quality and secure themes and plugins
So let’s talk about the last point.
Many themes and plugins available today were not created by developers who firmly understand best practices for quality code and security.
In fact, one-fifth of the top 50 most popular plugins in 2013, were found to contain at least one of only 5 high-risk vulnerabilities they were tested for.
Even WordPress security companies will sometimes put out vulnerable software by mistake, or they may not know how to effectively protect their customers’ sites against certain threats.
Also, many free themes around the web were created by people with malicious intent. All in all, this means you have to keep on your toes and do a bit of homework before picking a theme or plugin for your blog or business.
If you’re a beginner and looking for free themes and plugins, then make sure to only download them from trustworthy sources, such as:
- the official WordPress theme repository and plugin repository
- a theme or plugin shop that also sells premium products
As addressed by Codeinwp in this article, you can end up paying a steep price if you’re not careful where you get your free theme from.
When choosing a theme or plugin, you should also check:
- if it’s supported and periodically updated
- if it has favorable reviews from other users (if it’s brand new, however, you may have to take a chance if you can’t find an alternative)
- if the developer is active and has a history with other themes/plugins
From the WordPress repository, here’s an example of a high-quality plugin that is periodically updated, has an almost flawless rating, and was created by developers with several other plugins under their belts:
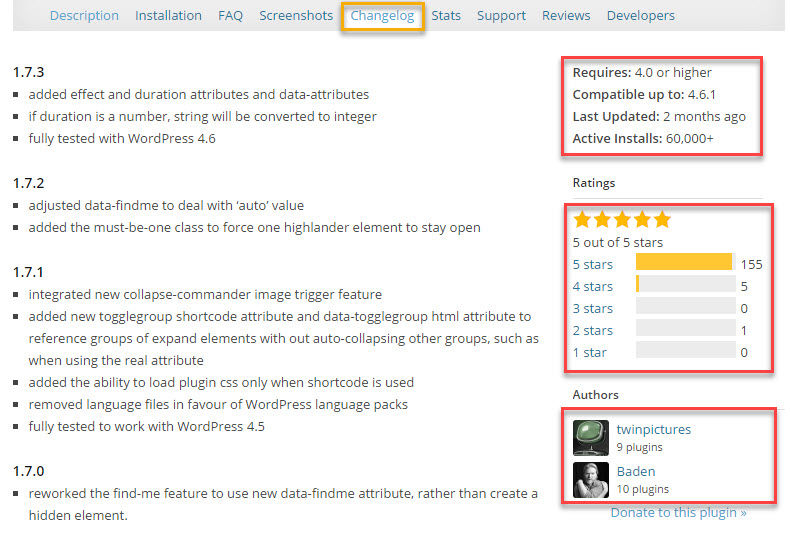
That is a plugin I would definitely consider using.
And here’s an example of a plugin that will push me to look for alternatives. It hasn’t been updated in a long time, is poorly rated, and the author appears to have abandoned it:
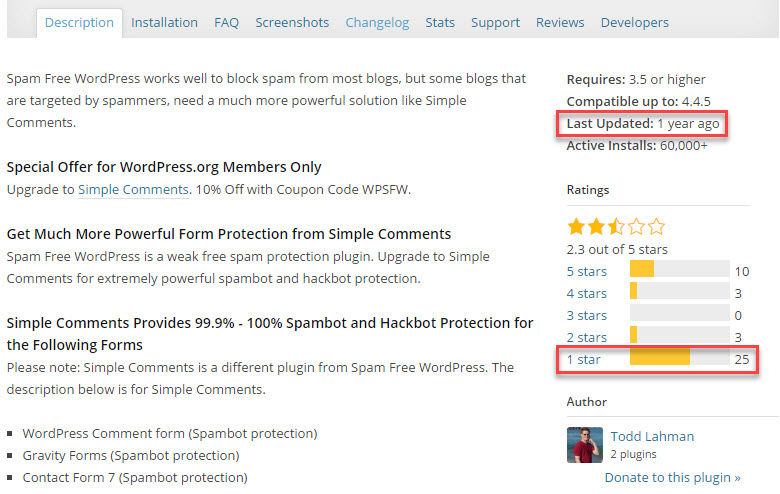
I will always make sure to check why a plugin has received so many poor ratings. Also, a plugin that hasn’t been updated in a while doesn’t mean you shouldn’t use it.
Some plugins are so simple they don’t really need to be updated often, yet will continue to work for years without security issues. But you should always make sure to:
- check what other people have said about the plugin
- check if there are well-supported alternatives you can use instead
Finally, this is an example of a plugin you should just stay away from:
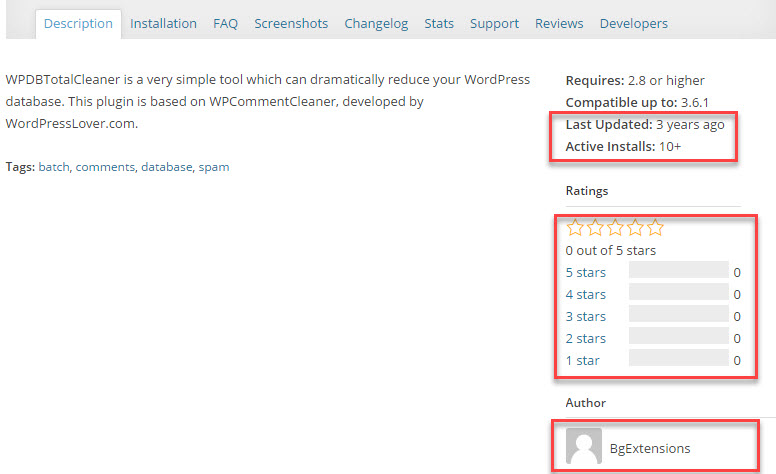
It hasn’t been updated in years, barely anyone is using it, there are no ratings, and the author’s profile is deactivated.
Should I Remove My Existing Security Plugins?
If you’re using one of those plugins made to be the “only security plugin you’ll ever need,” then I suggest you remove it before following along, so you avoid creating conflicts.
Popular examples of these include:
- Acunetix WP Security
- All In One WP Security & Firewall
- BulletProof Security
- iThemes Security
- Shield WordPress Security
- WordFence Security
There are some problems with all-in-one security plugins you should be aware of:
- They usually feature an overwhelming number of options and functionality, many of which you’ll never use because you may have no idea what they do
- You’re putting all yourin one basket, so if there is a big conflict between the plugin and your remaining setup, you may have to deactivate the plugin and lose all protection
- They may make claims of protecting your site from specific attacks, which their plugins instead fail to do
- Because of their massive and complex codebase, these plugins may themselves come with overlooked vulnerabilities
- Some of these plugins will make extensive changes to your site’s root .htaccess file, which sometimes leads to crashes, conflicts, or a mess when you try to get rid of the plugin later
I don’t use these plugins for my personal sites or for any sites in our care. And with a little bit of security know-how… you won’t need them either.
Instead, I recommend you combine a set of lightweight and efficient plugins that were designed to effectively solve specific problems. I’ll show you some of our favorites.
Creating Your Own Security Snippets Plugin
If you’ve never written a single piece of code in your life, don’t freak out. I’ll be right here with you.
Yup, you’re going to create your very own WordPress plugin—a quick and simple one for your site—from scratch, and I’ll guide you each step of the way.
There are a few reasons I want you to do this:
- I will be sharing a few security code snippets you can apply to your website
- By keeping these snippets separate from your WordPress theme files, you won’t have to worry about updating or changing your themes and losing your code
Let’s kick off!
Step 1: Open a blank document using an editor like Notepad (Windows) or TextEdit (Mac). (For TextEdit, make sure to use plain text format.)
NOTE: If you’re comfortable with a code editor, then use that of course.
Paste the following code into your editor:
If you copy and paste directly into your text editor, the two lines of text at the bottom may sandwich together.
Use your enter key to add more room between them.
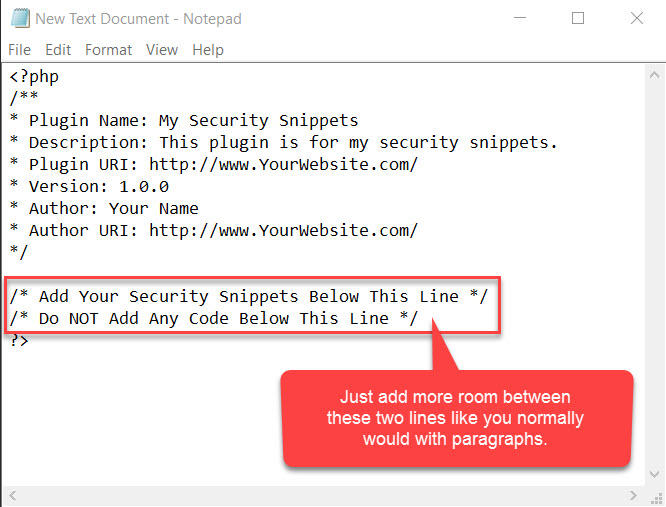
When you’re done, it should look like this:
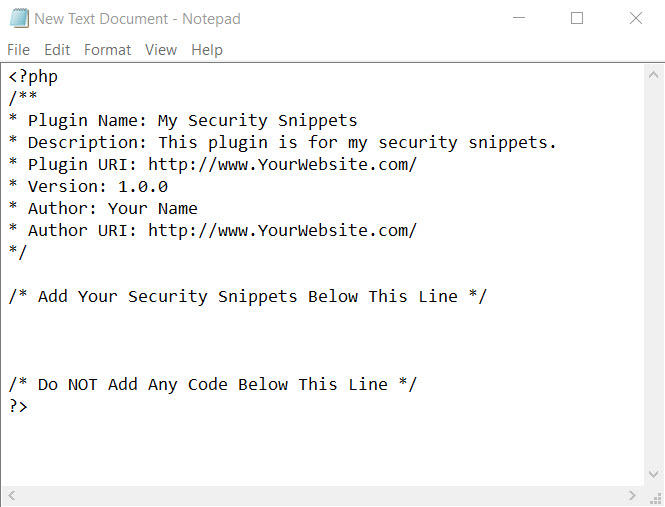
This text tells WordPress:
- To identify the document as a plugin
- The name of the plugin and its author
- What the latest version of the plugin is
- Where to link the plugin and author to
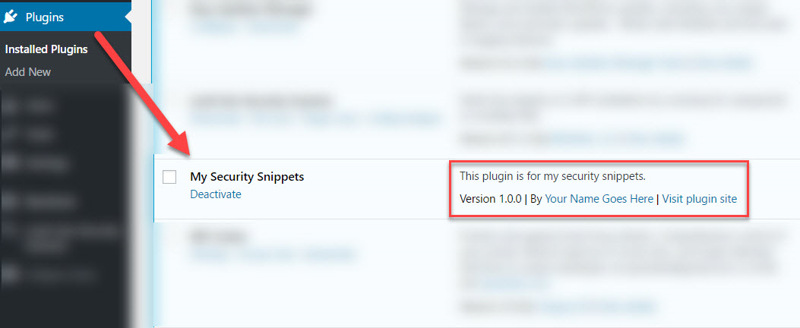
When ready, save the document as my-security-snippets.php.

The heart of your plugin is now complete, so let’s get it up on your site and ready for use.
Step 2: Log into your cPanel account.
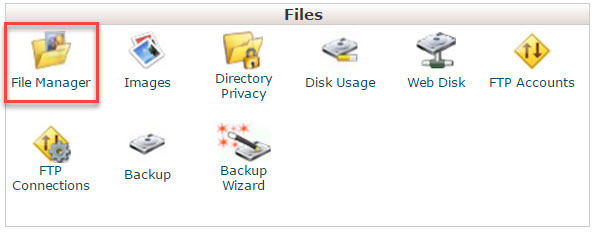
Locate and open the File Manager application within the Files section.


On the left-hand side, you’ll see a list of directories for your cPanel user account. We want to find your website’s root directory, which is typically called public_html.
Click on public_html to load its contents, then locate and double-click the wp-content directory.
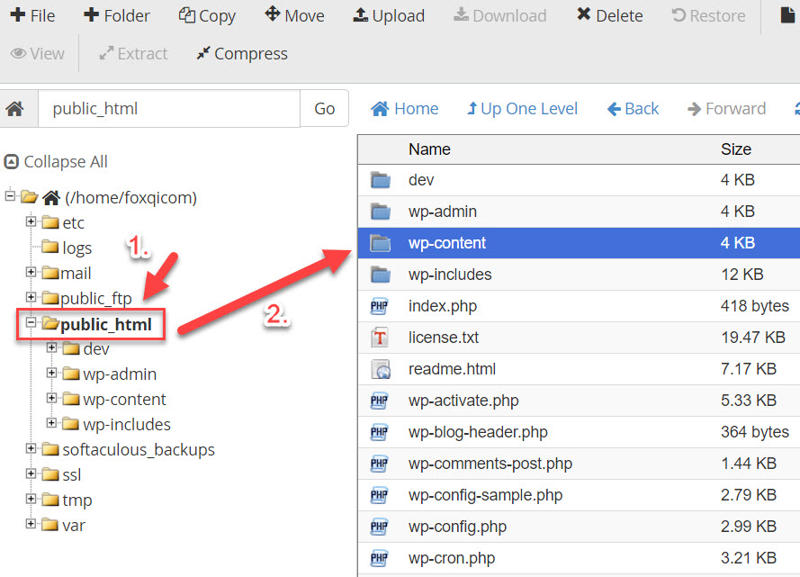

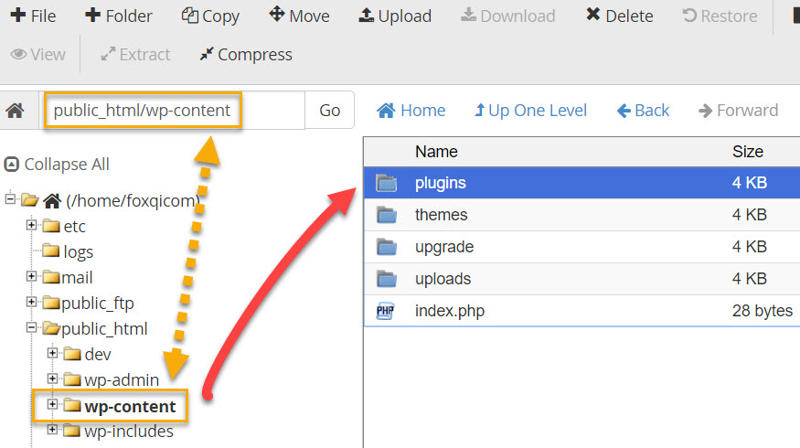

Step 3: Create a new folder by clicking the Folder button.
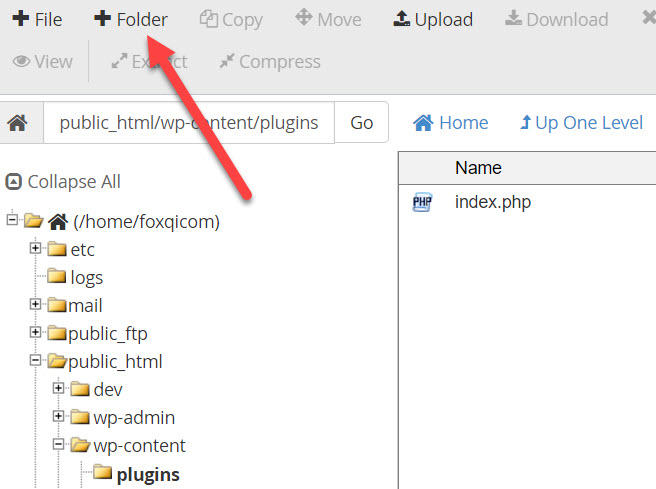

Name the folder my-security-snippets, don’t make any changes to the path, and click Create New Folder.
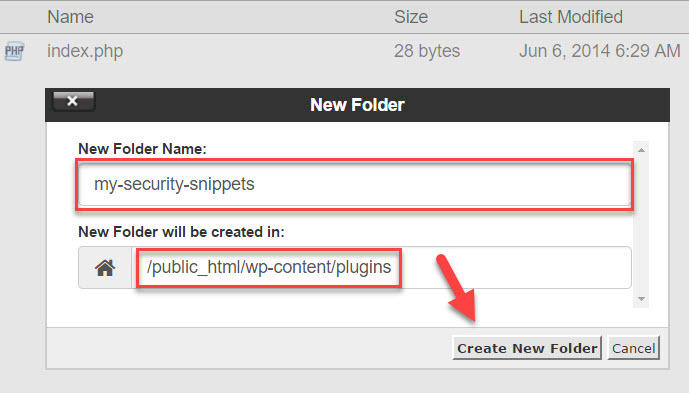

Open the my-security-snippets folder.
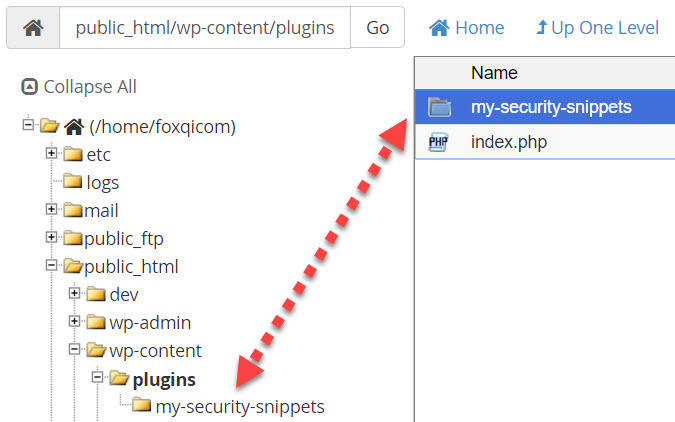

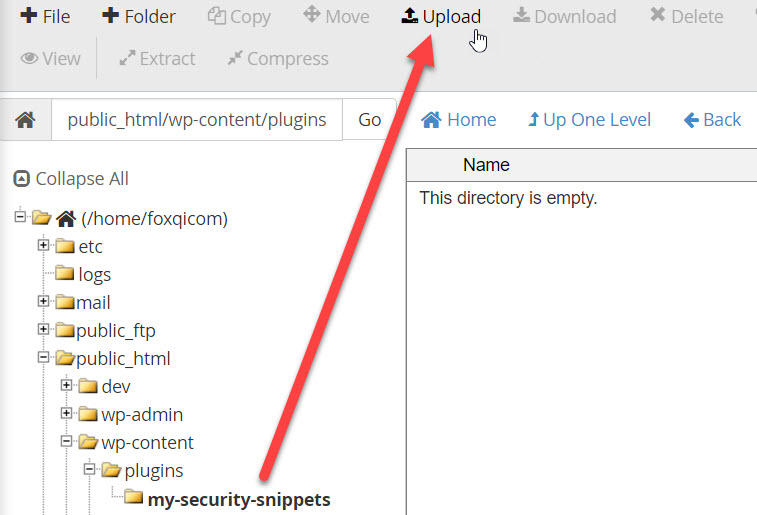
Step 4: Let’s upload the code file you created in the beginning. Click the Upload button.

Click the Select File button, browse to your code snippets file and upload it. Once complete, click the “Go Back to” link.
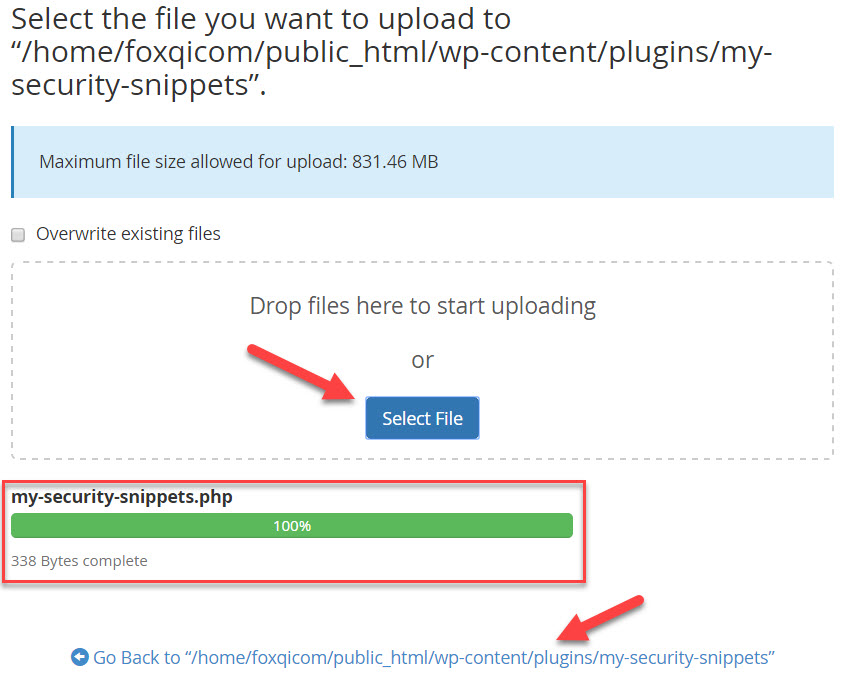

You’re done!
Step 5: Log into your WordPress site and go to the Plugins page. You can then activate your new plugin.
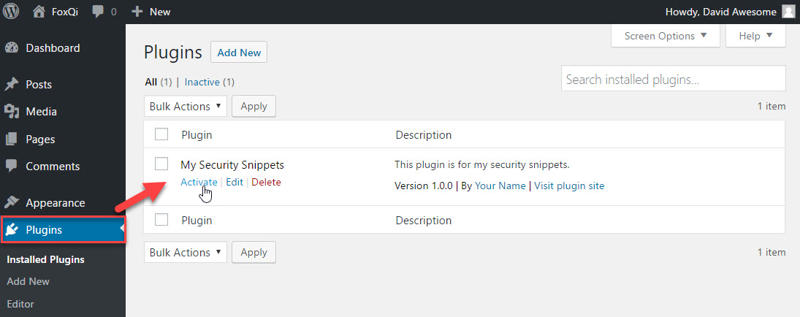

Your plugin is set to go. I’ll now show you how to edit your plugin file for when you need to add code snippets later.
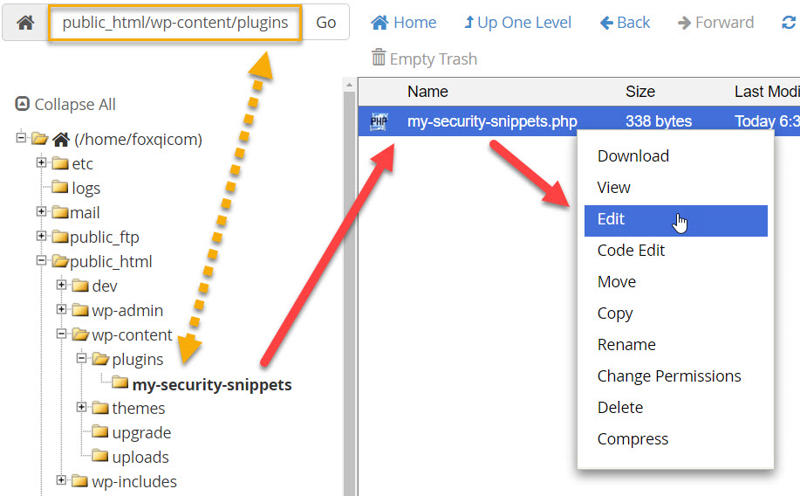
Step 6: Return to the my-security-snippets folder. Right-click the my-security-snippets.php file and click Edit.

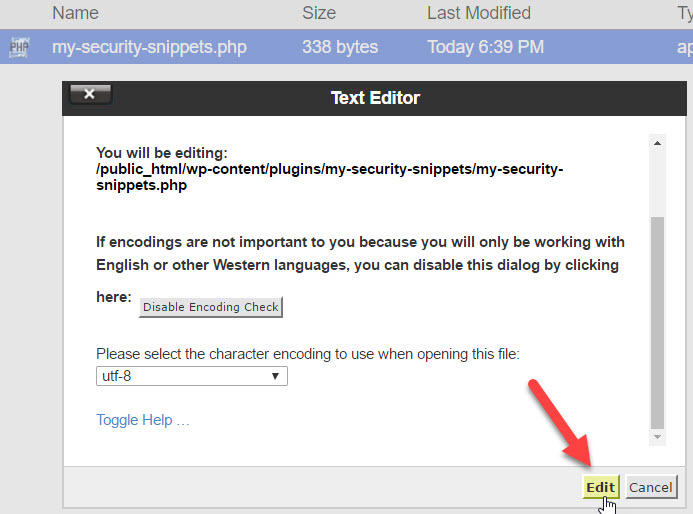
In the modal window that pops up, click Edit.

The editor will open in a new browser tab.
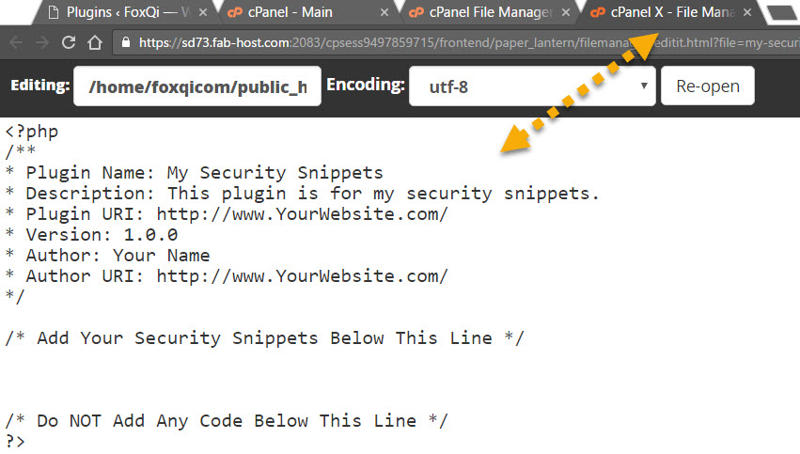

Here, you can make your changes and hit save when you’re done.


How to Change Your Password
So maybe—just maybe—your password is something awesome yet really insecure like 123456. Or qwerty perhaps? Either way, let’s get this sorted.
I’ll show you how to change your password if you:
- have access to your user account;
- have forgotten your password but remember the associated email address; or
- have forgotten both your password and email address
Changing Your Password Using the Admin Dashboard
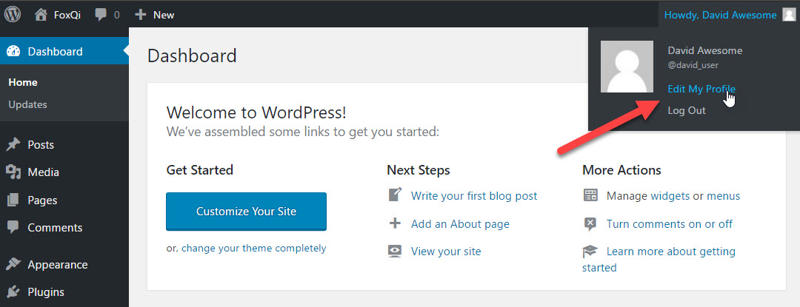
Step 1: From the admin dashboard, toggle the drop-down in the upper-right corner and click Edit My Profile.

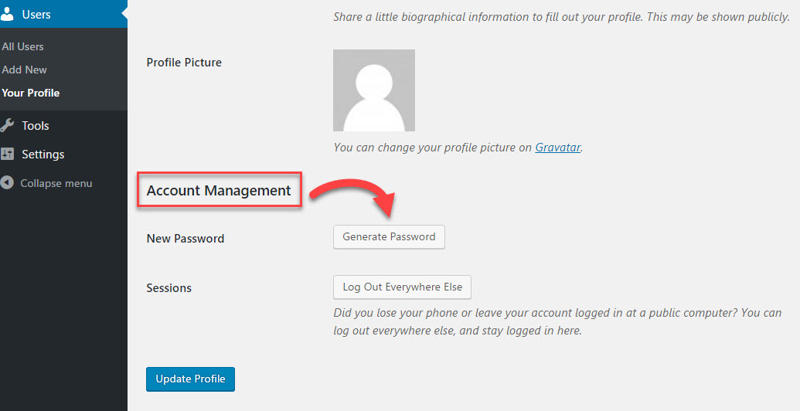
Step 2: On the Profile page, scroll down to the Account Management section and click Generate Password.

Save your new password and click Update Profile.
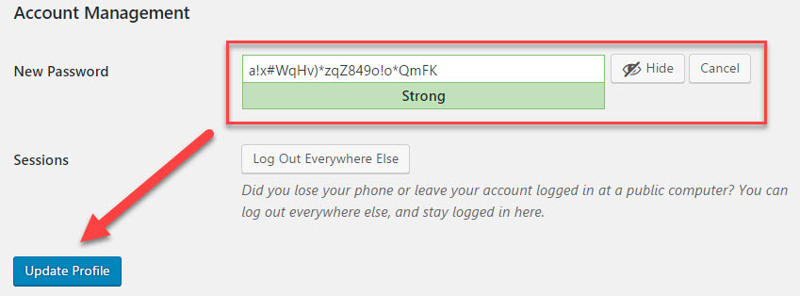

And you’re done!
Resetting Your Password through Email
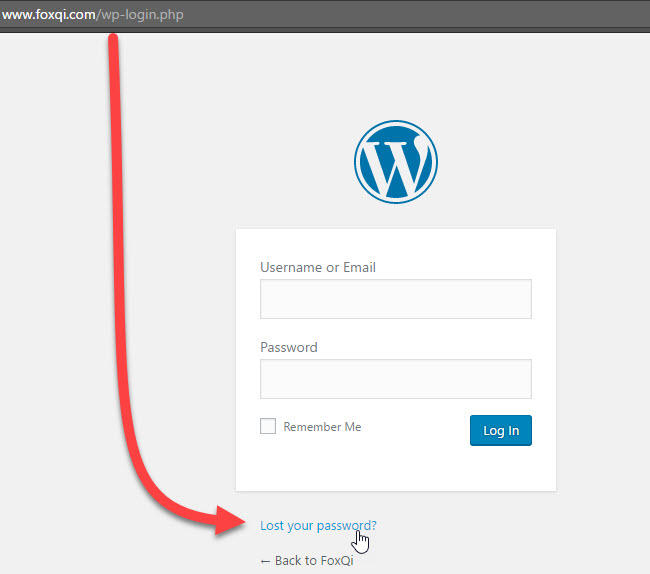
Step 1: Go to your site’s login page (mysite.com/wp-admin or mysite.com/wp-login.php) and click the Lost Your Password? link.

On the following screen, type in your email address and click Get New Password.
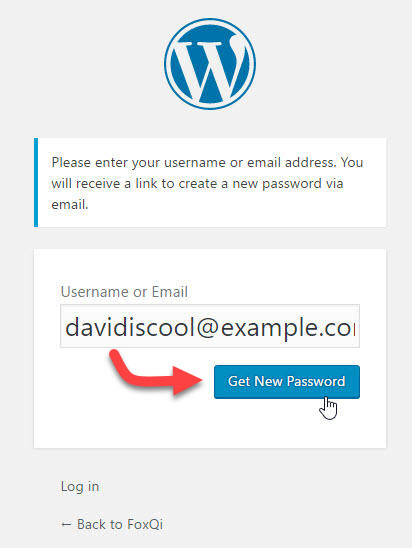

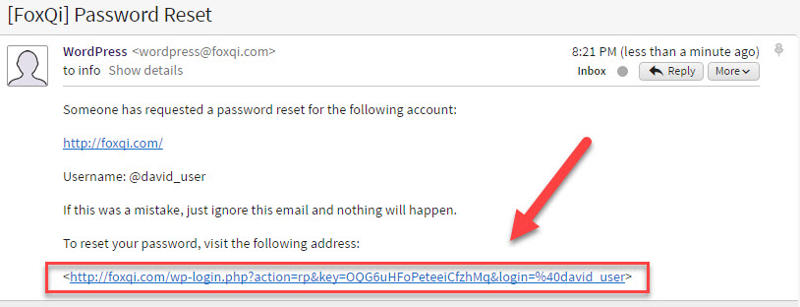
Step 2: Open the email from WordPress in your inbox and click the reset link.

Enter your new password and click Reset Password.
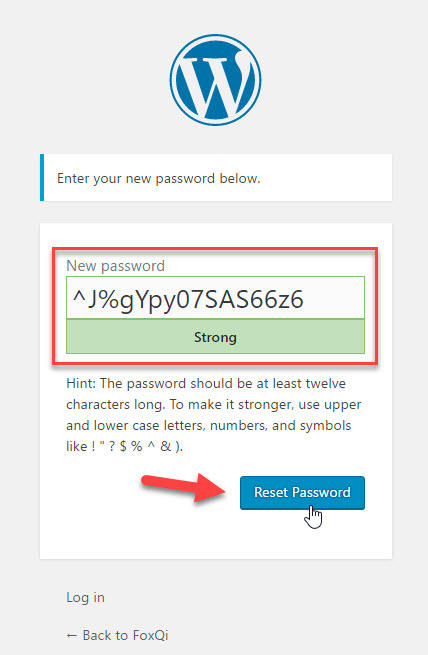

You’ve now got a shiny new password!
Changing Your Password using cPanel’s phpMyAdmin
Okay, so somehow you managed to forget both your password AND your email…
But don’t sweat it! You can still change your password like the pros do. All you need is to tinker a bit with your site’s database; easy-peasy. Follow along.
Step 1: Log into your cPanel account.


Step 2: Locate the File Manager application within the Files section.


Step 3: Click to load the contents of your site’s root directory (in most cases it’s called public_html).
Locate and right-click your site’s wp-config.php file, then click view.
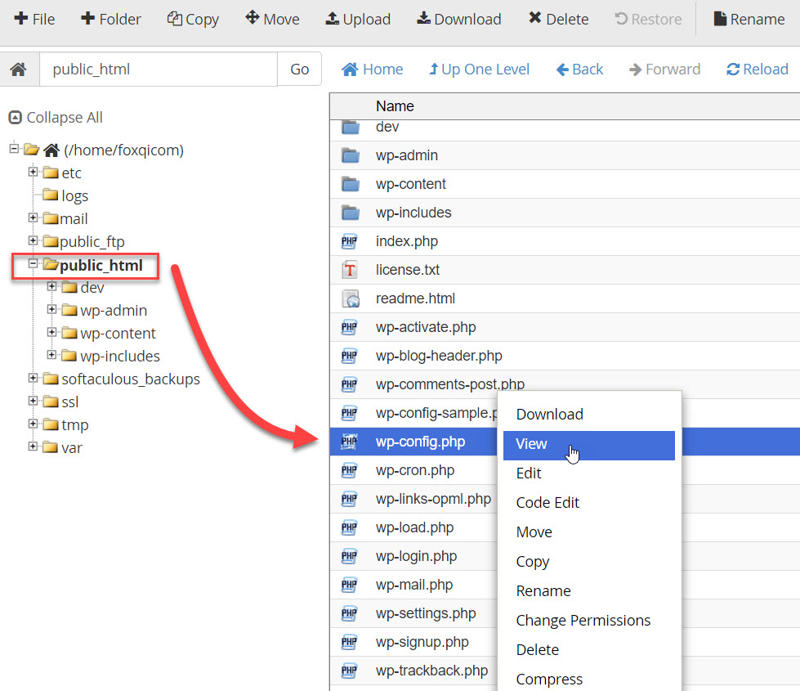

With the wp-config.php file open, scroll down to the MySQL settings section and locate your website’s database name.
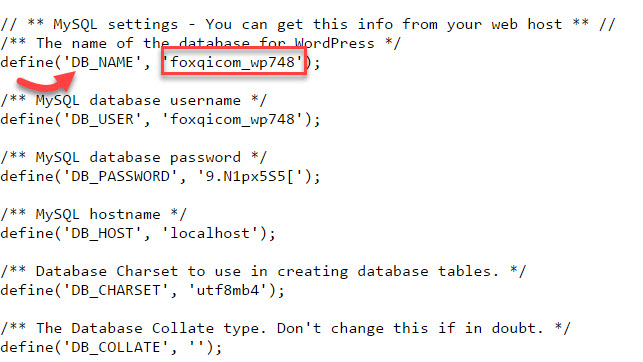

In the case of our demo site, the database name is foxqicom_wp748. Keep it fresh in your mind or note it down.
Step 4: Head back to the cPanel dashboard, then locate and open the phpMyAdmin application within the Databases section.


phpMyAdmin is a software used to manage MySQL databases, the type of database WordPress websites run on.
In the control panel, you’ll find a list of databases, one for each WordPress website installed on your cPanel account.
In our case, I’ve installed two sites, but right now we’re only interested in FoxQi.com, so foxqicom_wp748 is the database we want to load, then click the wp_users table.
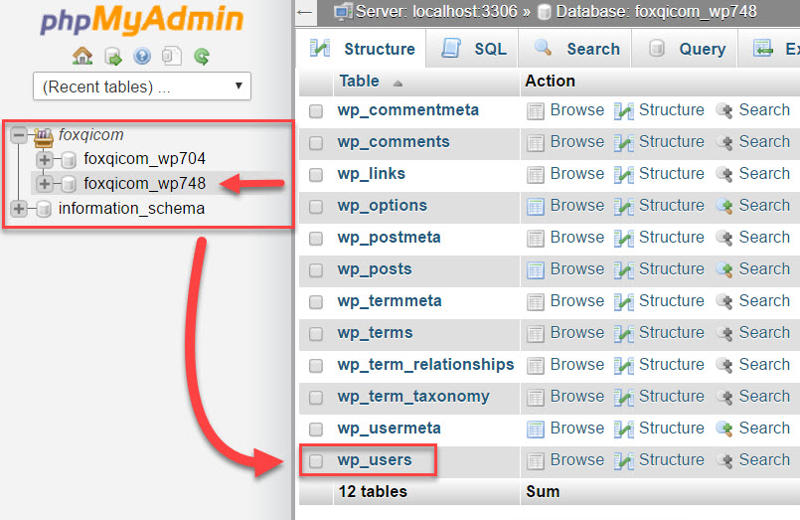

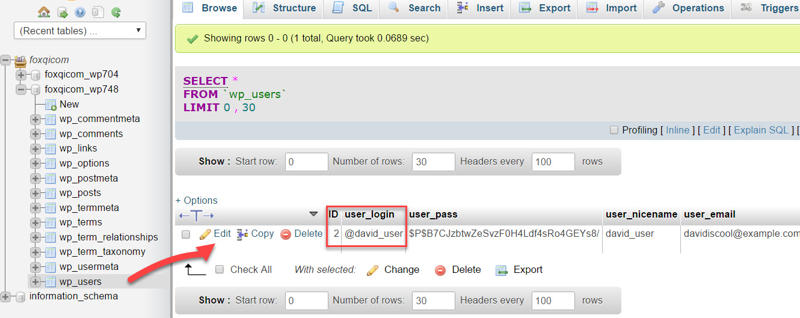
The wp_users table contains the profile settings for each user registered on your site. I’ll click the Edit link adjacent to my @david_user account.

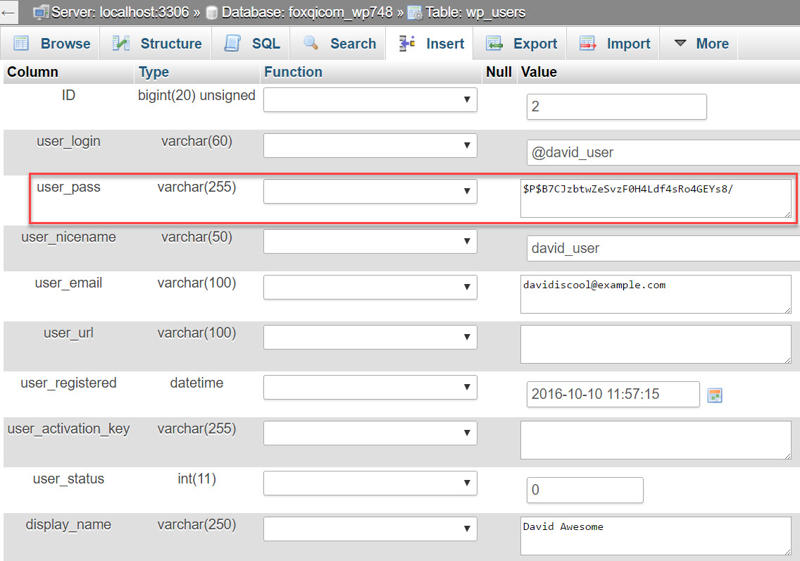
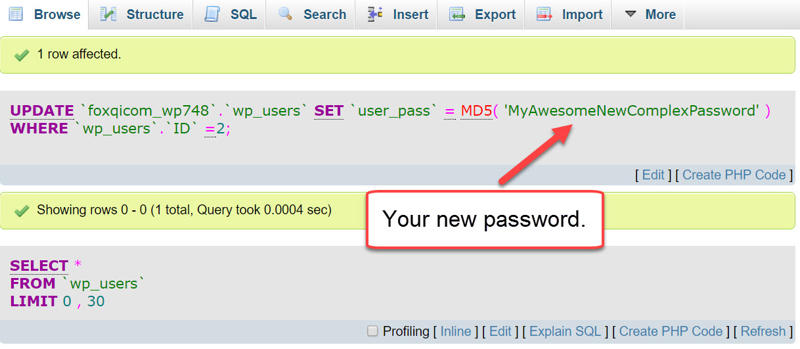
Next, you’ll see the user settings for @david_user. We’re interested in the user_pass row.

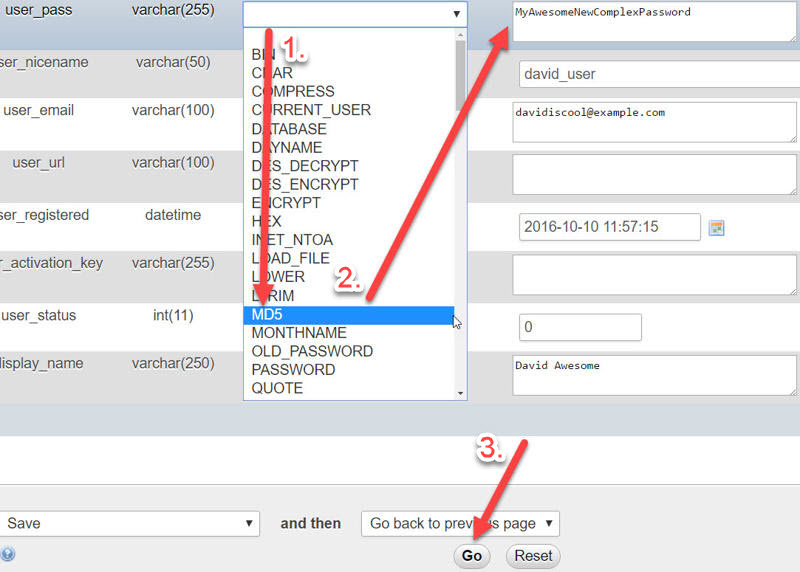
- First, select the MD5 hash from the user_pass drop-down list.
- Next, replace the existing string of random gibberish with your own new password gibberish.
- And finally, click the Go button.

You should see the following page showing your new password. You’re done!

How to Protect and Hide Your Username from Enumeration
User enumeration is when someone tries to snoop out the login usernames associated with each registered user on your site.
If someone can figure out your username, then they only need to crack your password to get in.
User enumeration can be dangerous for sites with many registered users, because some users may be using weak passwords.
To test user enumeration on a WordPress site, simply add /?author=1 at the end of the site’s domain URL (e.g. foxqi.com/?author=1).
The “1” specifies the ID of the first user registered on the site. This is typically the admin user.
The second user who registers will get an ID of 2, and so forth. There are hacking scripts that can run through hundreds of IDs on a site and collect all the usernames in very short time.
In our case, using /?author=1 won’t work, because we deleted the admin user and created a new user. So we would have to use /?author=2 to get a positive result.
Even if I changed the public display name for my @david_user account on our FoxQi demo site, someone would be able to find the login username by going to foxqi.com/?author=2.
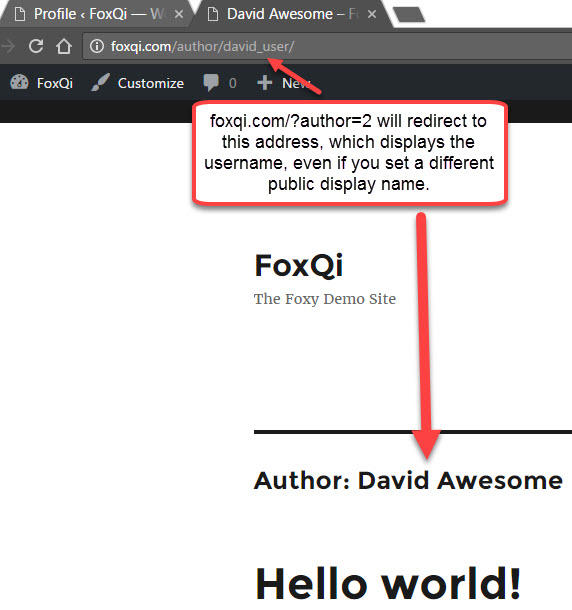

But this is also why it’s a great idea to add the @ symbol at the beginning of your username, as the address bar won’t show it.
So, we’ll do two things now:
- Block user enumeration
- Hide your login username from URLs everywhere on your website
Protecting Your Username from Enumeration
The most effective way to block author user enumeration is to simply “kill” the request when it’s made. (In other words, when someone goes to foxqi.com/?author=1, make the page go blank and don’t redirect.)
Step 1: Paste the following code snippet—without the ?php bit at the top—into your snippets plugin.
Your snippets file should now look like this:
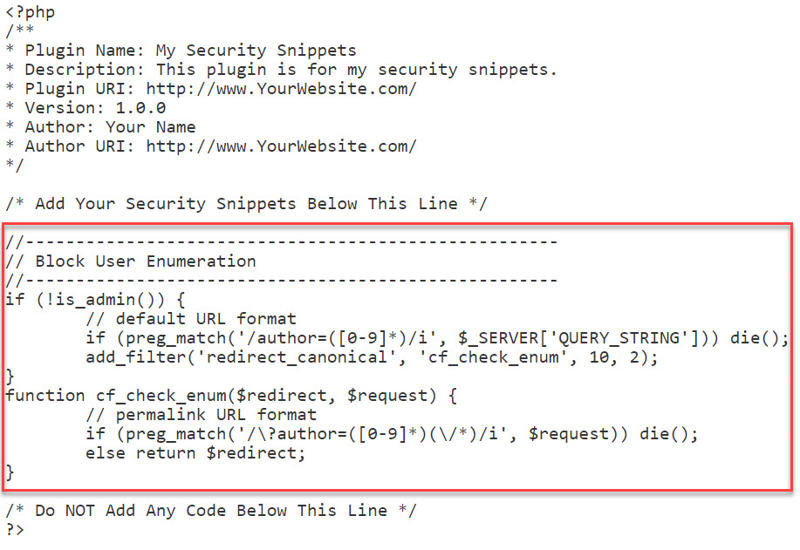

Click the Save Changes button and browse to YourSite.com/?author=1 or YourSite.com/?author=2 and check if it works. Your browser should now be blank.
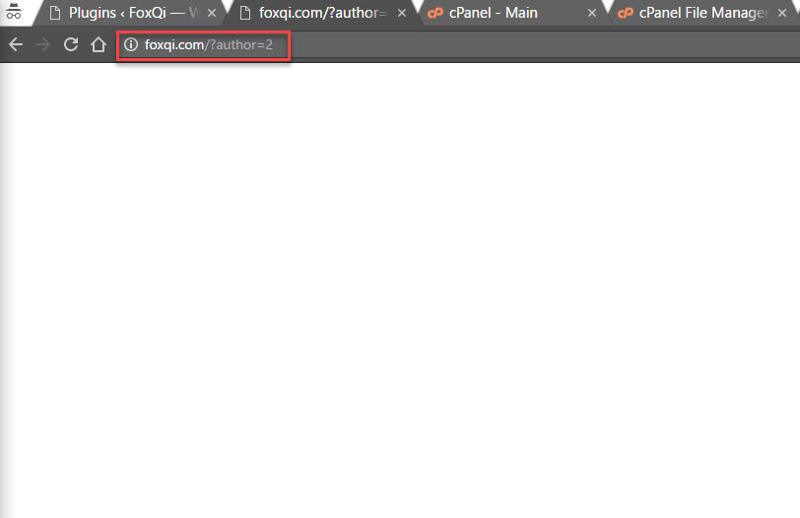

Success!
How to Hide Your WordPress Login Username in URLs
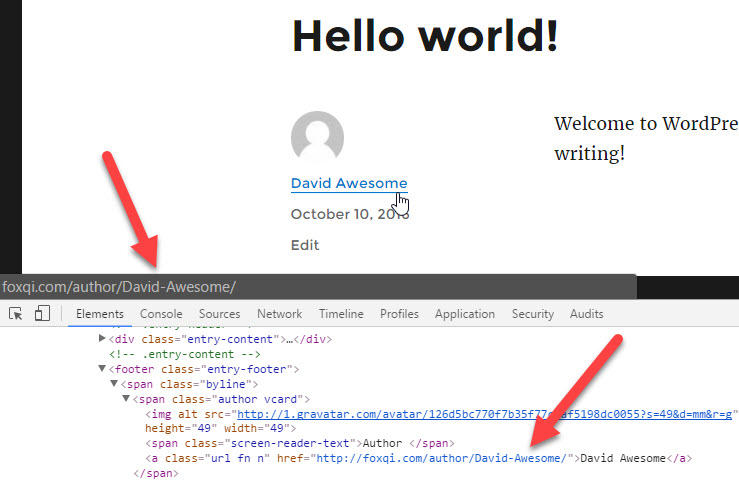
Another way your login username can be discovered is if someone hovers over your public display name anywhere on your site; especially on your blog posts.
Some browsers will display your author URL containing your username at the bottom of the screen, or someone can also just view the page’s source code.
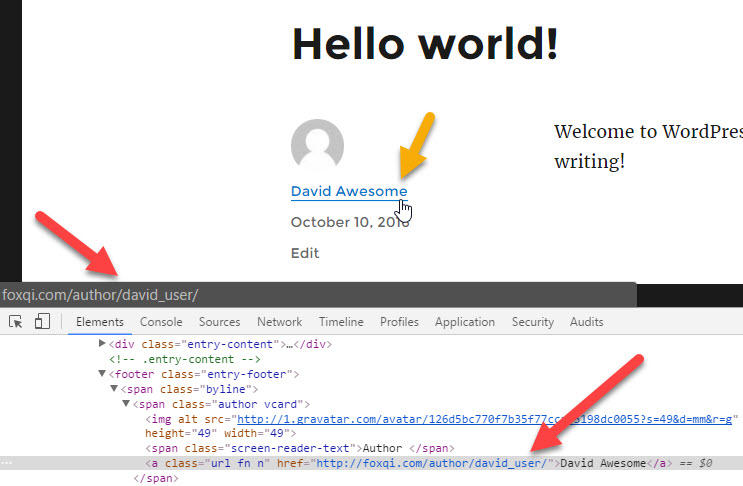

But you can actually change david_user to just about anything you like, without changing your username. Here we go.
Step 1: Log into your cPanel account and open phpMyAdmin again. Then open the wp_users table just like I showed in the password change tutorial.
What we want to change this time is @david_user’s user_nicename. Click the Edit link.
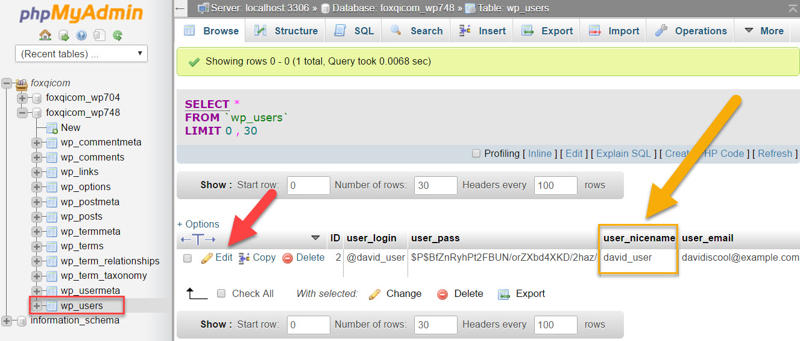

Step 2: The following should look familiar to you. But this time, we’re changing the user_nicename row.
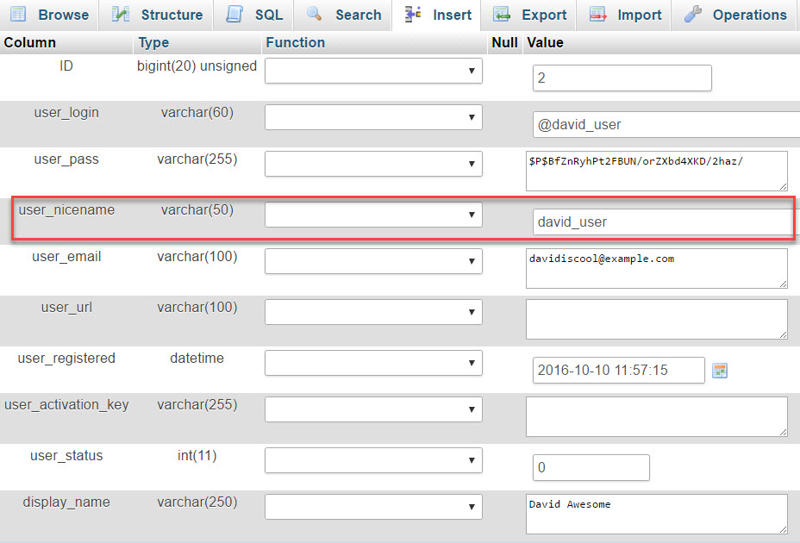

Change david_user to anything you like. You can use hyphens to separate words.


When you’re done, click the Go button at the bottom of the page. You should then see the following:
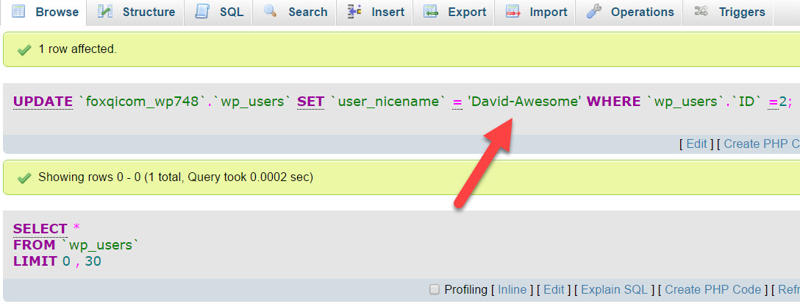

Head back to the blog post and check it out!

Three Tricks for Protecting Your WordPress Login Page
By default, your WordPress site’s login page can be accessed by going to YourSite.com/wp-admin or YourSite.com/wp-login.php (both will work).
While there are many ways to add protection to your login page, I normally only do the following three things:
- Change the default error message WordPress throws after failed login attempts
- Limit the number of times login attempts can be made from a single IP address within a certain timeframe (e.g. max 5 login attempts every 2 minutes)
- If a site’s login page is being bombarded with login attempts from many different IP addresses, I will change the URL address to something different and block access to /wp-admin and /wp-login.php
I’ll show you how to do this now.
We’ll change the error message using a code snippet and cover the last two steps using the Cerber Limit Login Attempts plugin.
[thrive_2step id=’1509′] [/thrive_2step]
How to Change the Failed Login Error Message
When you try to log into your site but mistype your password, here’s the message you’ll see:
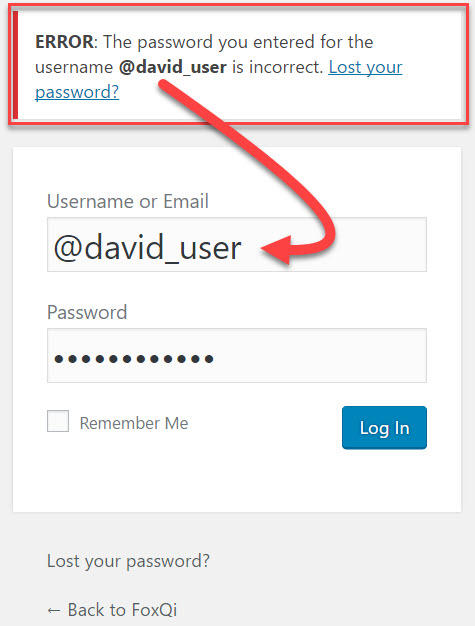

But when you try logging in with a username that isn’t registered on the site, here’s what WordPress gives you:
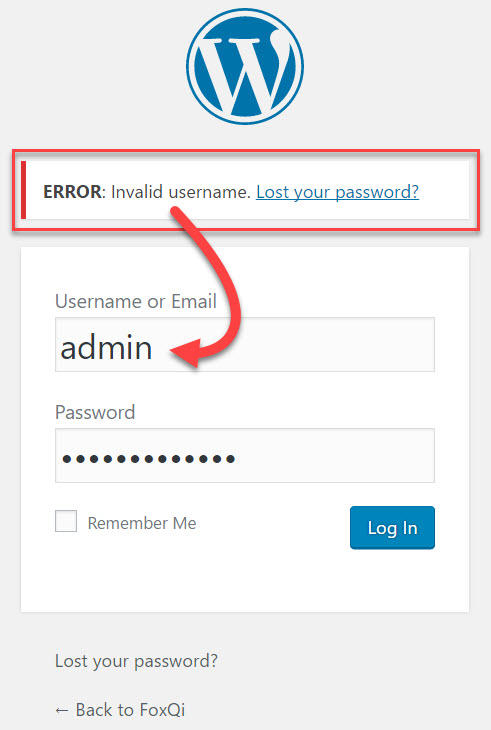

WordPress basically gives away that no user on the site has “admin” as their username, and will also readily tell you if the username does in fact exist.
We can change this in a jiffy, though, so follow along and let’s create a custom error message that will appear no matter which username is typed in.
Step 1: Paste the following code snippet into your security snippets file—below the first snippet—and remember to save your changes:
Your snippets file should now look like this:
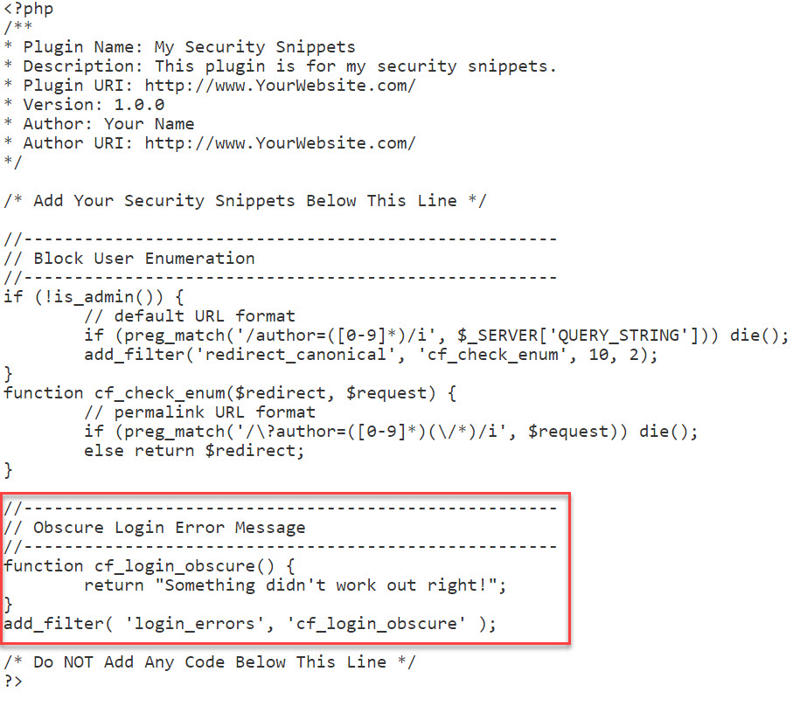

Now go to your login page and check that it works. You should see something like this:
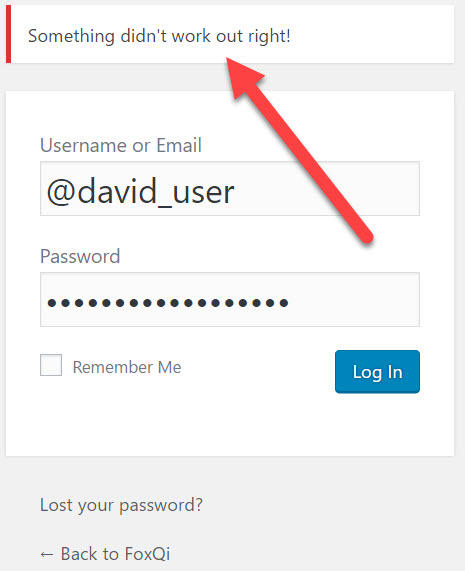

You’re done!
Protect Your Login Form with Cerber Limit Login Attempts


Cerber Limit Login Attempts, aka. WP-Cerber, is a superb plugin for protecting and monitoring your login page.
Some key things it lets you easily do:
- Limit how many times someone can attempt to log into your site within a specified timeframe
- Block access to YourSite.com/wp-admin and YourSite.com/wp-login.php and create a custom login URL address
- Watch who is trying to log into your site and what usernames they’re using
- Block malicious IP addresses
- Lock down your login page if your site is going through an aggressive brute-force attack
I’ll show you how to install the plugin and apply some standard configurations.
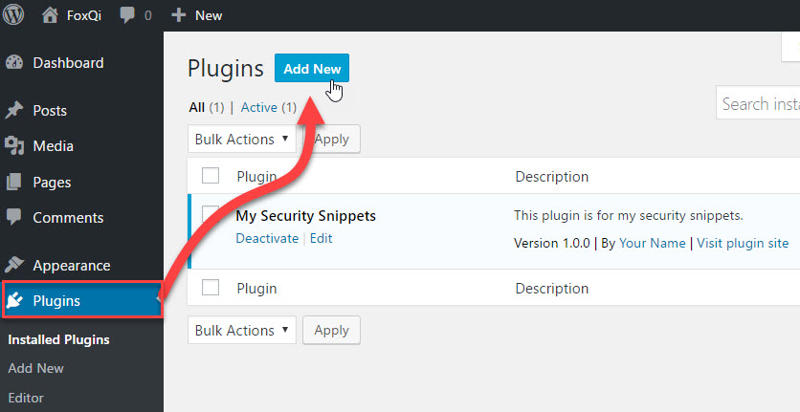
Step 1: Log into your WordPress site, go to the Plugins page and click Add New.

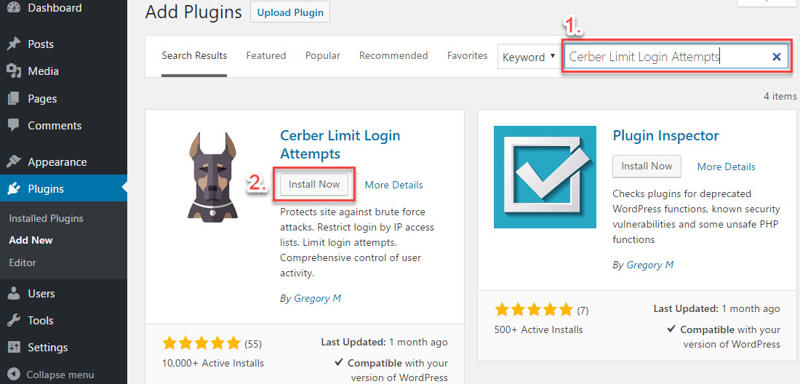
Step 2: Search for “Cerber Limit Login Attempts” and the plugin by Gregory M should appear as the first result on the left-hand side. Click Install Now and the plugin will be ready to activate shortly.

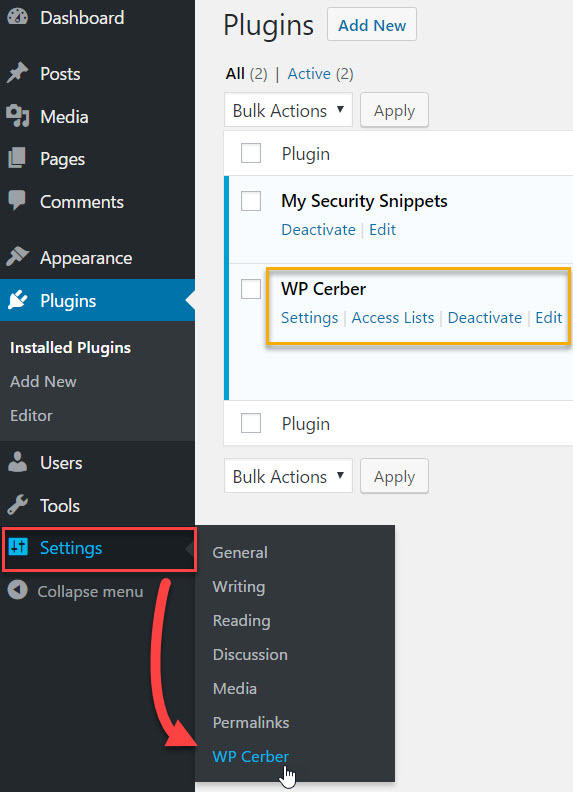
WP-Cerber will get its own sub-menu item under Settings. Click it.

WP-Cerber’s default settings are great for a typical WordPress site, so you probably won’t need to make any drastic changes. But I’ll take you through what this plugin offers.
The Main Settings tab is the first one you’ll see. The first section of this tab allows you to configure login attempt rules.
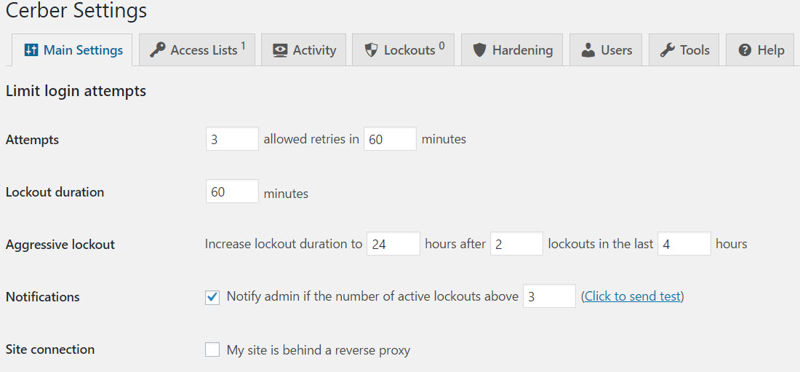

- Attempts: Set how many times someone can try to log in within a XX-minute window.
- Lockout duration: Set how long someone will be locked out for.
- Aggressive lockout: Set how long they will be locked out if they repeatedly fail to log in.
- Notifications: Set the number of lockouts that must happen before WP-Cerber emails you about it.
- Site connection: If you’re using a service like CloudFlare as a reverse proxy, you will need to check this box.
Feel free to leave these settings at default.
Next up, the proactive security rules settings:


- Block subnet: If someone’s IP address is 100.100.100.1 and another’s IP is 100.100.100.94, this setting will block both of them, as the fourth number represents a subnet class.
- Non-existent users: This will block an IP address immediately if they try to log in using a username that doesn’t exist.
- Redirect dashboard requests: Block an offending IP address from being redirected to /wp-login.php when trying to access /wp-admin.
- Request wp-login.php: As it says, if someone tries to access YourSite.com/wp-login.php, they’ll be blocked immediately.
Third, custom login page settings:


- Custom login URL: Here’s where you can set your own login page URL address. For example YourSite.com/davids-login.
- Disable wp-login.php: When my sites are under brute-force attack, I tick this setting to block access to /wp-login.php.
Fourth, citadel mode settings:
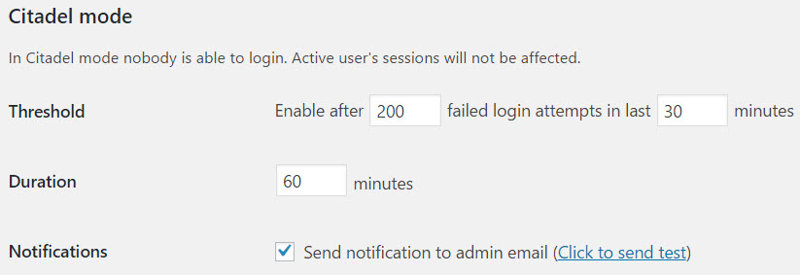

Threshold: If your login page is getting hit by dozens or hundreds of unique IP addresses, WP-Cerber will lock down your login page after 200 failed login attempts within a 30-minute window. Remember that no one, including you, will be able to log in.
Duration: Here you can set how long everyone will be locked out for.
Notifications: Tick whether or not you want to receive an email notification when citadel mode is switched on.
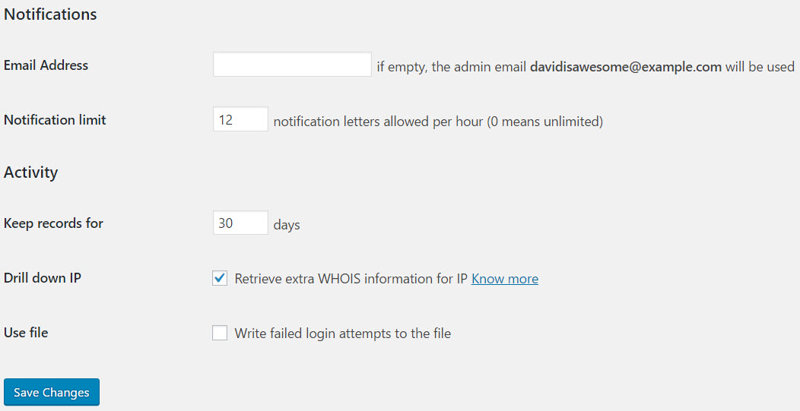
Finally, the Notifications and Activity sections. These you can configure as you see fit.

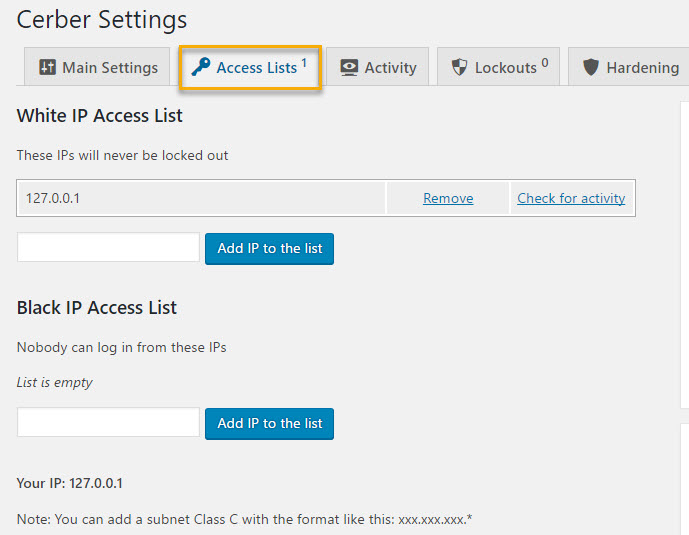
Moving on to the Access Lists tab, here you can add IP addresses you want to white- or blacklist.
As an example, whitelisting your own IP address will stop WP-Cerber from locking you out if you mistype your password too many times.
Permanently blacklisting an IP address will block all login attempts from that address.

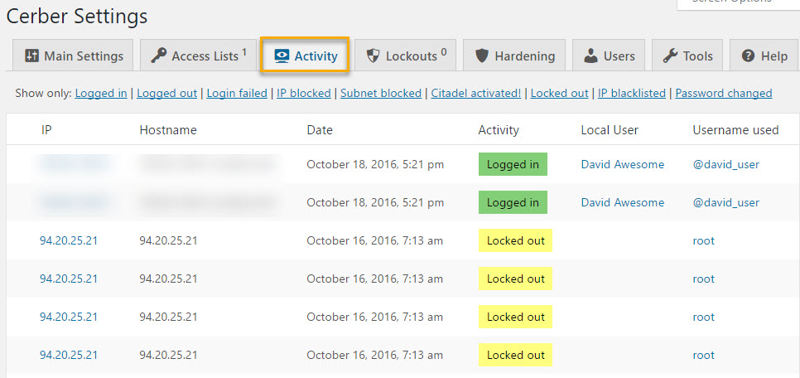
Moving on, we get to the Activity tab I showed you earlier, where you’ll see a log of all recent login attempts.
You’ll notice someone has been trying to log in several times within 60 seconds. (The full list showed 48 attempts.)

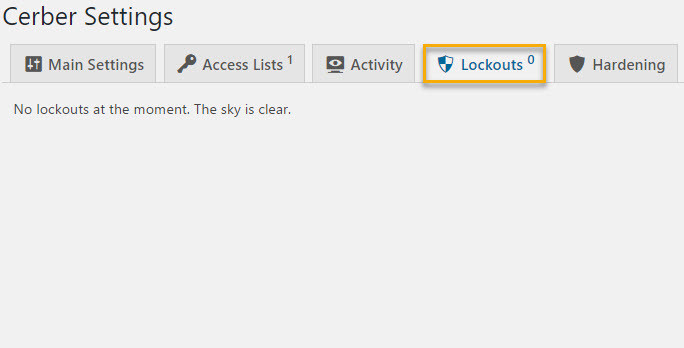
Next up, the Lockouts tab will show you a list of IP addresses which WP-Cerber is currently blocking. In our case, there were fortunately no misbehaviors.

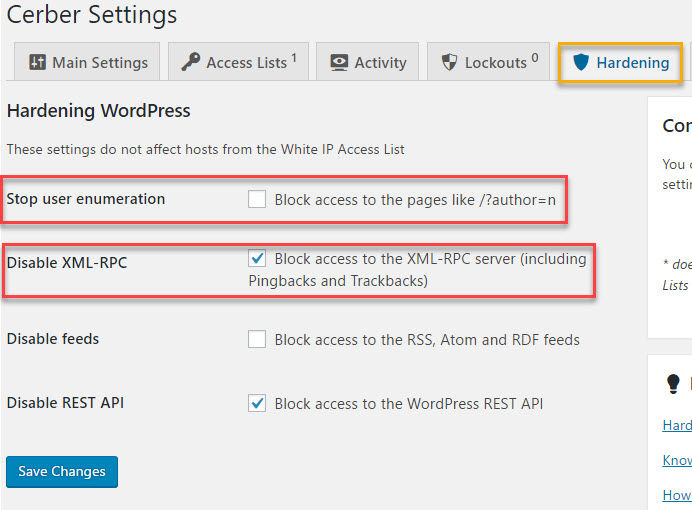
On the Hardening tab, you have a few options to choose from.
If you followed along in creating your own security snippets plugin, make sure Stop user enumeration is unticked.
If you plan on logging into your site using the WordPress mobile app, you should also untick Disable XML-RPC.
You can leave Disable feeds and Disable REST API at their default setting.

The Users tab settings will let you block specific usernames from logging in.
You can also specify how long users will stay logged in before they’re automatically logged out of your site.
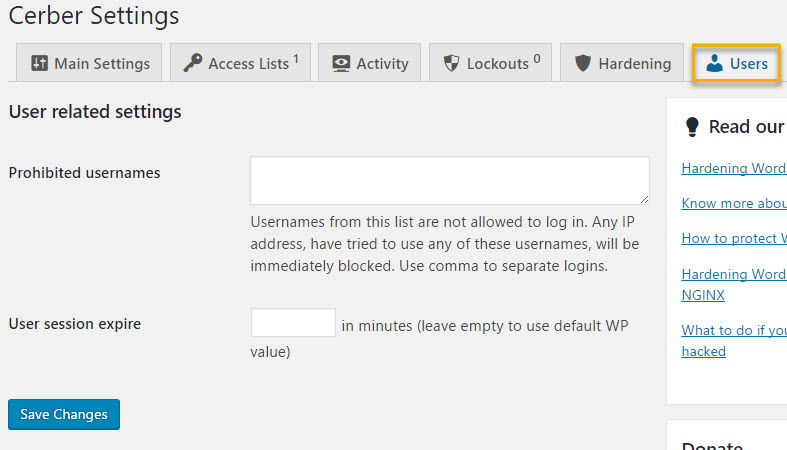

The plugin author recommends you add the following usernames to the ban list: admin, administrator, manager, test.
And finally, I’ll show you the Tools tab.
This nifty tab page will let you export your current settings so you can quickly import them into another website, and vice versa.
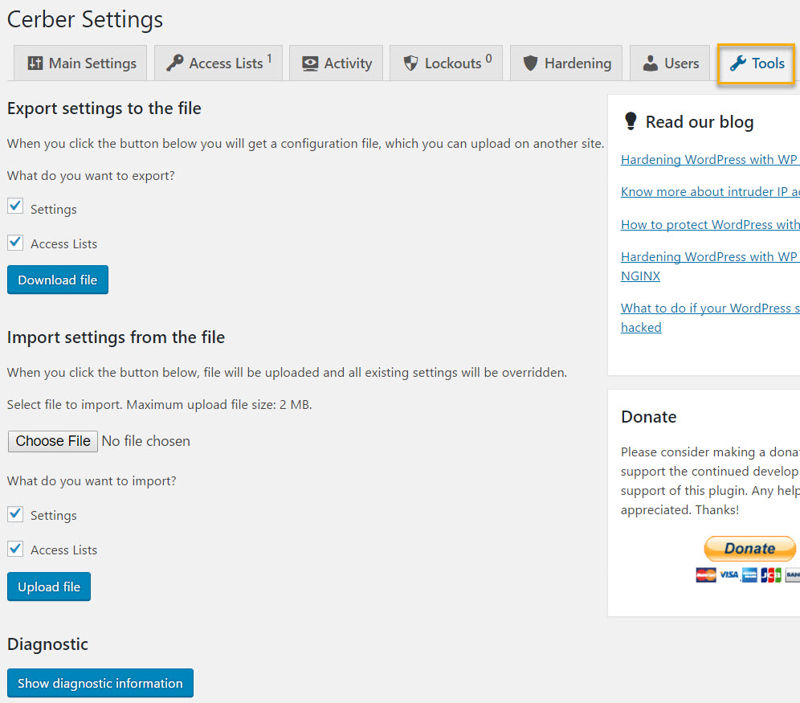

Once you’ve made your changes, you’re done, and WP-Cerber will handle the rest.
Why and How to Disable Admin Theme File Editing
You might’ve noticed you can actually see and edit your theme’s CSS stylesheets and .php files right from your site’s admin backend by clicking the Editor item under Appearance.
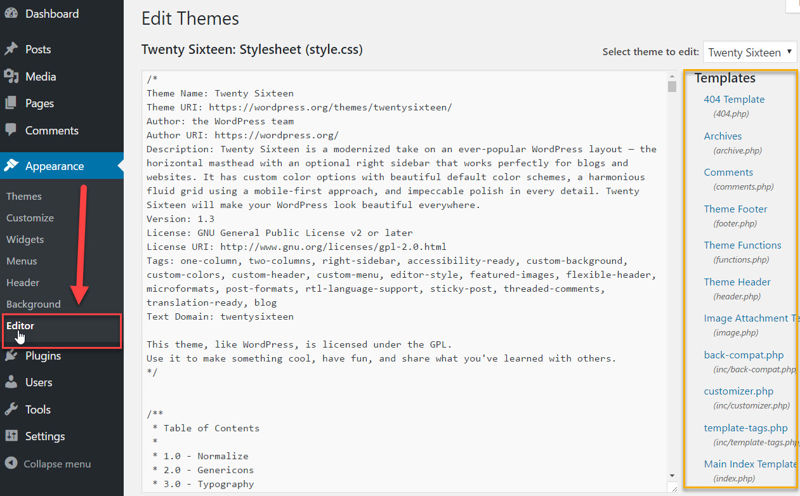

These are the files that make up your theme, giving your site both its appearance and functionality. Fortunately, only an administrator account can access the theme editor page.
Also, bear in mind it’s bad practice to make changes to these files from this editor, because if you make a mistake, you’ll cause a white screen of death for yourself and all visitors.
But if someone with malicious intents were to gain access to any admin-level account on your site, the theme editor will be an ideal first place to go.
What could a potential hacker do here? Well, if they’re smart, they would make sneaky changes which allow them to regain access to your site following any actions you take after realizing you’ve been hacked.
They will also often try to infect and break into your hosting server through your website.
Other than that, the hacker can inject hidden links, change the appearance of your site, place spammy adverts, and much more.
Of course, if you have a malicious administrator on your site, you’re in trouble on multiple levels, but that doesn’t mean you can’t make it more difficult for them to do damage.
And that’s what we’ll do by disabling the theme editor with this code snippet:
There are two places you can place this code. The first option is to paste it at the end of your security snippets plugin:
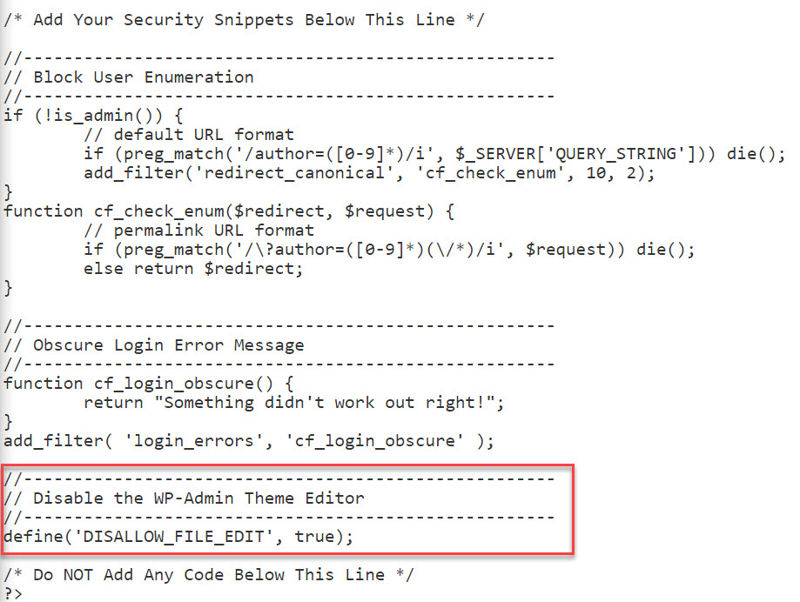

And you’re done. For the purpose of this tutorial, I will use the plugin.
The other option, which is where you would normally put this piece of code, is in your site’s wp-config.php file. I’ll show you how.
Step 1: Just like I’ve shown you earlier, log into your cPanel account and open the File Manager application within the Files section.
Step 2: Load the contents of your site’s root directory (usually public_html), right-click the wp-config.php file then click Edit.
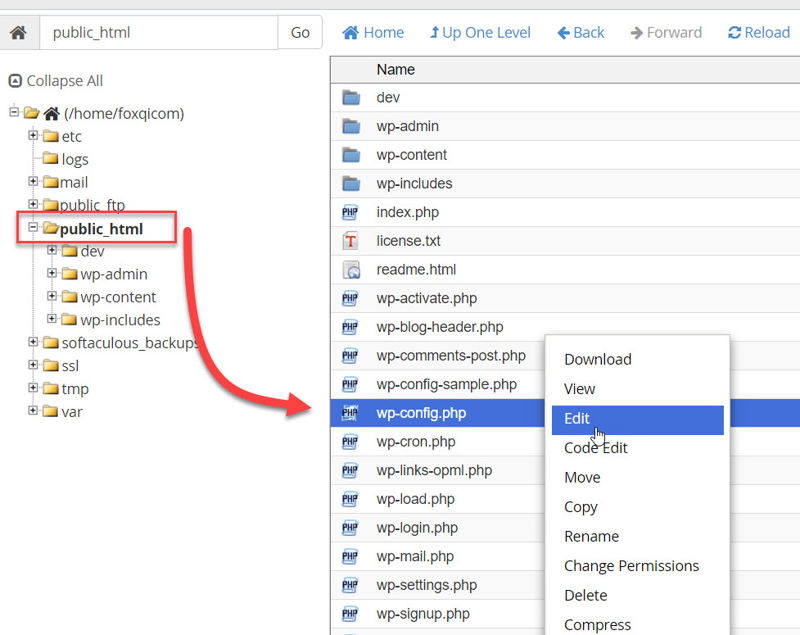

When the modal window appears, click the Edit button.
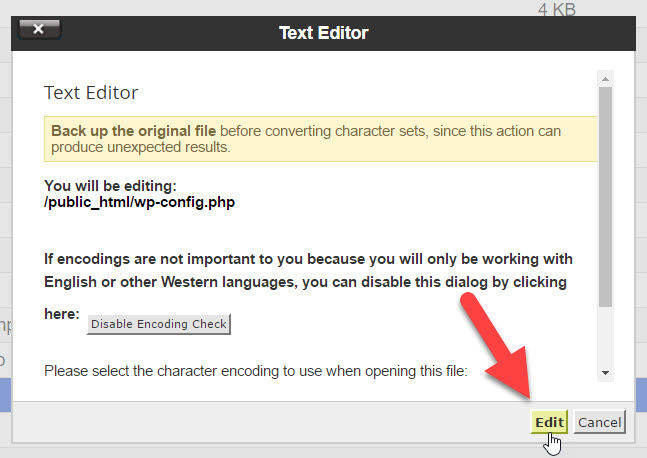

With the wp-config.php file open in your editor, scroll down until you see the WordPress Database Table prefix section.
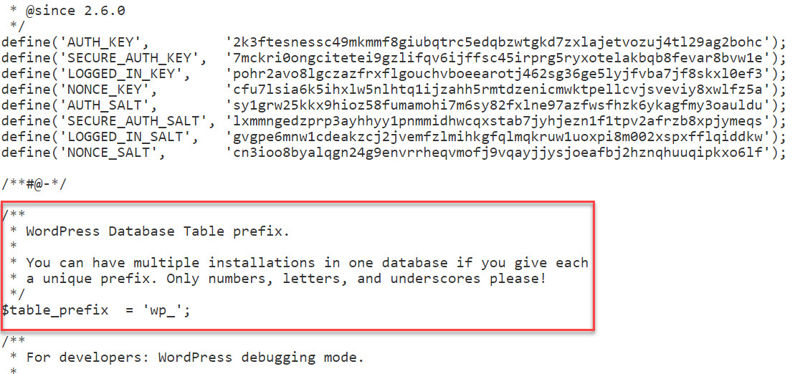

Paste your code snippet below the bit that says $table_prefix. Like this:
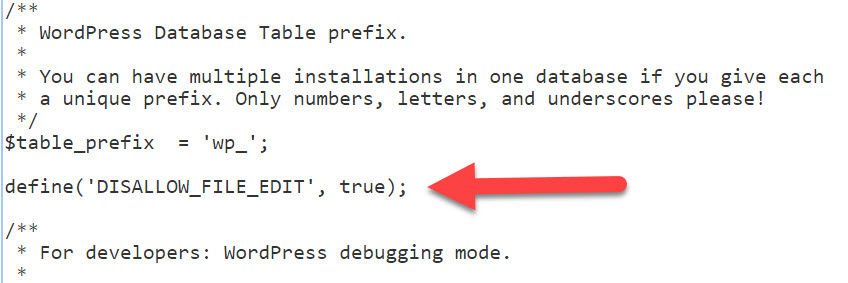

Hit the Save Changes button and you’re done!
Step 3: Head back to your WordPress dashboard and check that the Editor link is gone from the Appearance menu.
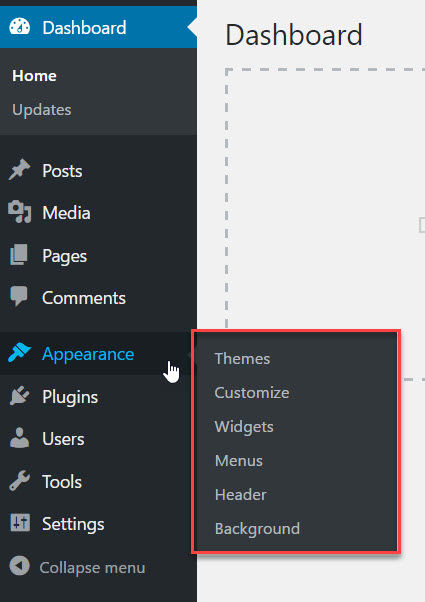

Excellent work.
Maintain Security by Always Keeping Your Website Up-to-Date
A big part of ensuring your website is secure is remembering to keep your WordPress core files, theme files and plugin files up-to-date.
This way, you help protect your site against exploitable vulnerabilities which are frequently being discovered in the various files that make up our sites.
According to web security company, Sucuri, three outdated plugins alone were responsible for 25% of all WordPress breaches in which the site owners had requested Sucuri’s services. And this was in the first three months of 2016.
Oh, and it gets even better: at the beginning of 2016, security updates had existed for over a year for all three plugins.
This means, for more than a year, no one had thought to themselves, “Hey… maybe I should log into my site and check for updates,” in which case you’re pretty much begging to get hacked.
Just silly, really. So let’s make sure this doesn’t happen to you.
Now, I get it. Many of you are busy and couldn’t dream of having to log into your sites every week and click update buttons.
So, to make your life a little easier, I have three tips for you:
- Schedule your WordPress core, themes, and plugins to be updated automatically.
- Setup an uptime monitor for your website. If an update breaks your site and creates an HTTP error 500, you will be alerted by email within a few minutes that your site is down.
- As I mentioned in the beginning, backup your website daily! If an update breaks your site, you can quickly restore a working copy.
I’ll show you how to automate updates with some simple copy-pasting of WordPress’ updates control filters or—if you want more control through your site’s dashboard—by using the Easy Updates Manager plugin, then we’ll set up an uptime monitor using the UptimeRobot service.
How to Set Up Automatic WordPress, Theme and Plugin Updates Using PHP Filters
The first way I will show you how to enable automatic updates, is by using WordPress’ PHP filters. This is very straightforward.
Below are the four filters I will use for this tutorial, then you can decide for yourself which one(s) you want to use for your site:
// Automatic WordPress major updates

add_filter( 'allow_major_auto_core_updates', '__return_true' );
// Automatic theme updates

add_filter( 'auto_update_theme', '__return_true' );
// Automatic plugin updates

add_filter( 'auto_update_plugin', '__return_true' );
// Automatic translation file updates

add_filter( 'auto_update_translation', '__return_true' );
The first filter basically says to automatically upgrade your site to the latest major release of WordPress (e.g. from version 4.6 to 4.7).
The second, third and fourth lines will update your themes, plugins, and translation files respectively.
Okay! So, before we start using these filters, there is one more decision you need to make.
When you enable automatic updates, WordPress normally sends you a notification email if the update was a success, if it failed, or if it caused your site to crash. The problem is with the success emails because they can add up quite rapidly.
So, you can choose to:
- leave this at the default setting and receive all notification emails;
- turn off all notifications using a specific filter; or
- just use the full code snippet I will share with you below, which will only turn off success notifications
First, here’s the filter to switch off ALL notifications:
// Disable auto-update emails

add_filter( 'auto_core_update_send_email', '__return_false' );
And below is the complete snippet that should work for most people. It will auto-update WordPress as well as your themes, plugins and translation files, and switch off success email notifications so you only get notified if something goes wrong.
All you need to do is paste the following at the bottom of your security snippets plugin:
Your snippets plugin should now look like this at the bottom:
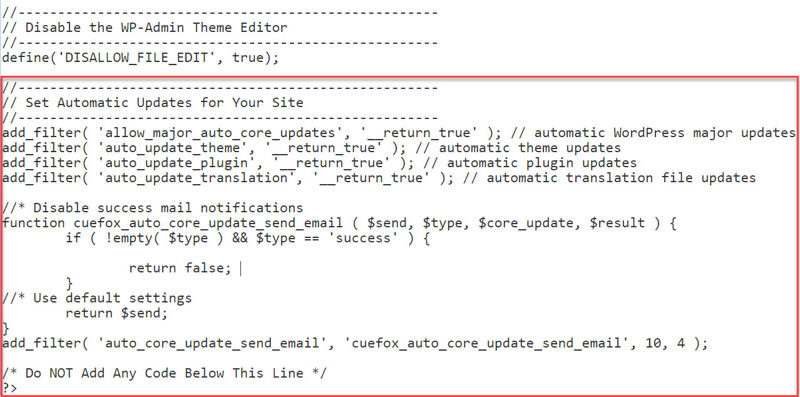

If this all seems too scary, you can instead use a flexible plugin, which I will show you next.
How to Set Up Automatic WordPress, Theme and Plugin Updates Using Easy Updates Manager
Easy Updates Manager is a terrific plugin, letting you easily automate updates for WordPress core, themes, and plugins.
It offers great flexibility, too. As an example, you can set automated updates only for your plugins, and you can even select plugins individually if you don’t want all of them included. The same applies with themes.
Step 1: Log into your WordPress site, go to the Plugins page and click Add New.
Step 2: Search for “Easy Updates Manager” and the plugin by the Easy Updates Manager Team should appear as the first result on the left-hand side. Click Install Now and the plugin will be ready to activate shortly.
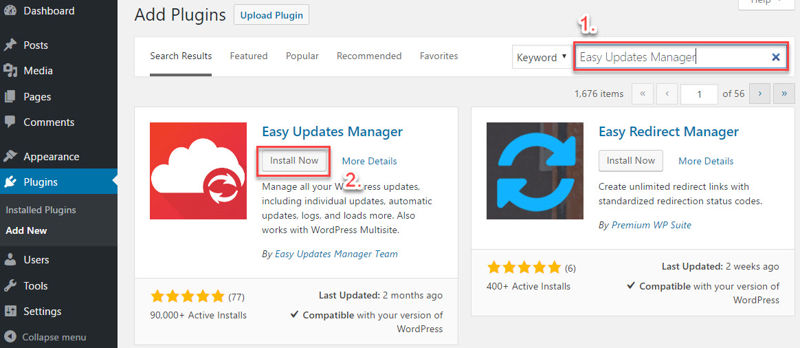

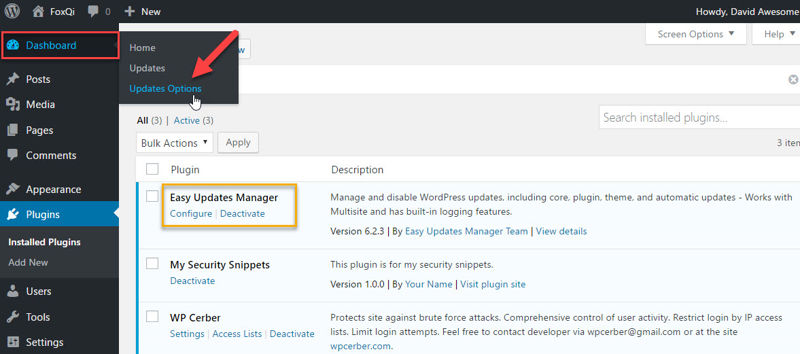
Following activation, the Easy Updates Manager options menu item can be found within the Dashboard drop-down.

On Easy Update Manager’s dashboard page, you’ll see 5 tabs across the top and some panels with green/red toggle options.
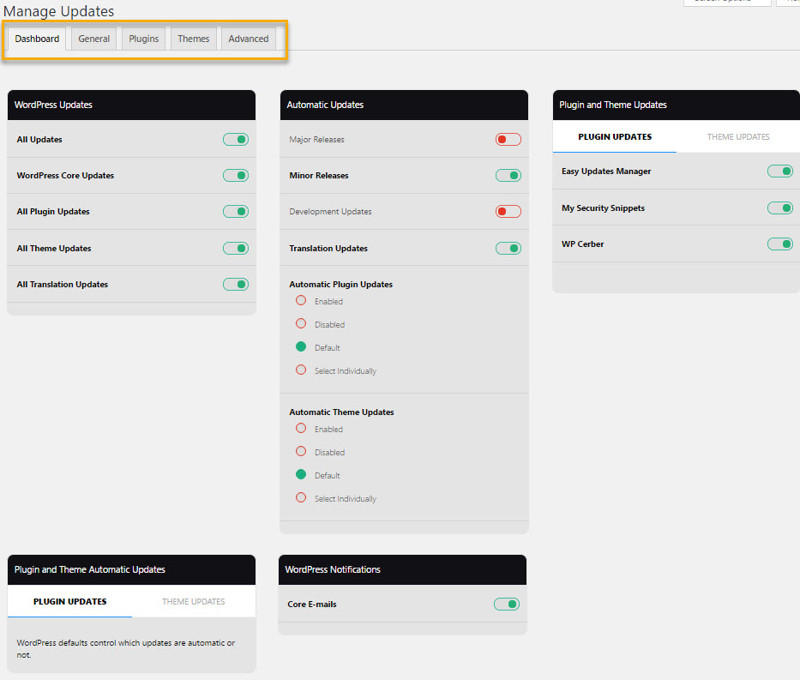

The first thing you should know is when you first activate the plugin, it won’t change any of WordPress’ default updating behaviors.
On the dashboard page, you’ll get a quick overview of what the current settings are. You can then begin changing these settings as you see fit from this page or from the General, Plugins or Themes tab pages.
Let’s start with the General tab page.
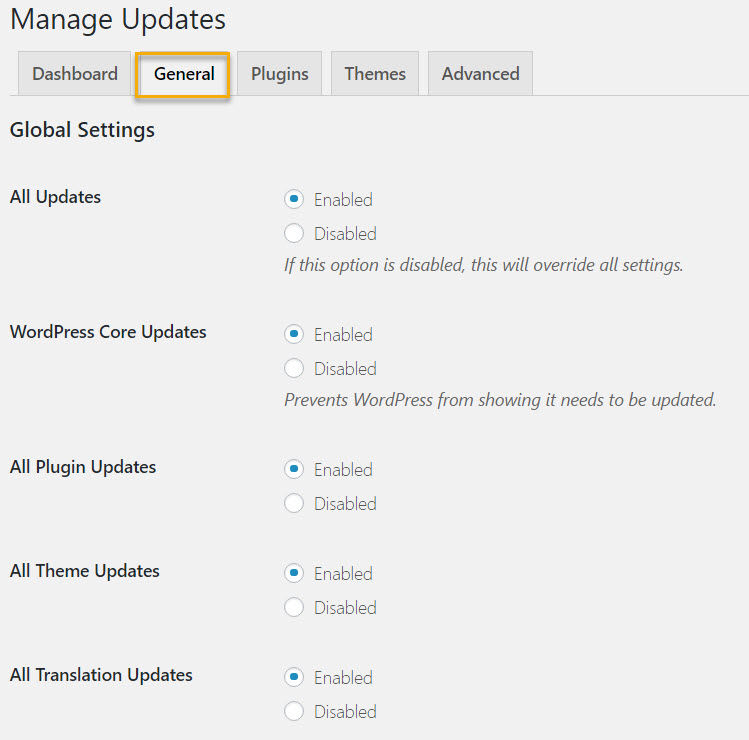

Starting at the top, you can choose whether to leave enabled or disable updates for different parts of your site.
If for instance, you disable plugin updates, you will stop receiving update notifications in the WordPress dashboard and there will be no update links on the plugins page.
I strongly encourage you NOT to disable any updates.
Next down the general settings page, you can configure automatic updates. This is the part we’re interested in.
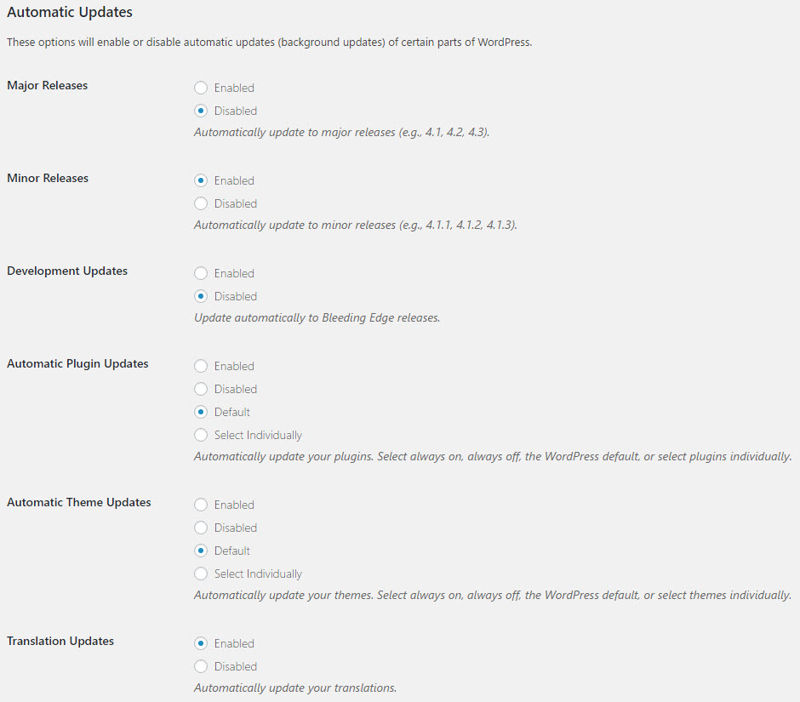

Set to Enabled for Major Releases, Automatic Plugin Updates, Automatic Theme Updates, and Translation Updates.
Just for this tutorial, I’ll choose Select Individually for my themes so you can see how that works later.
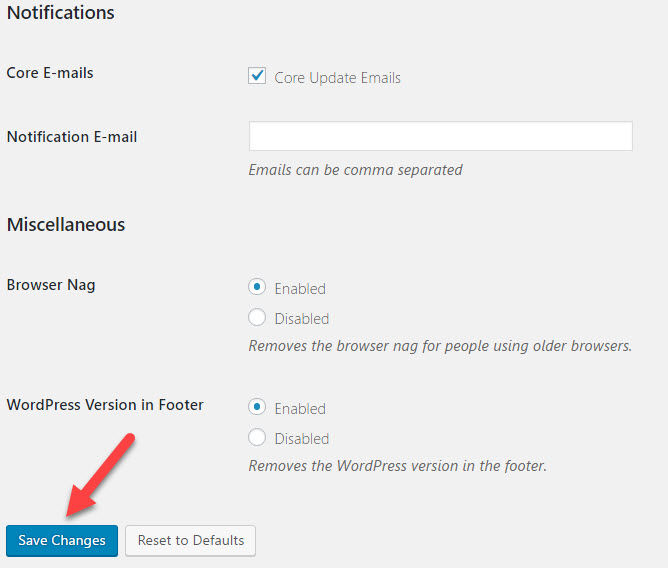
Finally, you’ll see the Notifications section. If you want, you can put in your email to be notified when WordPress core files are updated.
When you’re done, hit the Save Changes button.

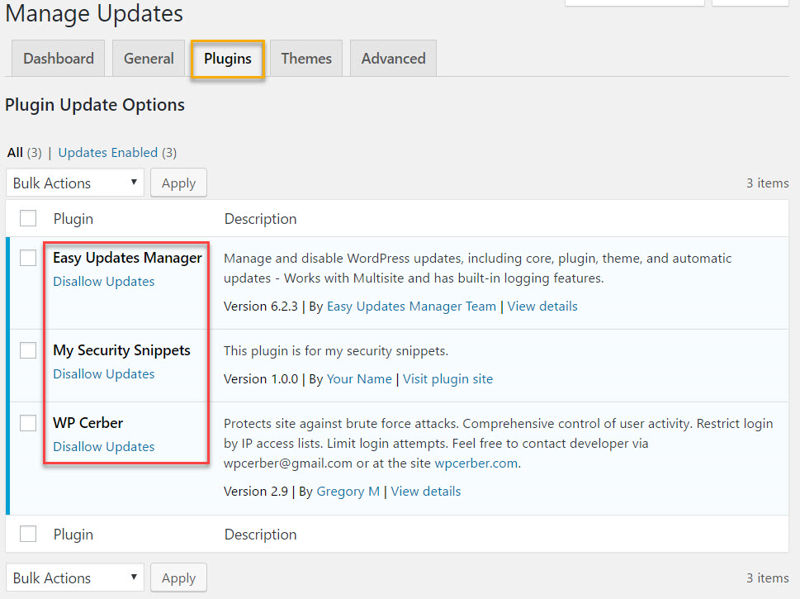
Moving on to the Plugins tab, you’ll see a familiar list of your plugins. Here, you can choose to disable updates for any plugins you don’t want to update. This will also prevent automatic updates for the ones you select.

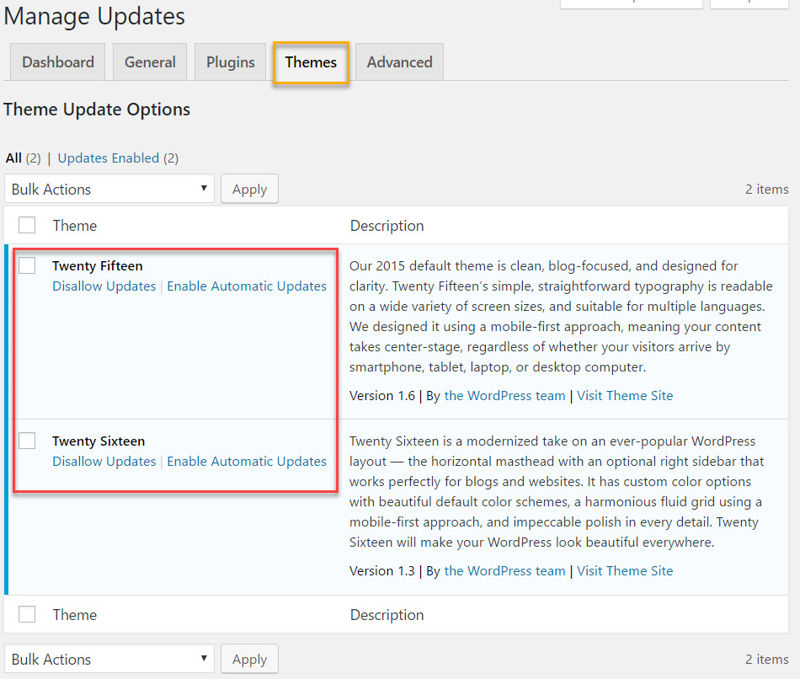
On the Themes tab, you’ll see a list of your available themes.
And because I chose the option of individually selecting which of my themes I wanted to enable automatic updates for, I can go ahead and choose that here.

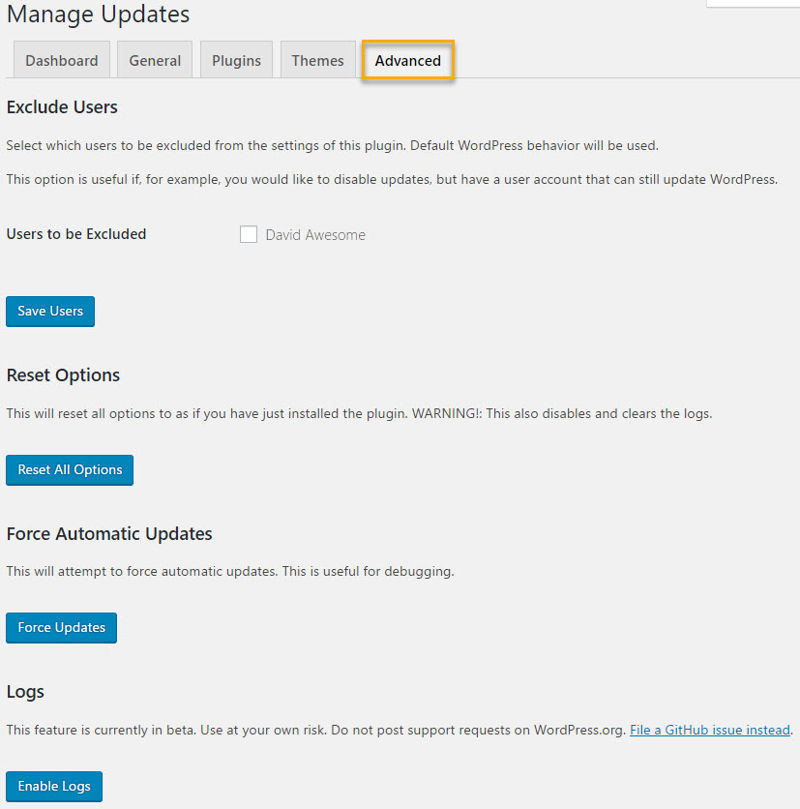
And lastly, the Advanced tab. Here you can do some useful things like:
- preventing specific users on your site from being able to change Easy Update Manager’s settings
- Reset all the changes you’ve made and return to WordPress’ default behavior
- Force automatic updates, which allows you to test that they actually work
- Enable logs, which will record details like which user performed an update of WordPress or plugins/themes, etc.

And you’re done! Updates will now happen automatically without you having to lift a finger.
How to Set Up an Uptime Monitor for Your WordPress Site with UptimeRobot
All right. Hear me out. Sometimes an update can break your site. It may never happen, but it CAN. Let me quickly tweak our FoxQi.com demo site a tiny bit to show you what this situation looks like.
Here’s what you’ll see when you try to load your website after something has gone wrong:
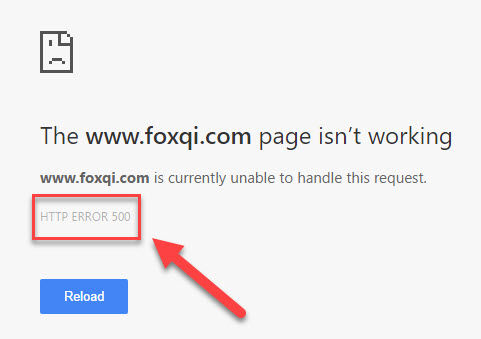

Now, this is not exactly cool to see and can be a huge turn-off for people visiting your website. That’s one of the reasons automatic updates are sometimes not a good idea.
But one thing you CAN do to soften the blow is getting notified if and when your site goes into HTTP error 500 mode.
That way you can take action sooner rather than later, and you should especially set this up if you chose to disable all WordPress update notifications previously.
You still with me? Terrific. Let’s get the monitor service going.
Okay, let’s get your site hooked up with UptimeRobot so you can be alerted anytime your site goes down for any reason.
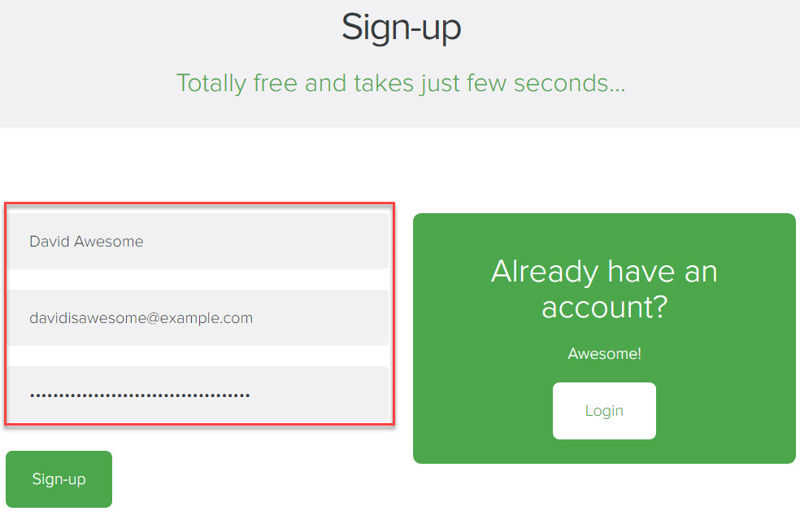
Step 1: Head over to UptimeRobot’s website and click the Sign-up button.
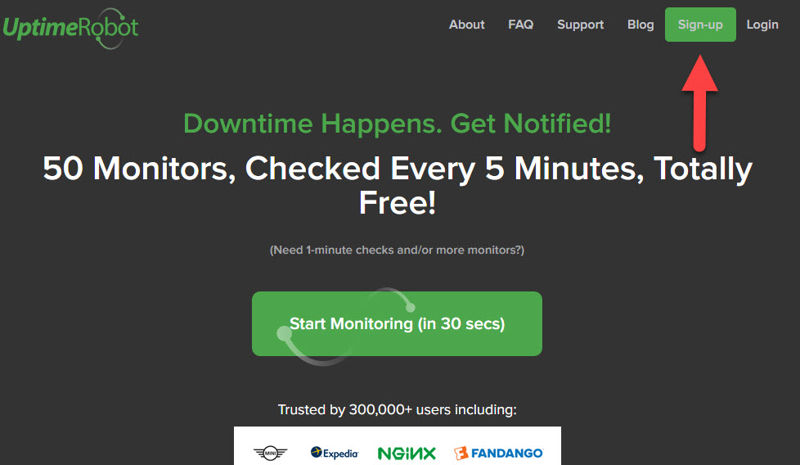

Go ahead and register for a free account, then make sure to check your email inbox for the activation link. I’ll meet you on the other side.

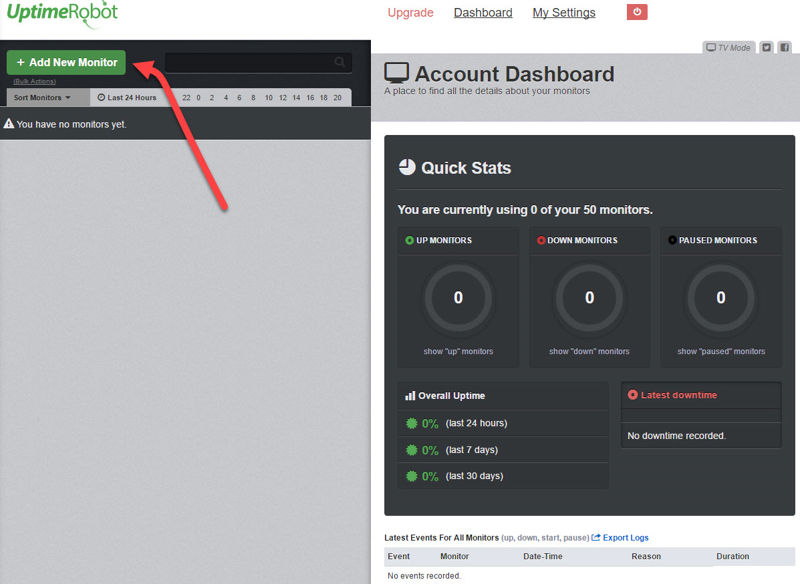
Step 2: On the default free plan, UptimeRobot lets you monitor up to 50 different IP addresses. This can be websites, servers, or online apps; it’s totally up to you.
So let’s create our first monitor for a website, which is really easy. On the main dashboard, click the Add New Monitor button.

A modal window will appear. Toggle the drop-down menu and click HTTP(s).
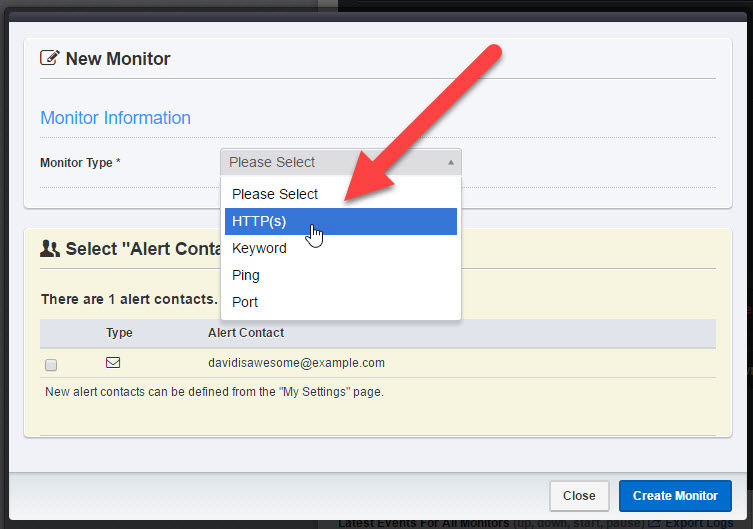

You’ll see some additional options.
- Type in a friendly name—anything you like—that will help you ID the monitor later on if need be. Then type in your website’s URL address and adjust how often UptimeRobot should check how your website is doing. (The more often, the better.)
- Check the box adjacent to your email address, which enables alerts to be sent to that address.
- Click Create Monitor!
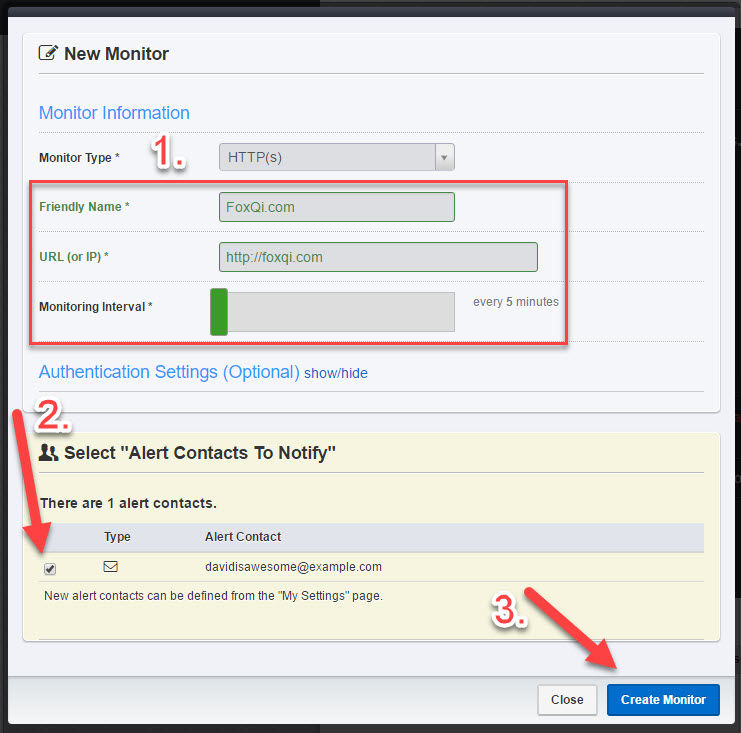

Feel free to close the modal window.
Your UptimeRobot dashboard will now display the monitor you just added.
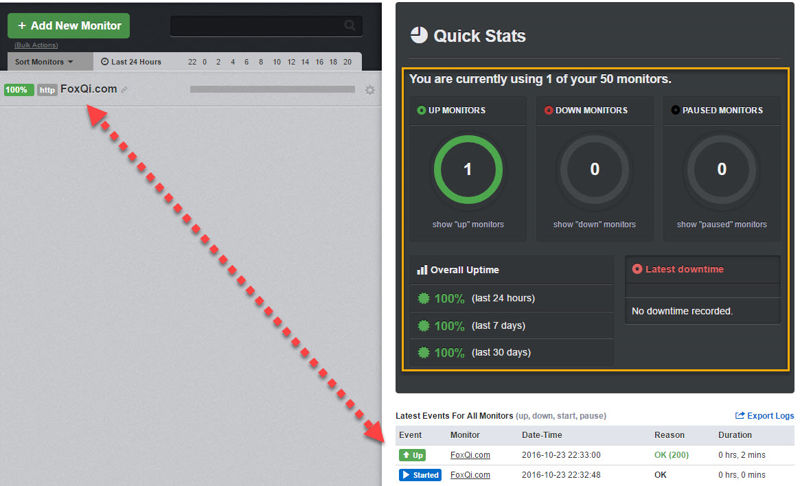

Here’s an example email you’ll receive when your site is down:
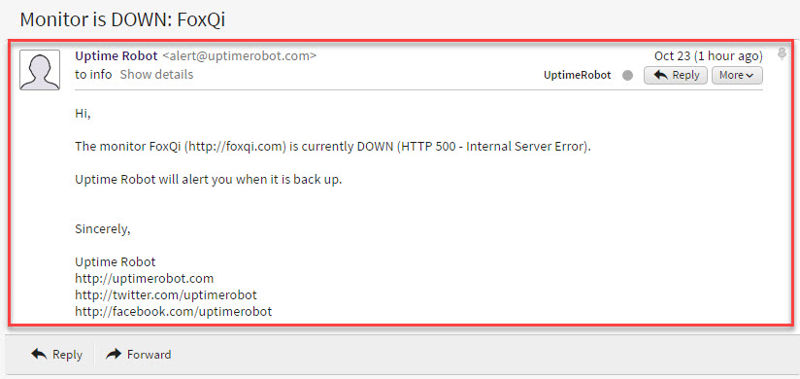

If your website is hosted with a terrible web hosting provider, expect to see a lot of these in your inbox; just sayin’!
And here’s what you’ll get when the site is back to normal again:
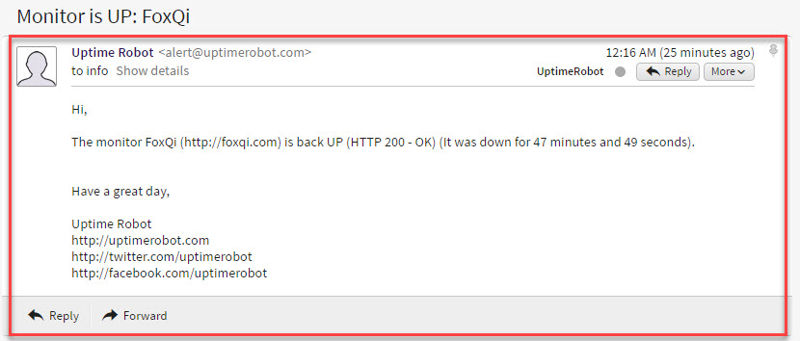

And you’re done! Good job.
Protect Your WordPress Website from Malicious Crawlers with Blackhole for Bad Bots


For any search engine—like for example Google—to index your website, it sends out web bot crawlers to scour the internet looking for sites to index and re-index.
That’s how you can eventually search for your site’s domain name and see it show up in the search results.
To control what parts of your site a bot is or is not allowed to index, you must use a plain text file called robots.txt, include your rules inside of it, then upload it to your site’s root folder. Here’s our file:
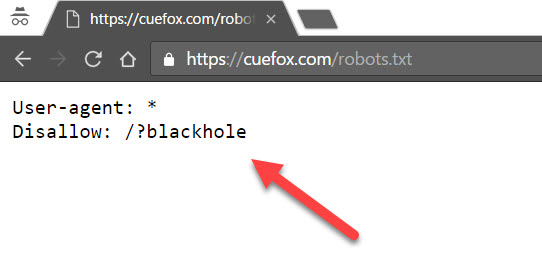

Now, the “good” crawler bots will obey your robots.txt file, while malicious bots are usually looking for things to harvest from your site such as your publicly listed email address, phone numbers, addresses, etc., which can later be used for spam and advertisements.
So, as part of their harvesting, bad bots will ignore the rules in your robots.txt file.
This is where Jeff Starr’s lightweight Blackhole for Bad Bots (BfBB) WordPress plugin comes into play.
After installing the plugin, you add a rule to your robots.txt file, which works as atrap. When a naughty bot ignores your rule, BfBB will ban the bot’s IP address and the bot will no longer be able to crawl your site.
In my experience, installing this plugin on sites with publicly visible email addresses sharply reduces the amount of spam those emails receive over time.
Let’s dive into setting this up on your site.
Step 1: As usual, log into your WordPress site, go to the Plugins page and click Add New.
Step 2: Search for “Blackhole for Bad Bots” and the plugin by Jeff Starr should appear on the left-hand side. Click Install Now and the plugin will be ready to activate shortly.


Blackhole for Bad Bots will get its own admin menu item. Click Settings from the drop-down.


On the first half of the settings page, you can:
- copy the rule needed for a blank robots.txt file
- enable/disable email alerts (I recommend disabling it) and set which email address you want the alerts sent to
- configure the message the bot/person will see when they disobey your rule (you can leave this at default)


Scrolling down to the second half of the settings page, you can:
- modify the list of whitelisted bots
- add whitelisted IP addresses
- reset the plugin back to default settings


Let’s create a robots.txt file.
Step 3: Open a blank document using an editor like Notepad (Windows) or TextEdit (Mac). (For TextEdit, make sure to use plain text format.)
Copy the following rule into your document:
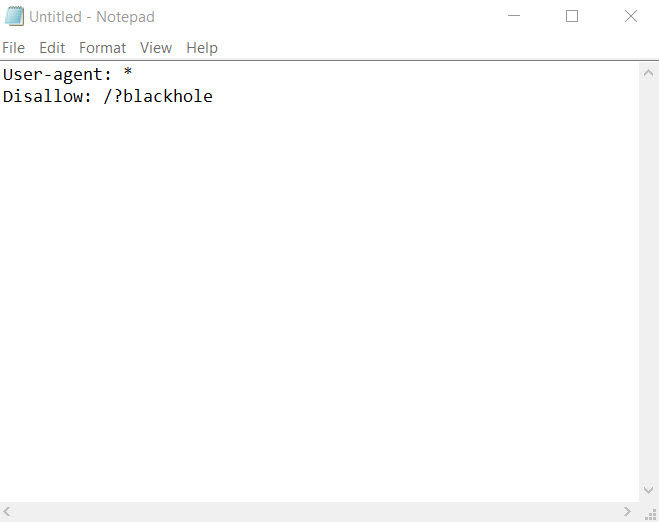

When you’re done, save the file as robots.txt.


Step 4: As you’ve done previously, log into your cPanel account, open the File Manager application and go to your website’s root directory.
Once there, click Upload.
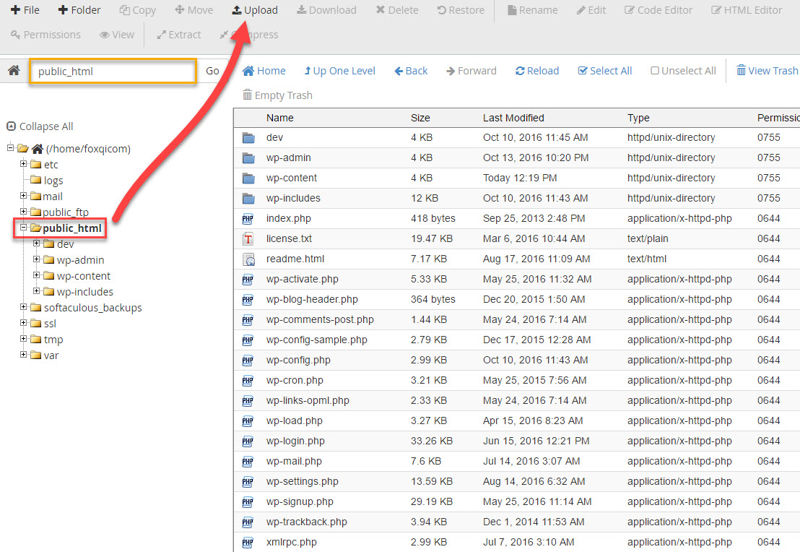

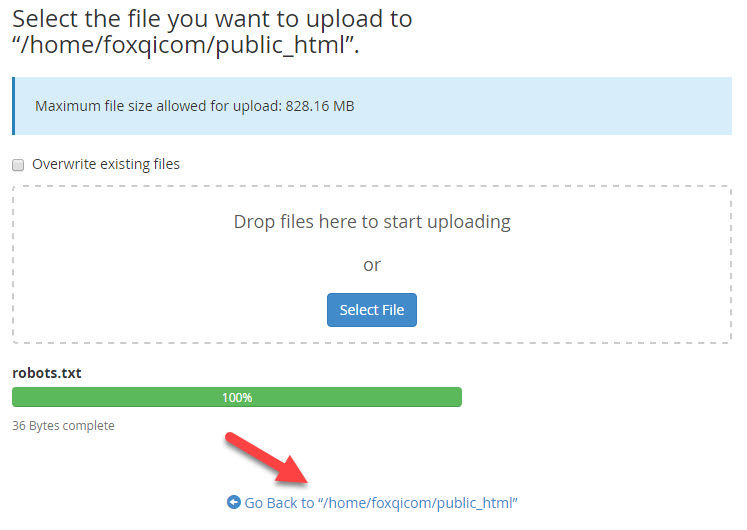
Now just upload your robots.txt file and click the return link.

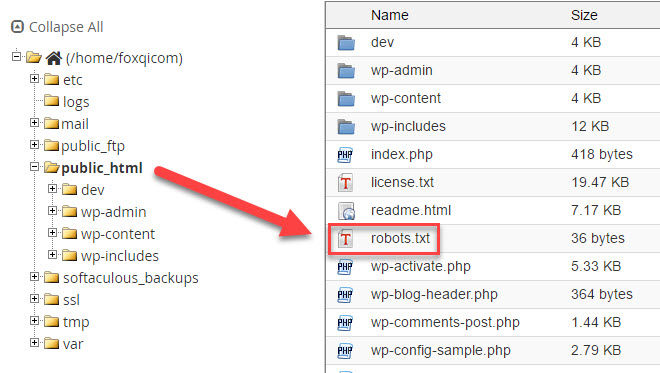
You should now see the robots.txt file in your site’s root directory.

Now browse to YourSite.com/robots.txt to test that it’s working.
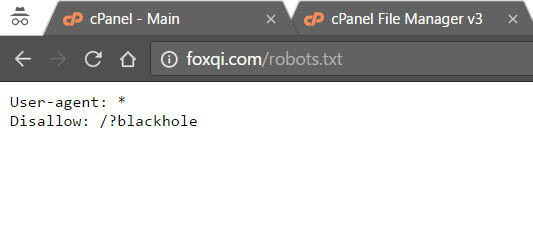

If you see the same as above, good job.
From the second sub-menu item (Bad Bots) under Blackhole, you can see the list of bots that have disobeyed your robots.txt file and are banned from your site.
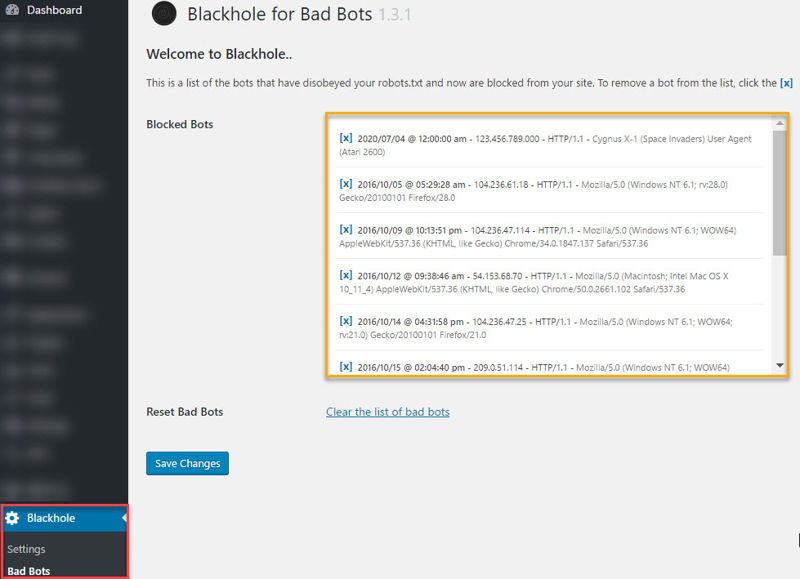

While false positives are rare, you can easily unblock them from this page. Other than that, you’re all set!
Adding Simple Firewall Protection to Your WordPress Website with Block Bad Queries


Another one of my favorite WordPress security tools is Jeff Starr’s efficient Block Bad Queries (BBQ) firewall plugin.
We install the pro version of this plugin on every website we manage for our clients, but the plug-n-play free version will also give your site adequate protection.
So, here’s what BBQ does:
After you’ve installed the plugin, it will begin watching all requests (aka. queries) made from another source to your site’s domain or IP address. (It compares these requests against a stored list of common malicious patterns.)
In other words, if I browse to YourSite.com/whatever/file.png, I’ve made a GET request to your site for an image file inside a specific directory.
Now, hackers, on the other hand, won’t be interested in your images. They’ll instead create automated scripts that scour the internet looking for other types of files on your server which they can exploit.
If you monitor your site’s access log on the server for GET requests, you may see requests like these:
- http://YourSite.com/path/?q=%2e%2e
- http://YourSite.com/wp-content/plugins/name-of-plugin/js/admin.js
- http://YourSite.com/wp-content/plugins/name-of-plugin/readme.txt
The last two examples are more relevant to WordPress and usually mean someone is trying to find out if:
- you’ve got the exact file they’re searching for because they want to exploit a known vulnerability in it
- you’re using a plugin (or theme) that is known to be vulnerable, so they can try to use it as a backdoor for exploiting your site
Once BBQ spots an absurd or malicious request, it will deny the request with an HTTP error 403 before your server spends any resources on it.
Overall, BBQ helps effectively:
- block WordPress-specific attacks
- block cross-site scripting attacks
- prevent directory traversal
- save bandwidth and server resources by terminating bad requests before they get through
Okay, time to get BBQ up and running. And you know what? All you need to do is install and activate the plugin and you receive a boatload of protection right out of the box.
There are no settings or options to configure in the free version.
Step 1: Log into your WordPress site, go to the Plugins page and click Add New.
Step 2: Search for “BBQ: Block Bad Queries” and the plugin by Jeff Starr should appear as the first result on the left-hand side. Click Install Now and the plugin will be ready to activate shortly.
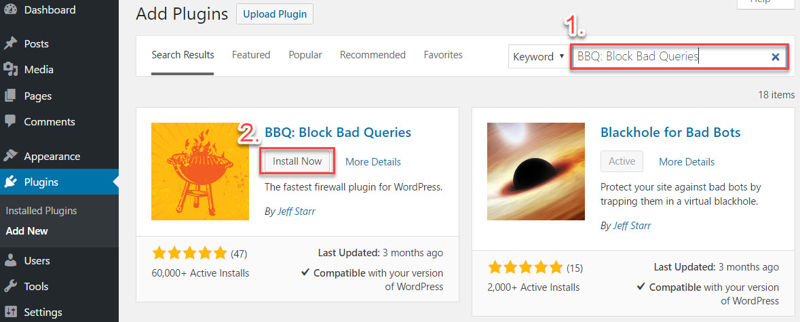

That’s it! The plugin is active and working as it should.
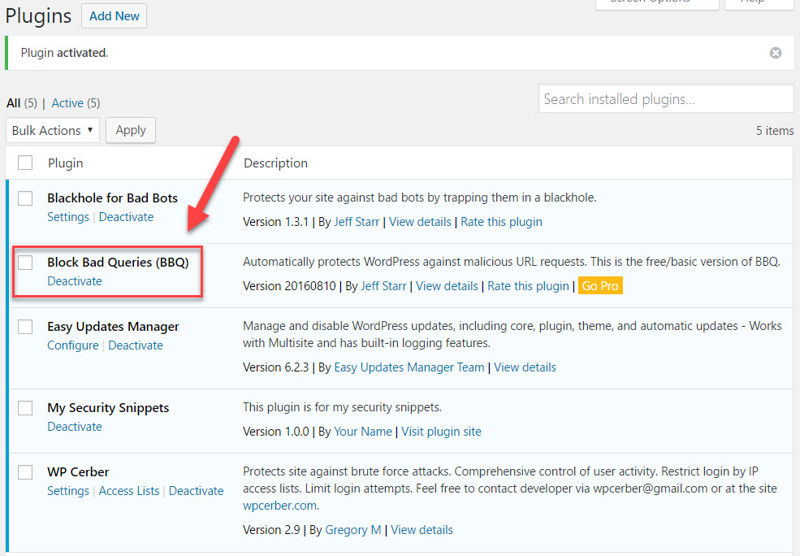

To test that the plugin is working, Jeff has listed some GET requests at Perishable Press you can try. Here are a couple:
- http://yoursite.com/path/?q=%2e%2e
- http://yoursite.com/path/base64_
First, I’ll try making a request without Block Bad Queries installed. You should see something like this:
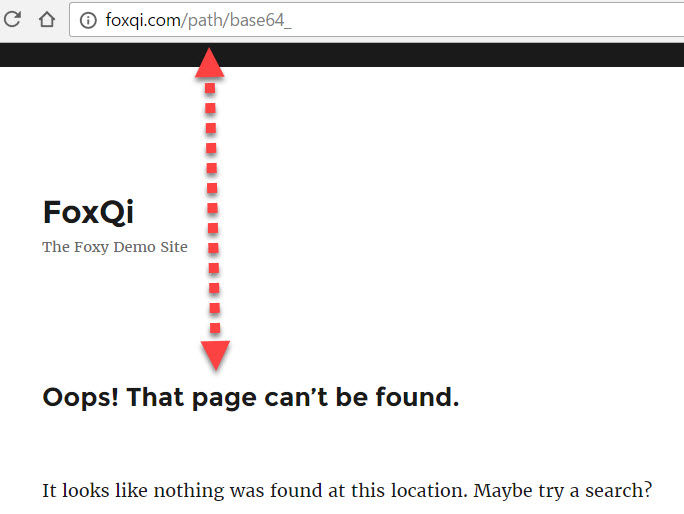

The above means the GET request was processed, redirecting you to a 404 page and wasting server resources. If your site was vulnerable to this specific request, it would’ve worked.
Now let’s make the same request with BBQ activated. You should get an HTTP error 403 this time:
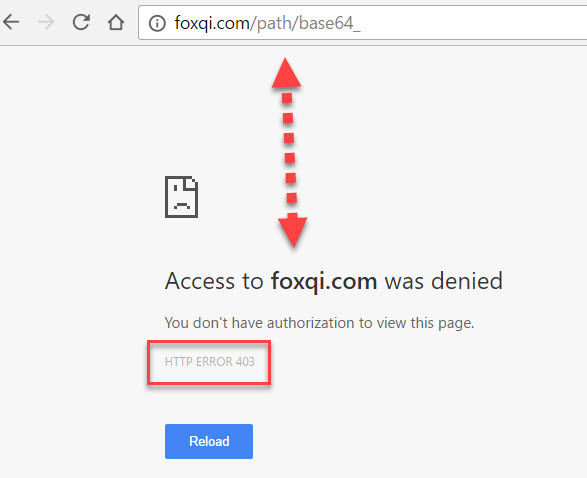

The request was successfully blocked, no redirects made and server resources spared.
Friend, you’re rockin’!
How to Check Your WordPress Site’s Integrity with Look-See Security Scanner


The last thing we’ll do is scan your site for potential problems, such as corrupted and infected files, or files that simply don’t belong in the WordPress core directories on the server.
I will walk you through a simple “integrity check” with the user-friendly Look-See Security Scanner (LSSS) plugin. But for a more thorough check, or in case of known infection, I will normally use:
- 4-5 different plugins to effectively scan the WordPress core, theme and plugin files
- malware and virus scanners on the server
- a couple of third party scanner services for scanning WordPress and checking a server’s integrity
- antimalware tools installed on my computer if I downloaded the website
So what do you do if the scanner finds infected files on your site? Oowee—that’s a mouthful for another article!
But the gist of it—for now—is you should consider getting someone experienced to solve the problem unless you really know what you’re doing.
There are many online resources available that try to help you recover a compromised WordPress site, such as the official codex article, so check those out as well.
To hire experts, I recommend:
- WPFixIt’s malware and virus removal service
- hiring an expert at Codeable to clean your site
O.K., time to scan!
Step 1: Log into your WordPress site, go to the Plugins page and click Add New.
Step 2: Search for “Look-See Security Scanner” and the plugin by Blobfolio, LLC should appear as the first result on the left-hand side. Click Install Now and the plugin will be ready to activate shortly.
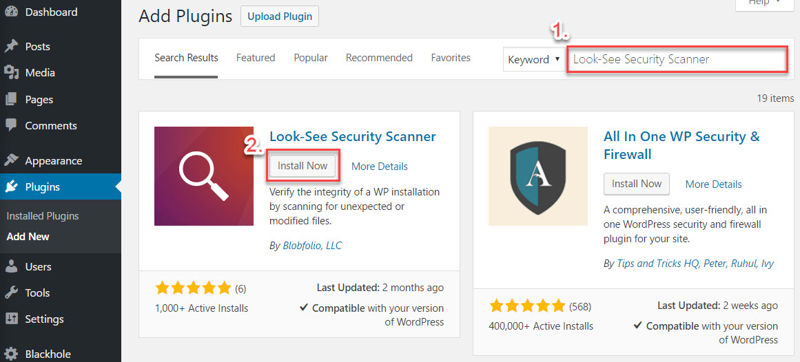

LSSS will get its own proprietary admin menu item. Click it.
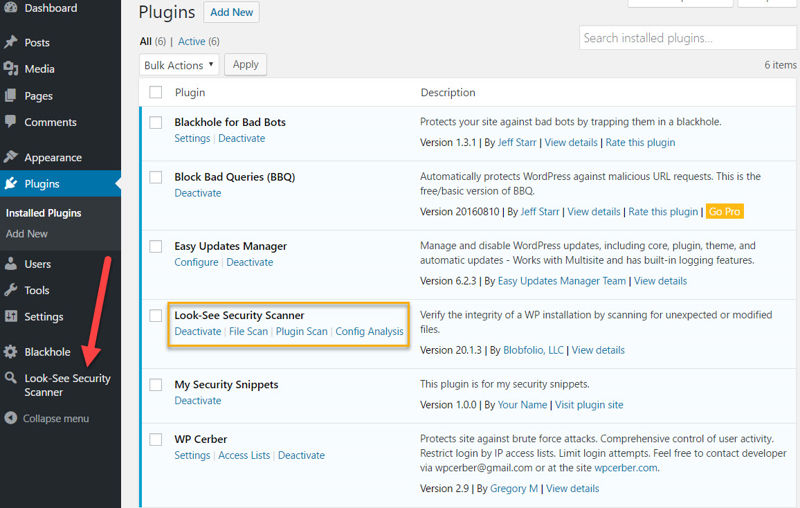

Step 3: On the File Scan page, all it takes is one click of the big blue button and LSSS takes care of the rest. But first, you can select these options on the right-hand side:
- CORE ONLY: this tells LSSS to only target WordPress core files (which means your themes and plugins will NOT be scanned)
- SKIP CACHE: tells LSSS to ignore the
wp-content/cachedirectory because the cache files are normally short-lived, meaning there is really no point for a hacker to try and infect them - SKIP MEDIA: tells LSSS to NOT scan stuff like your images, PDFs, MP3s, video files, etc.
- MAX SIZE: if you put a value of “2”, this tells LSSS to ignore all files that are larger than 2 MB. A value of “0” (zero) will instead remove the size cap altogether so you can scan huge files
Once you’re ready, click Start Scan and you’ll be able to follow the progress.
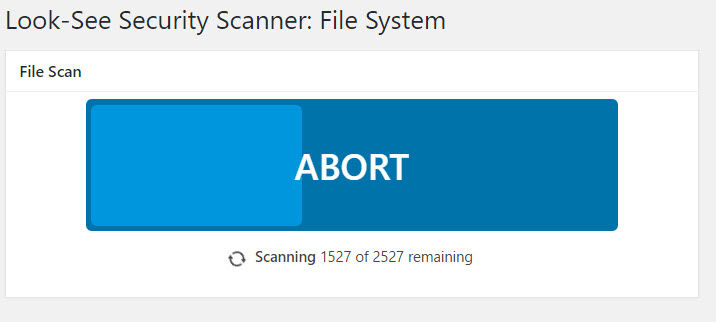

Once complete, you’ll get the results of your scan.
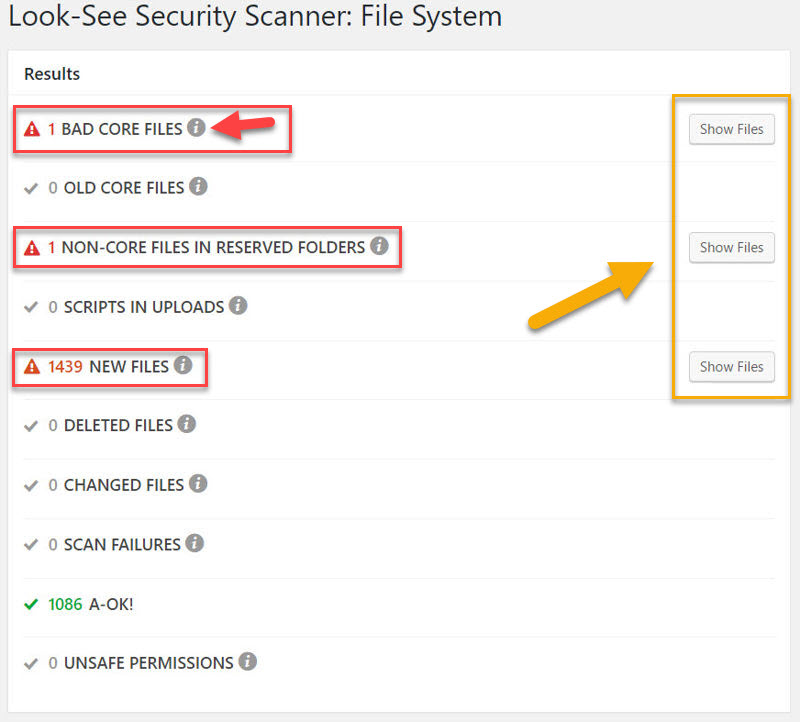

On the first scan, LSSS will show you a number of important things such as:
- if your site’s default WordPress files have been tampered with
- if your site contains outdated WordPress core files
- if there are non-core files in the default WordPress core directories
- if any script files have made it into your uploads folder
In subsequent or all scans, LSSS will tell you:
- which and how many new files have been added to your site since the last scan
- which and how many files have been deleted since the last scan
- which files have been modified
- which files LSSS was unable to scan
- which files have unsafe file permissions on the server
In the case of our FoxQi.com demo site, I got 3 warnings.
To learn more about each type of result, simply click the info icons. To see a list of which files are in question, click the Show Files button adjacent to the result type you’re interested in.
Let’s take a look at the first warning:
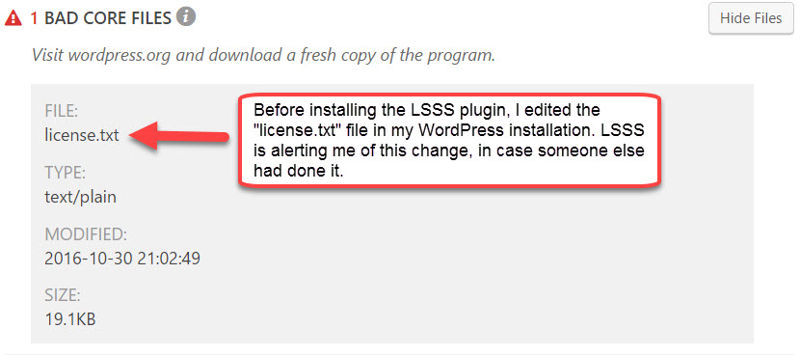

The license.txt file comes by default with every download of WordPress. So to test if LSSS would spot any changes made to this default file, which it successfully did, I made some edits to the file.
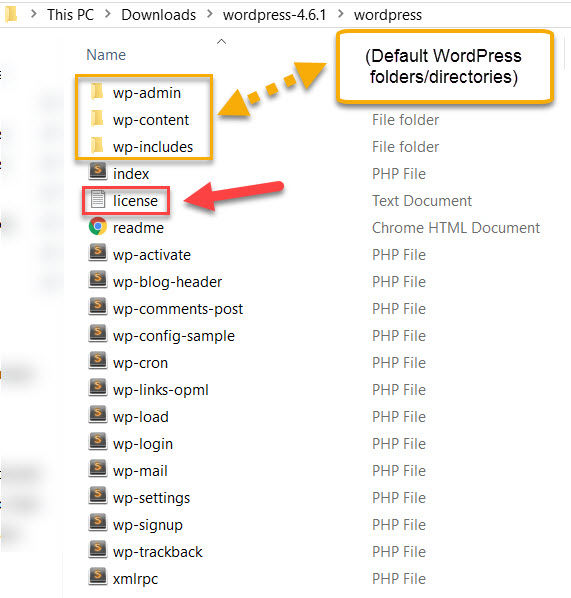

That completes the scan section.
Moving on, we’ll look at the LSSS plugin’s vulnerability detection and history page.
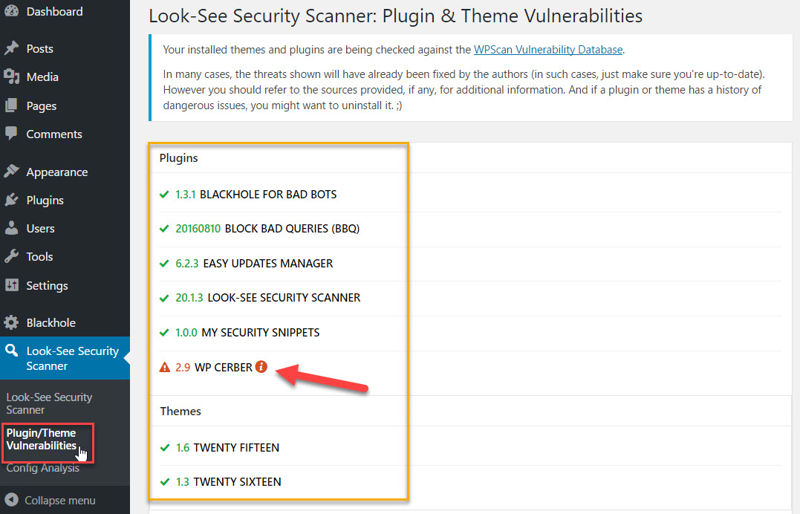

LSSS will compare all your themes and plugins against the WPScan vulnerability database. If a theme or plugin has ever had a disclosed vulnerability, LSSS will flag it in red, even if the issue has been fixed.
Above, you see that WP-Cerber, which I walked you through how to install earlier, has had a previously disclosed vulnerability. We can toggle more details:
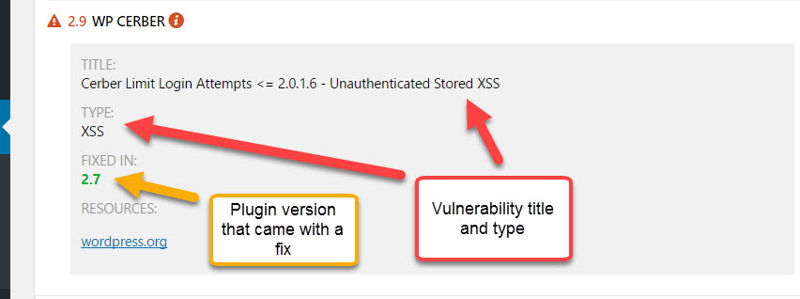

Always remember, security plugins are not perfect. But they can still be very helpful when used appropriately.
Finally, let’s wrap up with the plugin’s Config Analysis page.
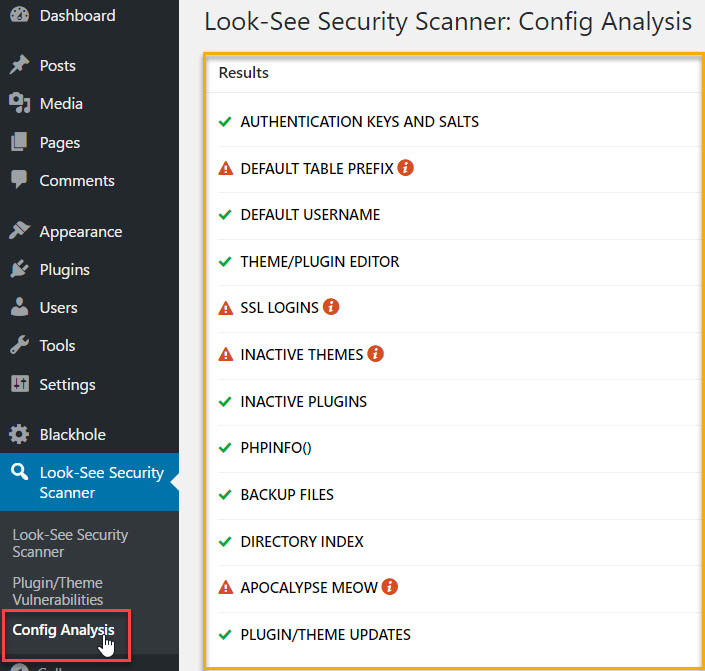

Here, LSSS will tell you how your site is doing against some basic security checks. During this tutorial, you’ve completed two of them (DEFAULT USERNAME and THEME/PLUGIN EDITOR).
You can solve:
- DEFAULT TABLE PREFIX by following this tutorial
- SSL LOGINS by installing an SSL certificate for your website (ask your hosting provider about this) and making sure to enforce it on your site’s login page
- INACTIVE THEMES by going to Appearance > Themes and deleting any themes you’re not using
- APOCALYPSE MEOW is another great plugin by the same author, but it has similar functionality as WP-Cerber, so you won’t need it
Whether you want to keep or remove LSSS from your site to reduce your “plugin footprint,” once you’re done, is entirely up to you. Just bear in mind you won’t have the benefit of comparing the latest scan with the one before.
Stay Up To Date with WordPress Security News
To wrap up this tutorial, I encourage you to keep yourself updated with news and information concerning WordPress security.
A great news aggregate site for this is WP Security Bloggers.
Out of the featured blogs you can follow, my personal favorites are:
At the least, I recommend you subscribe to the WP Security Bloggers feed and Plugin Vulnerabilities to receive alerts in case a plugin you’re using needs to be updated ASAP or is vulnerable without an available fix (in which case you may have to remove it).
 [/thrive_2step]
Terrific work, friend! If you’ve followed along to the end, your site is now much more secure.
Got questions or some of your own security tips? Please share them with us in the comments below, we’d love to hear them!
And if this tutorial was helpful to you at all, we’d super appreciate you giving it a share.

Leave a Reply