Sometimes you want to add, remove, or tweak the appearance and functionality of your website with quick lines of code. This sweet tutorial will show you exactly how to add code snippets to your WordPress site, which won’t be erased by updates.

Here’s the plan. I will walk you through creating a slick, lightweight code snippets plugin that you can use for any of your WordPress sites.
If you’ve followed our security tutorial, you’re already well-prepared to follow along from having built your security snippets plugin.
If you haven’t, this step-by-step tutorial will still be very easy even if you’ve never written a single line of code. If you can use a text editor and write emails, you can do this.
[thrive_2step id=’1619′] [/thrive_2step]
The security snippets plugin you built, is essentially a “site-specific plugin” in its most basic form, in that you can only use it to add PHP code (the main language in WordPress that controls the functionality and logic of your website).
But what if you also wanted to add CSS and—usually for experienced users—jQuery (JavaScript) snippets for styling and behavior respectively?
Well, you COULD go to the WordPress plugin repository and install either:
- 3 separate plugins (one for each language: CSS, PHP, and jQuery)
- 1 bulky plugin that can handle all three languages
To be very user-friendly, however, these plugins usually feature options panels and a visual interface in the admin backend of your site where you can tweak settings or write and paste your code.
That’s some extra weight you don’t need on your site when you can simply create your own skinny plugin and edit the raw files directly.
For most people, CSS, the language used to give your site its visual appearance and styling, is super easy to get started learning and you may end up finding CSS snippets you would like to try on your site.
I will also be sharing more code snippets with you in the future, so this plugin we’ll build together will come in quite handy.
So, roll up your sleeves, friend, and let’s dig in! Here’s what I’ll be covering with you:
Toggle Table of Contents- Understanding the Advantages of a Code Snippets Plugin
- Creating a Code Snippets Plugin for Your WordPress Site
- Using cPanel to Upload the Plugin to Your Site
- Uploading and Installing the Plugin through the WordPress Dashboard
- How to Add Snippets or Edit Your Plugin Files
- How to Deactivate a WordPress Plugin Using Cpanel’s File Manager
- Share / Sign Up / Comment (We Appreciate It!)
Understanding the Benefits of a Code Snippets Plugin
There are a few great advantages to using a code snippet (or site-specific) plugin.
I use them all the time for our projects, as it helps keep our code and customizations organized.
Let’s quickly cover some advantages.
The Code is Separated from Your Theme
If you’ve been trying to customize various parts of your WordPress site, chances are you’ve read tutorials and how-to guides that tell you “just add this line of code” to your theme’s functions.php, style.css, and/or a scripts.js file.
The problem with this approach is that if you ever update or change your WordPress theme, you will immediately lose any code you’ve added.
By instead using a code snippets plugin, you separate the code away from the theme, and you’re then free to switch themes and carry out updates.
All Your Code is Transferrable to Another WordPress Site
If you end up writing or collecting code in your snippets plugin, which you would like to reuse on another site, all you have to do is copy the plugin to the new site.
Afterward, feel free to make any adjustments to the plugin at the new site.
Using a Code Snippets Plugin Keeps Your Theme Files Clutter-Free
Some themes already come loaded with huge functions.php and style.css files.
Now, if you begin customizing your theme heavily, using these files, and especially if you don’t know how to comment code, you can lose track of what you’ve added and confuse yourself.
But What About Child Themes?
If you’ve ever used image editing software like Photoshop, you may be familiar with the idea of adding layers to your images, which allow you to add new images, elements and effects on top of the main image and edit these elements/effects separately.
WordPress Child themes work in a similar fashion and were designed as a useful way to customize or override parts of your main theme (which is then called the “parent” theme), by acting as a separate layer on top.
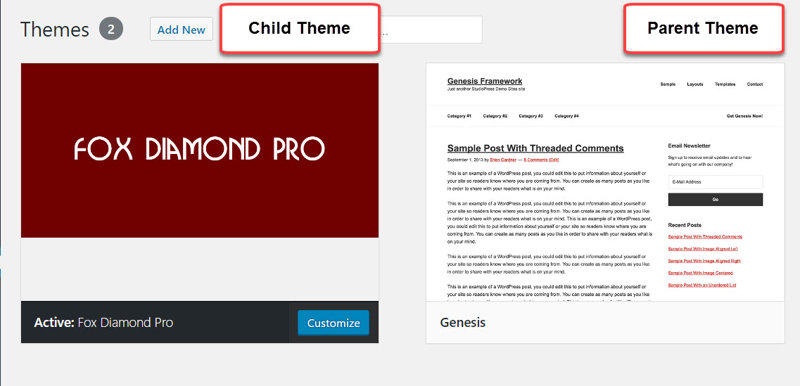
By including your PHP, CSS, and script files in the child theme, you can add your code to these files and they will not be affected by updating or changing your parent theme.
However, if you’re using a WordPress theme framework like the widely popular Genesis Framework from StudioPress, the situation gets a little murky.
For your WordPress site to run the Genesis Framework, two parts are needed:
- the framework parent theme that is mandatory to use
- a Genesis child theme of your choice that is put on top of the parent Genesis theme
Because of this, Genesis themes have to be sold as child themes, and these child themes may receive periodic updates. (And no, you unfortunately can’t create “grandchild” themes.)
This gray area is what pushed me to find a solution where I didn’t need to depend on a theme to make most types of customizations.
So, again, being able to separate things into a plugin saves the day.
Are There Any Disadvantages to Using This Plugin?
Yes, there are a few things about this approach that are less than ideal when considering best practices.
Once you understand these minuses, it’s up to you to weigh the pros vs. cons.
The first problem has to do with CSS. A theme (or child theme) is meant to provide the CSS styling for your website. Plugins are not.
Plugins should only come with easily-overwritable styling necessary for the HTML elements they add to your site.
For example, if a plugin adds an FAQ accordion to your website, it should just provide basic styling to make the accordion look presentable and usable out of the box.
When you use a plugin to style an already pre-styled theme, you end up adding code with the intention of overwriting existing code.
This, for example, means you now have two CSS rule-sets trying to change the size of your blog post titles.
The theme’s style.css file says “make the title 25px.” But you want it bigger, so you add some lines to your plugin’s style.css file that overwrite the theme’s code by saying, “make the title 40px.”
This adds unnecessary code weight (aka. “bloat”) to your website.
The second problem is your web browser must load an additional style.css file from your plugin (adding an extra “HTTP request” and increasing your site’s load time).
While one extra file normally won’t impact performance in a noticeable way, just make sure you’re not loading too many style and script files by the time your site is ready for launch.
So, I’ll leave you with this:
- It’s not best practice to use a plugin to style your website
- But despite the reasons noted, there is normally no noticeable sacrifice in your website’s speed
Creating a Code Snippets Plugin for Your WordPress Site
Let’s get the ball rolling and create your code snippets plugin.
The plugin we’ll make will consist of 3 folders and 7 files total.
It will contain a set of 3 files for styling and modifying the front-facing side of your website, and a separate set of 3 files to customize the admin backend and login page if you’d like to do this.
The 3 files are:
- a
functions.phpfile for your PHP snippets - a document-ready
scripts.jsfile for your JavaScript code - a
style.cssfile for your CSS code
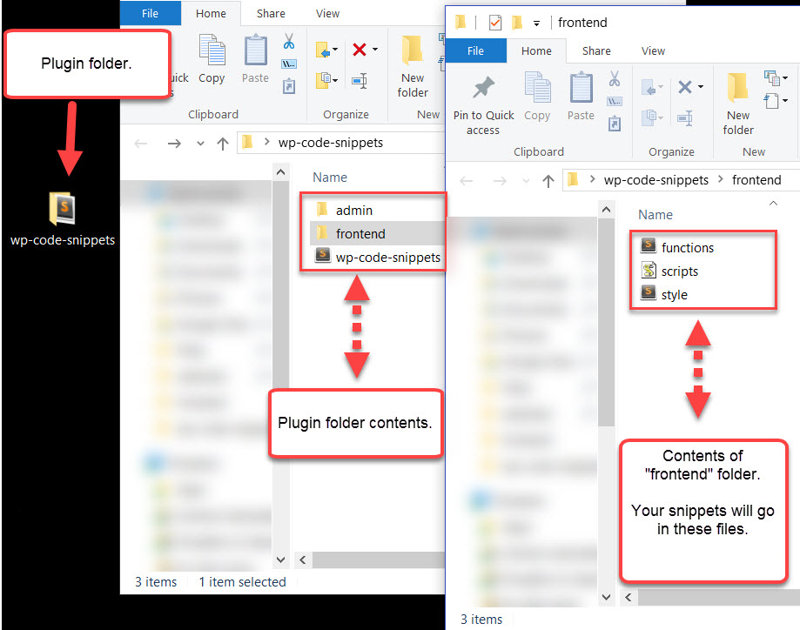
Step 1: On your computer dashboard, create a new folder called wp-code-snippets.

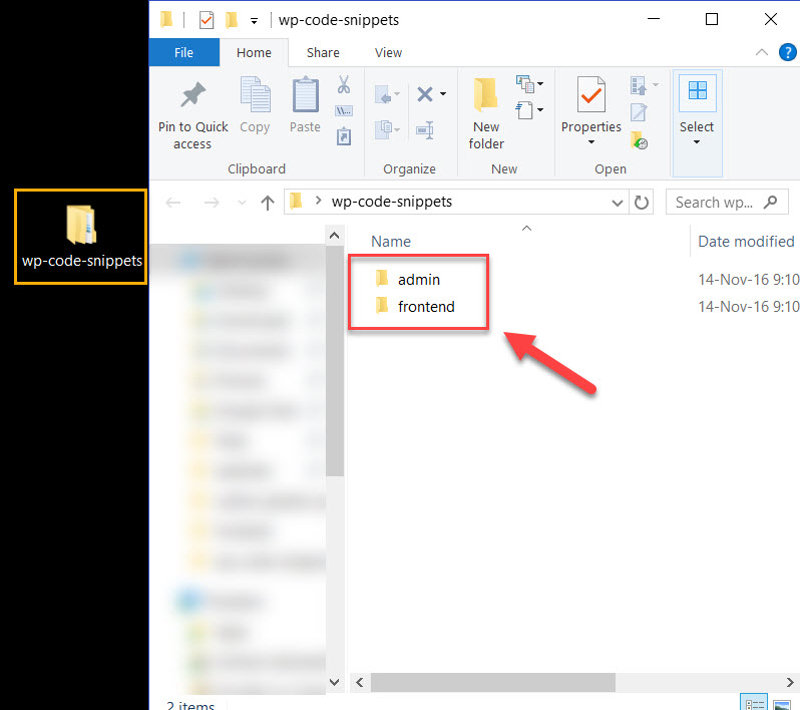
Step 2: Inside the wp-code-snippets folder, create two new folders. Name one admin and the other, frontend.
Step 3: Open a blank document using an editor like Notepad (Windows) or TextEdit (Mac). (For TextEdit, make sure to use plain text format.)
NOTE: If you’re comfortable with a code editor, then use that of course.
Paste the following code into your editor:
Make sure to put in your preferred author name and website links.
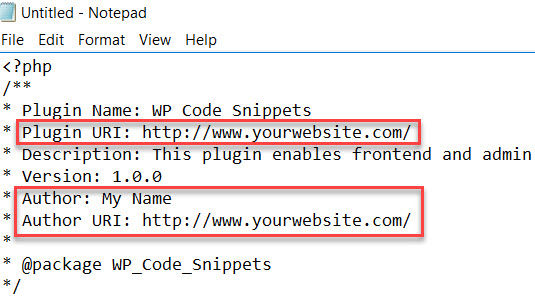
The beginning portion of your text document should now look something like this:
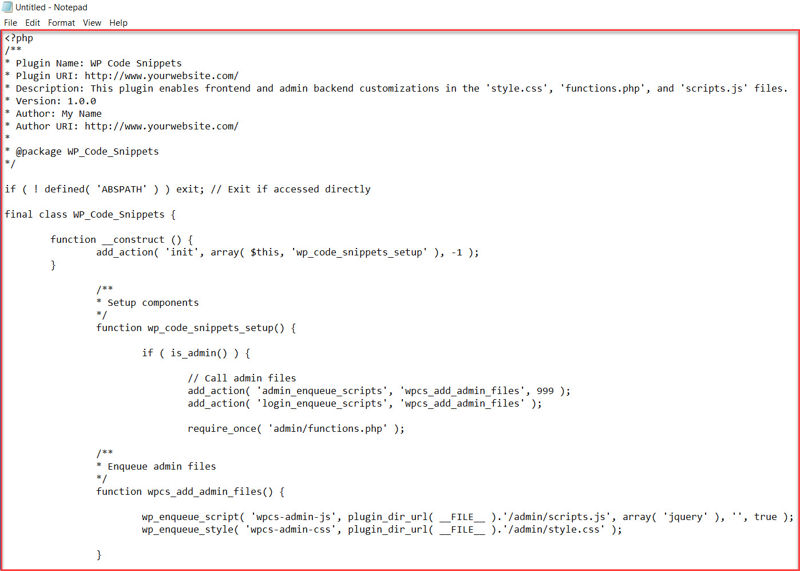
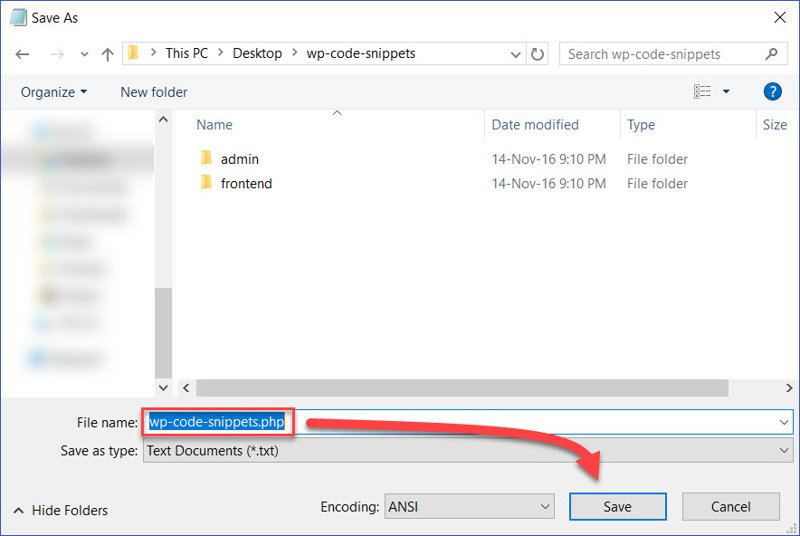
When ready, save the document as wp-code-snippets.php inside the wp-content-snippets folder.
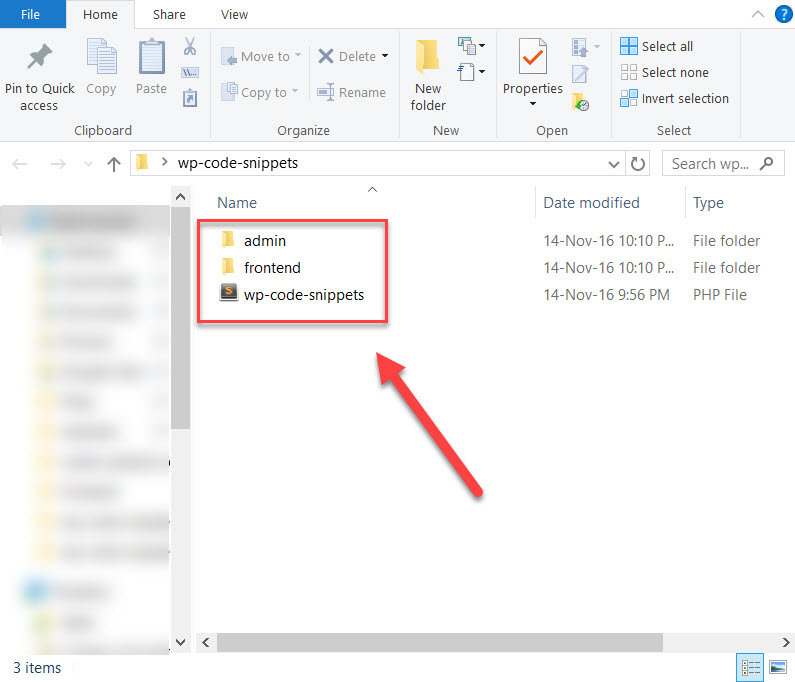
Very good! Before moving on, make sure your plugin’s folder now contains these 3 items:
Step 4: Just like you did previously, let’s create the files for the admin and frontend folders. Make sure to save each document with the correct file extension (i.e. file-name.php, file-name.js, and file-name.css).
For the functions.php file, paste the following code:
For the scripts.js file, paste the following code:
For the style.css file, paste the following code:
When you’re done, the admin and frontend folders should each contain one functions.php file, one scripts.js file, and one style.css file.
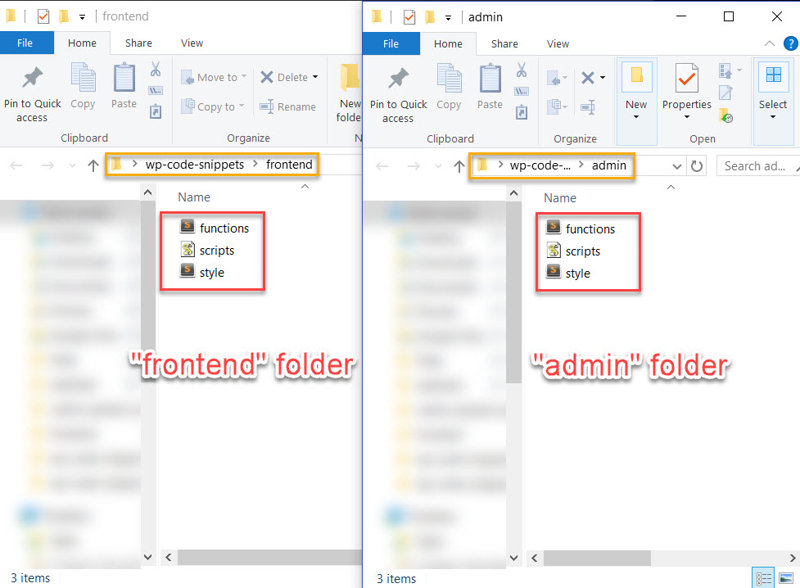
Brilliant work, friend. You’ve created the heart of your plugin and fleshed it out with the files needed for all your custom tweaks.
Your plugin is now ready for use. Let’s quickly compress it into a zip file.
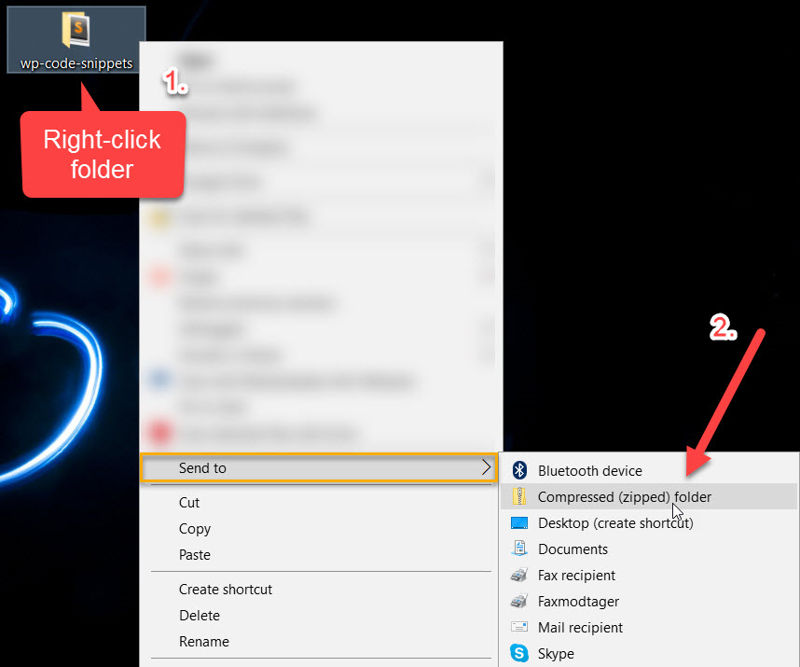
Good job. Next, I’ll show you how to upload your plugin through:
- cPanel’s File Manager application
- the WordPress admin dashboard
Using cPanel to Upload the Plugin to Your Site
[thrive_2step id=’1619′] [/thrive_2step]
All right. This is the part where you’ll need access to your cPanel account with your hosting provider.
Step 1: Log into your cPanel account.
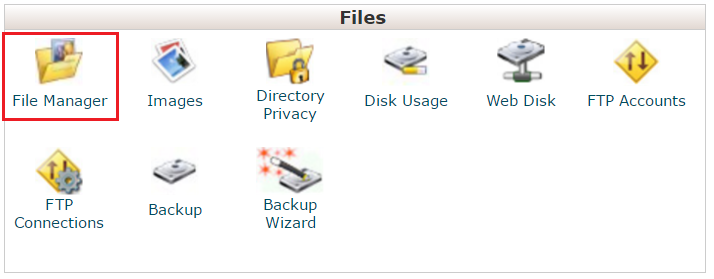
Step 2: Locate and open the File Manager application within the Files section.
On the left-hand side, you’ll see a list of directories for your cPanel user account. We want to find your website’s root directory, which is typically called public_html.
Click on public_html to load its contents, then locate and double-click the wp-content directory.
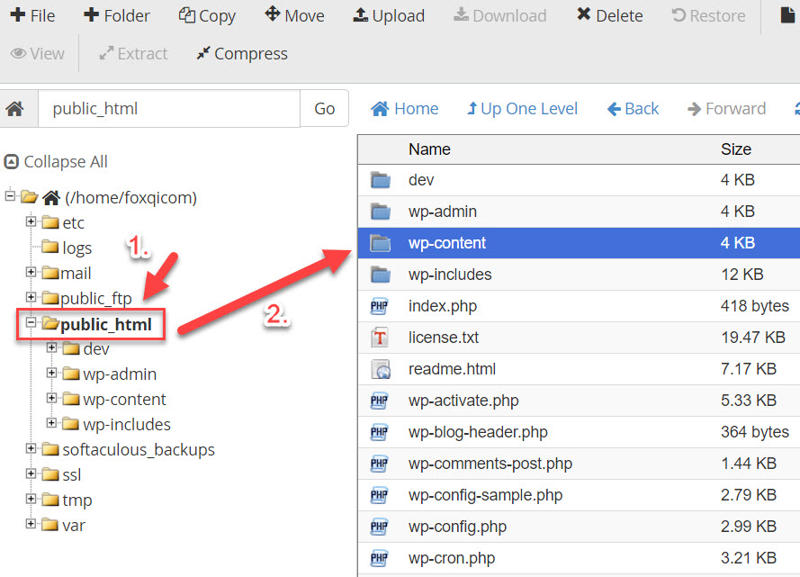 Inside wp-content, enter the plugins directory.
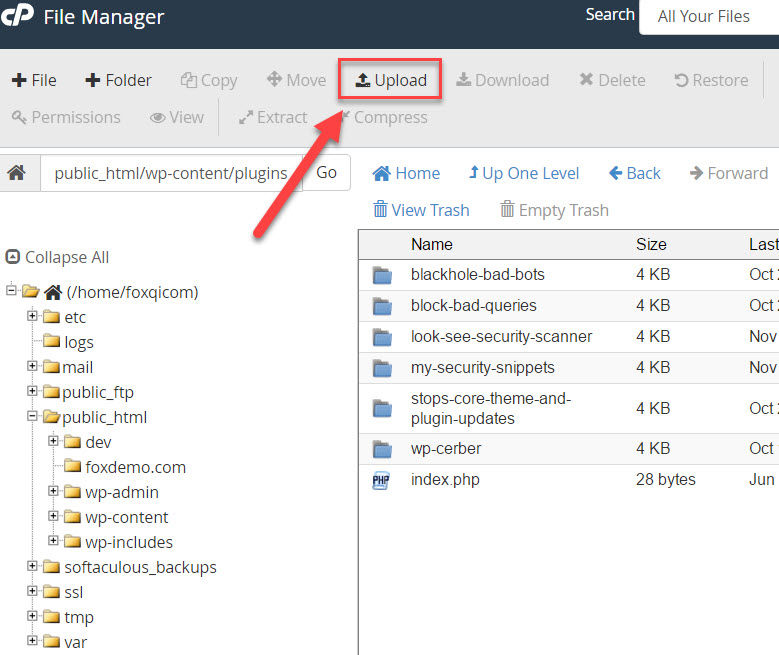
Step 3: Click the Upload button.
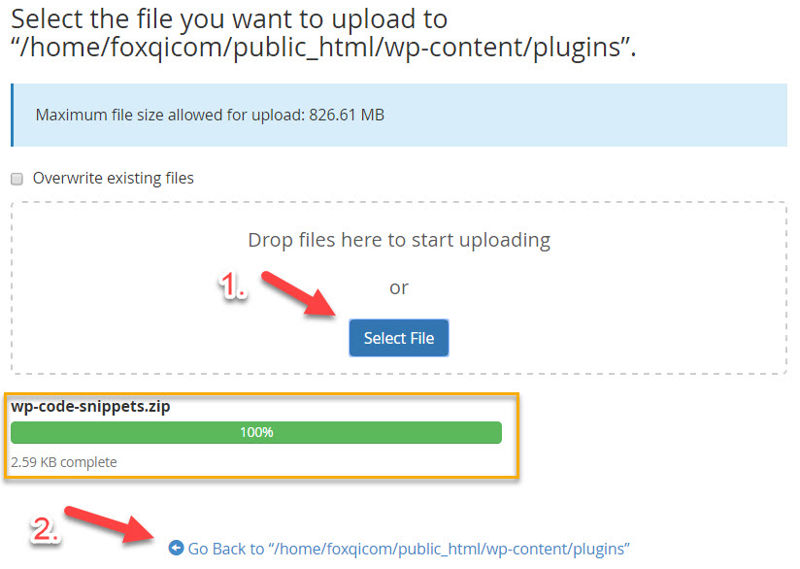
On the following screen, click Select File, browse to your file’s location on your computer and upload it.
Once finished, click the Go Back to link.
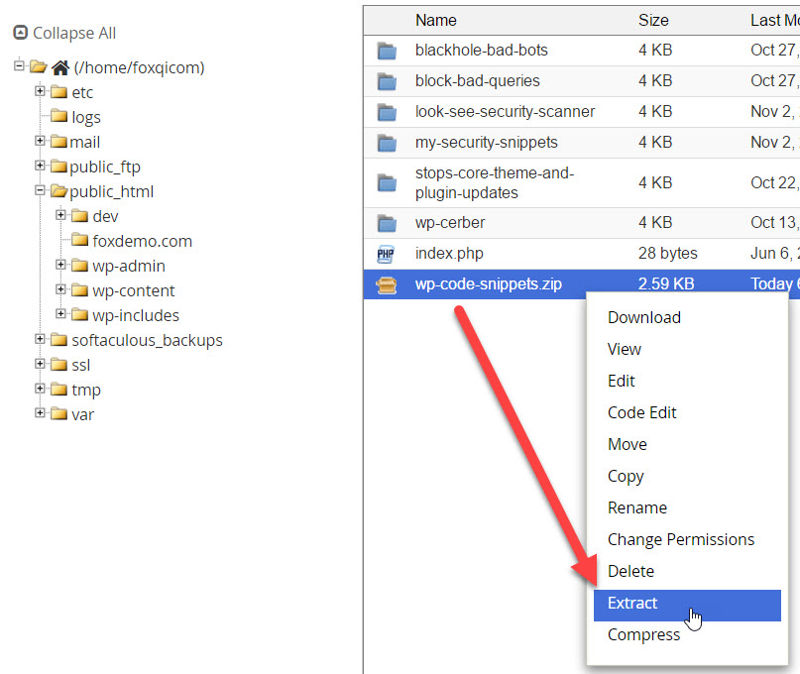
Step 4: Back in the plugins directory, right-click the wp-code-snippets.zip file and click Extract.
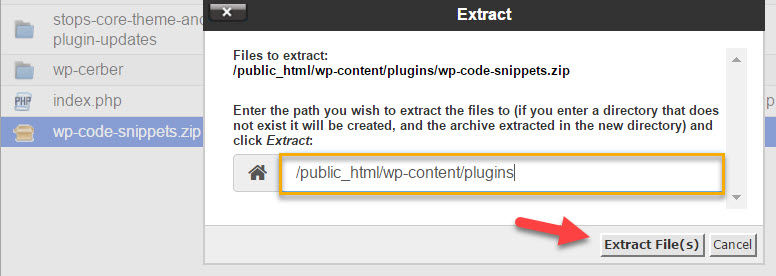
In the modal window that appears, leave the path unchanged and click Extract File(s).
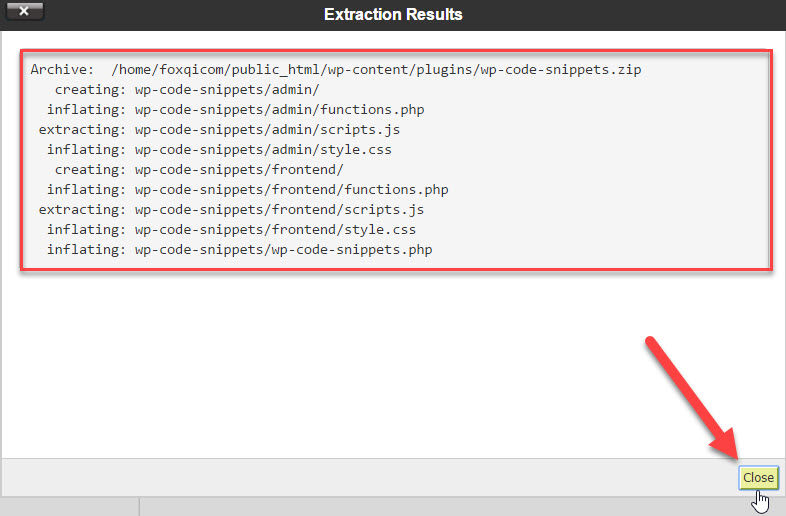
If and when you see the Extraction Results modal window, simply click Close.
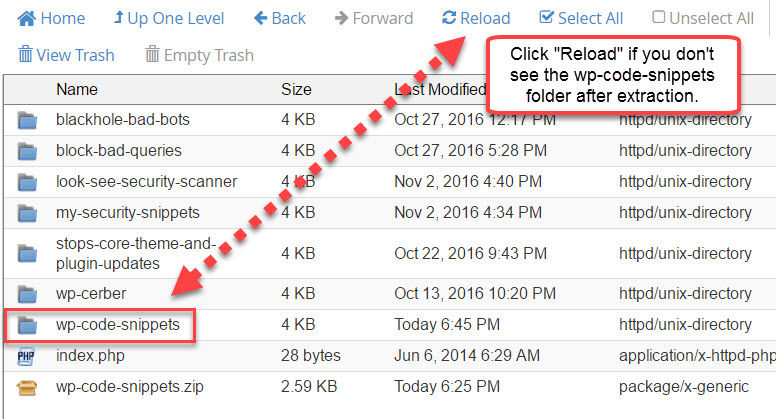
If you can’t see the wp-code-snippets folder anywhere, click the Reload button.
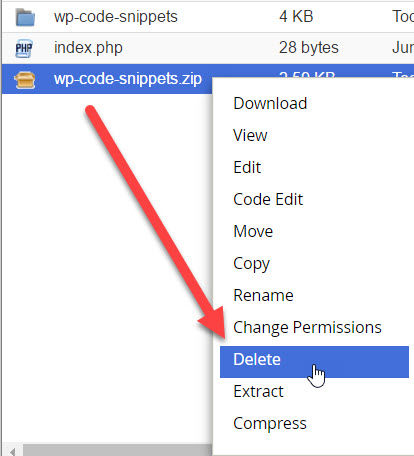
Step 5: Right-click and delete the wp-code-snippets.zip file.
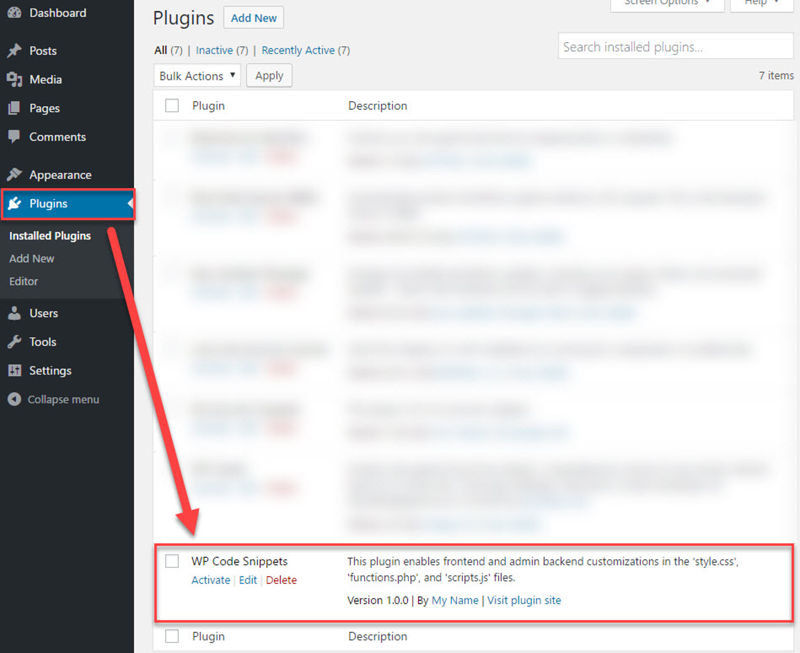
Sweet! You’ve done it. Head into your WordPress dashboard and activate the plugin from the plugins page.
Uploading and Installing the Plugin through the WordPress Dashboard
Perhaps you’d rather upload your plugin with ease from the WordPress dashboard. You can do that too.
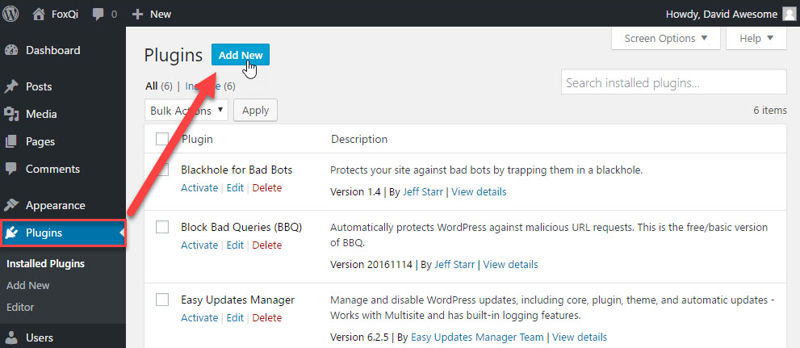
Step 1: Log into your WordPress admin area, go to the Plugins page and click Add New.
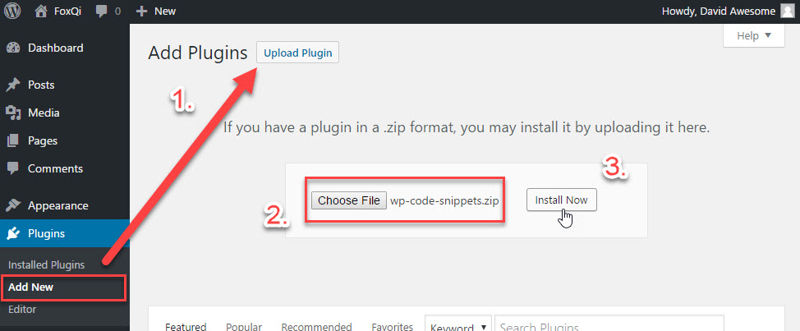
Step 2: On the Add Plugins page:
- Click the Upload Plugin button.
- Click Choose File, locate and upload your
wp-code-snippets.zipfile - Click Install Now
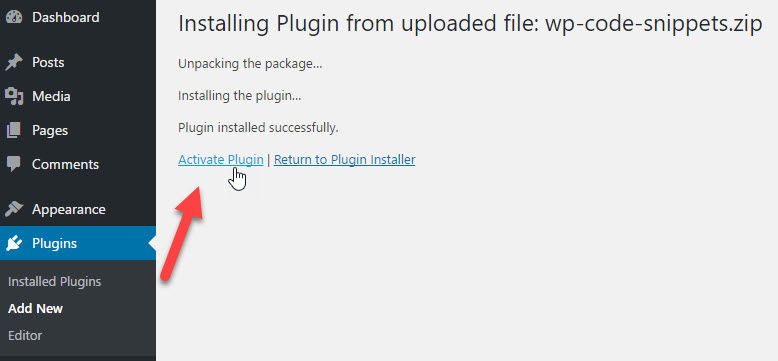
After the plugin installation is complete, click Activate Plugin.
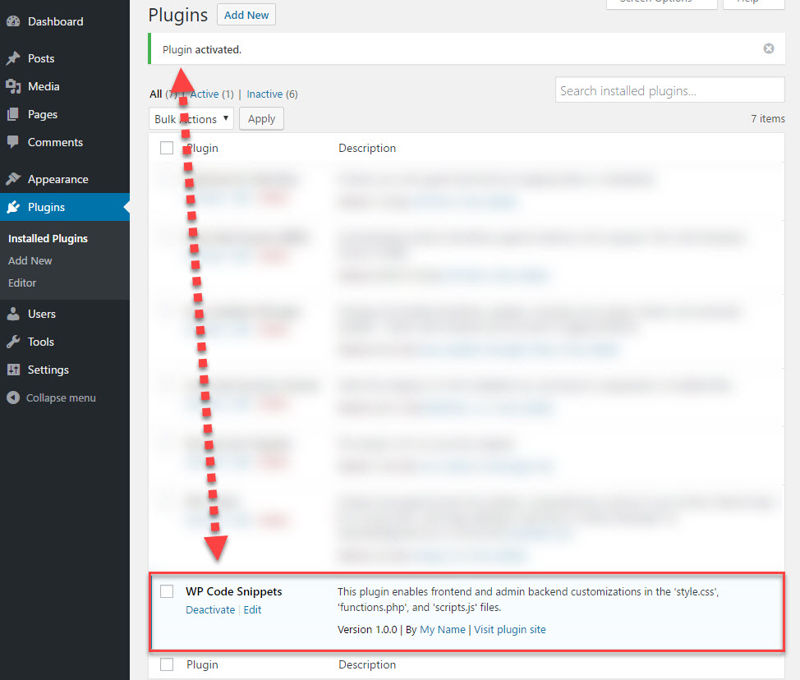
Your plugin is now ready for using!
How to Add Snippets or Edit Your Plugin Files
To add code snippets or edit your plugin’s files, head back into cPanel’s File Manager and load your site’s plugins directory.
Once there, enter the wp-code-snippets folder.
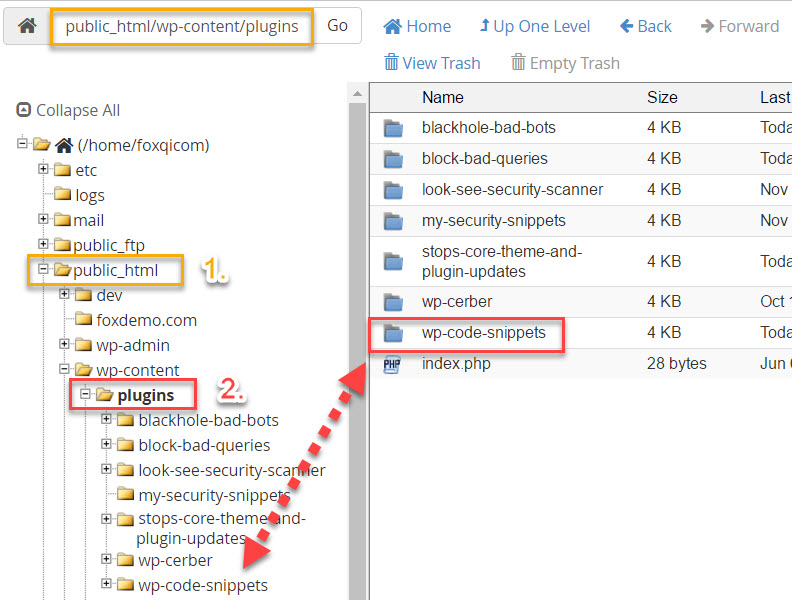
Next, you’ll see the:
adminfolderfrontendfolderwp-code-snippets.phpfile
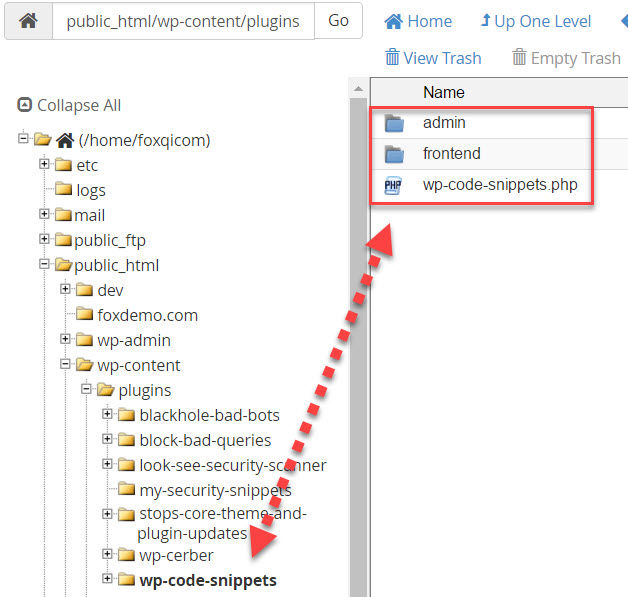
If you’re adding code that’s supposed to change the WordPress admin area or login page, go into the admin folder.
If, instead, your code is meant to change the frontend of your website, head inside the frontend folder. (Most people will only need this folder.)
For this demonstration, I’ll add some custom CSS code to the style.css file in the frontend folder.
The site title and tagline on FoxQi.com demo site is looking a little dull.
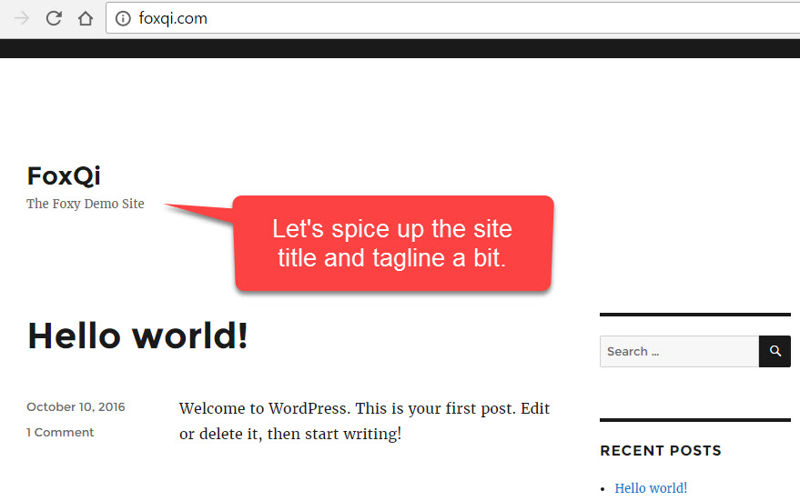
Let’s make it more eye-catching with some CSS.
Step 1: Inside the frontend folder, right-click the style.css file.
Usually I would tell you to click Edit. But this time, let’s use File Manager’s code editor instead. So click Code Edit.
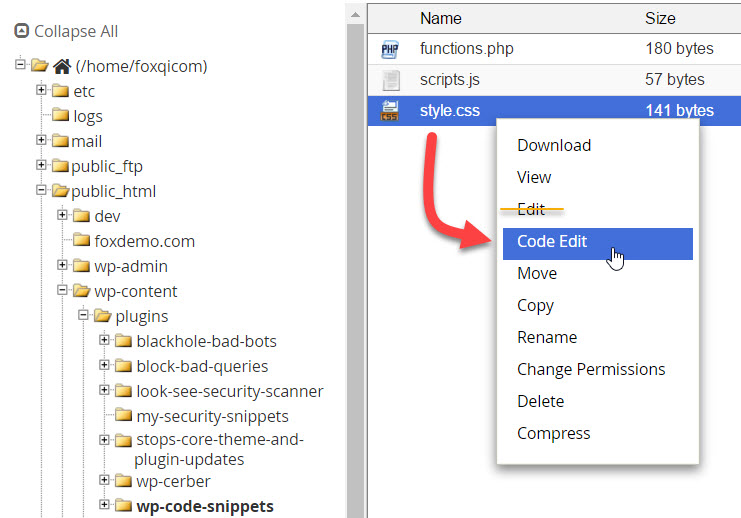
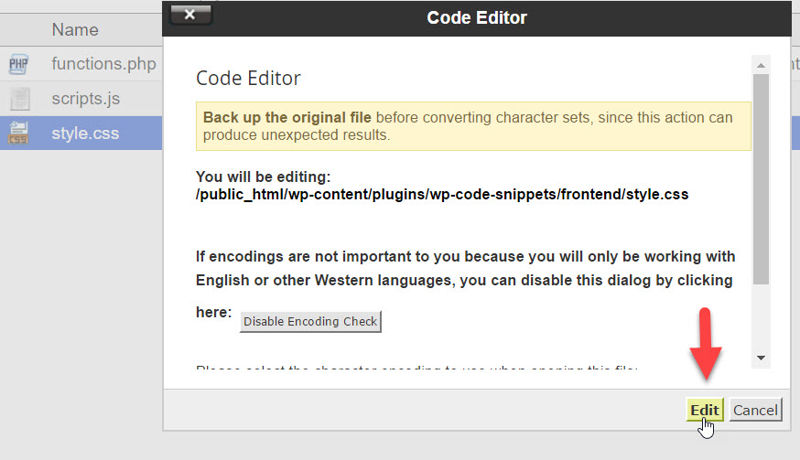
You’ll likely see another modal prompt. Just click Edit.
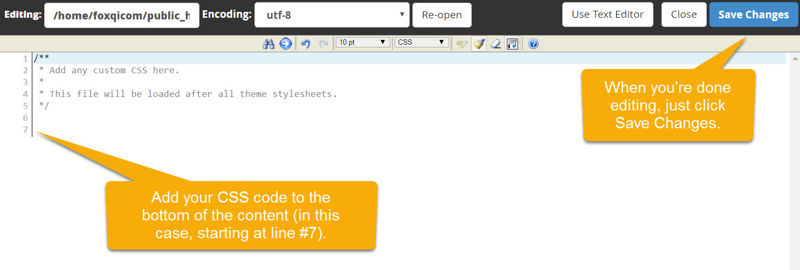
You’ll then see the code editor showing the contents of your style.css file.
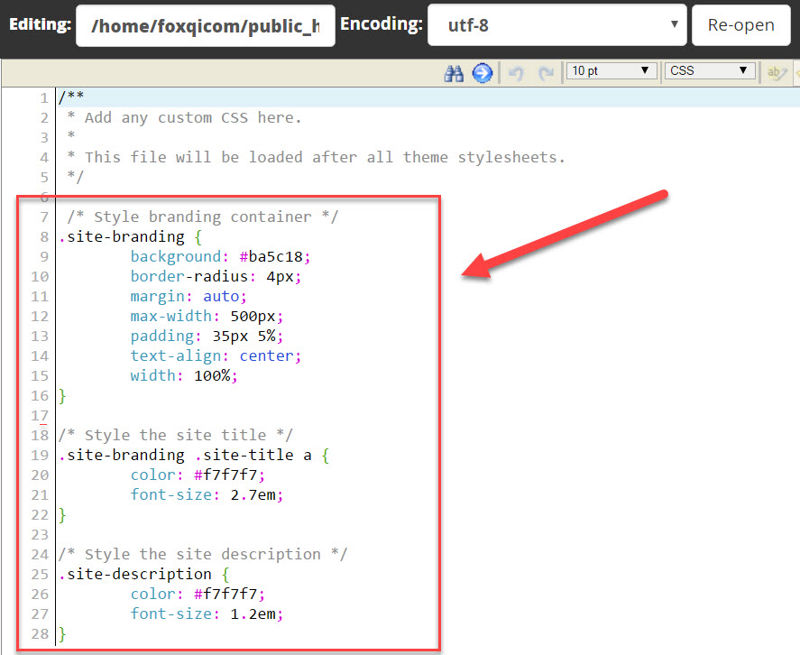
I’ll paste the following CSS into the code editor:
In the code editor, it’ll look like this:
After you’ve pasted (or written) your code, make sure to hit the Save Changes button.
And our site title and tagline now looks like this:

Now ain’t that just cool?
That should give you a basic idea of how to add and edit your code with File Manager’s code editor.
How to Deactivate a WordPress Plugin Using Cpanel’s File Manager
Here’s an important thing you should prepare yourself for, and why developers and web designers don’t work on live websites that are publicly accessible.
When you play around with code on a website, sometimes you can end up creating errors that will make your site behave strangely or go blank with an HTTP error 500. (This is something your visitors won’t be happy seeing.)
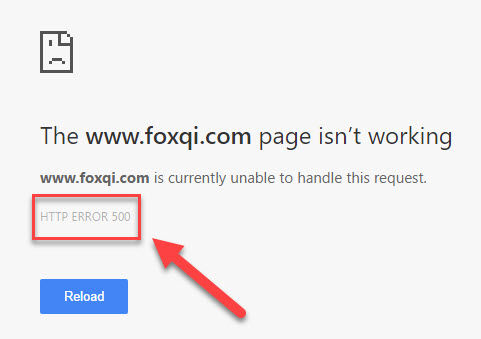
In many cases of error, you won’t be able to log into the WordPress admin area.
While you have very little to worry about when using CSS code, you do need to be extra careful when pasting PHP and JavaScript snippets and make sure to check your website immediately after pasting your code.
If you paste something into your plugin and the site goes down right after, just go back in the file and delete what you pasted.
If removing the code doesn’t work, then you should deactivate the plugin. And you can do this without logging into your website.
How? As an example, you can use cPanel’s File Manager. Simply right-click and rename your plugin’s folder to something different (e.g. changing wp-code-snippets to wp-code-snippets-off).
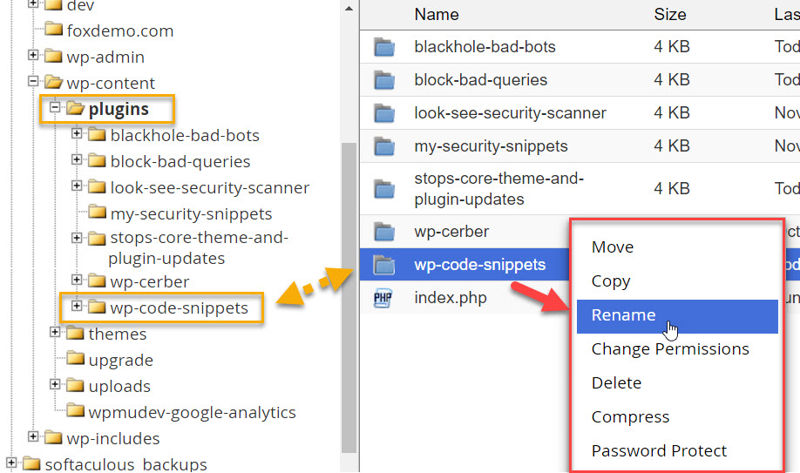
You can rename the folder to anything you like, then click Rename File.

What will happen is WordPress won’t be able to find the wp-code-snippets.php file (the “heart” of your plugin, remember?), and is forced to deactivate the plugin.
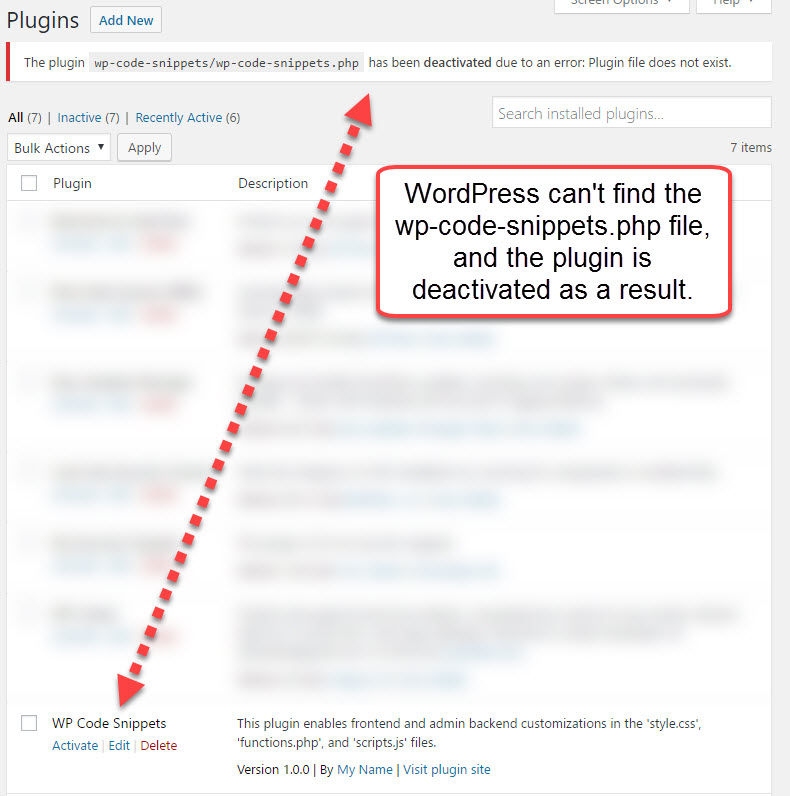
Your site should be back to normal again.
This is a good way to buy yourself some time to figure out what went wrong. Then you just need to change the plugin folder back to its original name and see if you’ve fixed it successfully.
 [/thrive_2step]
Congratulations on your new plugin! Give yourself a good pat on the back.
Got questions or some of your own tips and tricks for customizing WordPress sites? We’d love to hear them in the comments below.
If this guide was helpful to you at all, we’d really appreciate you giving it a share.

Leave a Reply